Remote access software has become a cornerstone of modern work and life, enabling technical support, remote collaboration, and device management without physical presence. UltraViewer stands out among countless tools for its simplicity, reliability, and cost-effectiveness—offering core remote control features for free, with optional enterprise upgrades for advanced needs. However, many users struggle with "UltraViewer download" (e.g., finding the right version or avoiding third-party risks) or only scratch the surface of its capabilities. This practical guide focuses on real-world scenarios, covering everything from official download and installation to advanced remote support techniques, helping you leverage UltraViewer to its full potential in work and daily life.
I. Why UltraViewer? The Go-To Choice for Remote Access
Before proceeding with "UltraViewer download," it’s important to understand what sets it apart from other remote control tools. UltraViewer’s success stems from its ability to balance functionality, ease of use, and affordability—addressing the pain points of both casual and professional users:
1. No Registration, No Subscription Fees: Instant Access
Unlike tools that require complex registration or monthly subscriptions, UltraViewer offers full core functionality (remote control, file transfer, voice chat) for free, with no hidden costs. You can start a remote session in seconds using just an ID and password, making it perfect for one-time use (e.g., helping a family member fix a computer issue) or long-term daily use (e.g., accessing your office PC).
2. Intuitive Interface: Zero Learning Curve
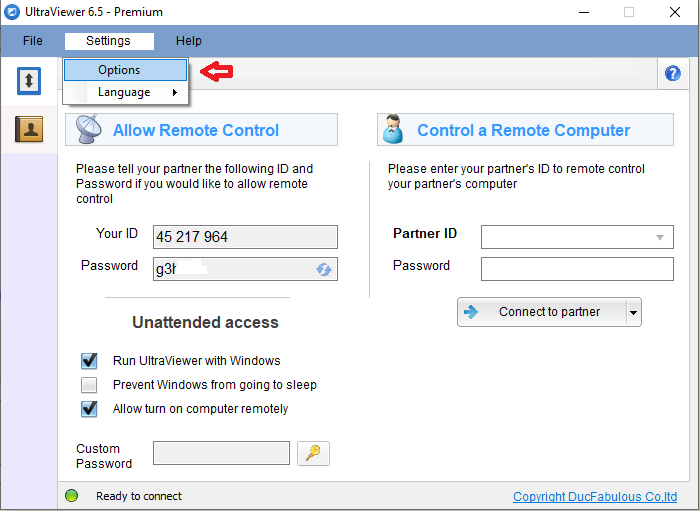
UltraViewer’s interface is designed for simplicity—even users with limited technical skills can navigate it effortlessly. The main window displays your ID and password prominently, with large, clearly labeled buttons for connecting, file transfer, and voice chat. There’s no need to configure complex network settings (e.g., port forwarding) thanks to its P2P technology, which automatically establishes connections between devices.
3. Versatile Scenarios: From Personal to Enterprise Use
UltraViewer adapts to a wide range of use cases, making it a versatile tool for different users:
- Personal Use: Access your home computer from work to retrieve files, control smart home devices remotely, or help friends/family with technical issues.
- IT Support: Provide fast, efficient remote support to clients or colleagues without traveling, reducing response time and costs.
- Business Collaboration: Collaborate with team members on documents, presentations, or projects in real time, even if you’re in different locations.
- Education: Teachers can remotely guide students through software tutorials or troubleshoot technical problems during online classes.
With these use cases in mind, let’s dive into the "UltraViewer download" process— the first step to unlocking these capabilities.
II. Practical Step 1: UltraViewer Download & Installation (2026 Latest Version)
"UltraViewer download" is straightforward, but choosing the official source and correct version is critical for security and performance. Below is a detailed guide for Windows (the primary platform) and tips for non-Windows users:
1. Windows 7/8/10/11: Step-by-Step Download & Installation
Windows users account for over 90% of UltraViewer’s user base, and the download-install process is optimized for simplicity:
Step 1: Visit the Official UltraViewer Website
Open your browser and enter the official link: https://ultraviewer-cn.com. The website is available in multiple languages (English, Chinese, Spanish, etc.), so you can switch to your preferred language using the dropdown menu at the top right.
Step 2: Select the Correct Version & Download
The homepage automatically detects your Windows version (32-bit or 64-bit) and displays the corresponding download button. If you need to download a specific version (e.g., for an old Windows 7 device), scroll down to the "Older Versions" section and select the appropriate edition. Click the "Download Now" button—the installer (UltraViewer_2026.exe) will start downloading immediately.
Step 3: Install UltraViewer with Minimal Clicks
Once the download is complete, double-click the installer to launch the setup wizard:
- Language Selection: Choose your preferred language (English is default) and click "OK."
- License Agreement: Read the end-user license agreement and click "I Agree" to proceed.
- Installation Options: Select "Typical Installation" (recommended for most users) or "Custom Installation" (to change the install path). Check "Create Desktop Shortcut" for easy access.
- Finish Installation: Click "Install" and wait for the process to complete (20-30 seconds). The software will launch automatically, and you’ll see the main interface with your unique ID and temporary password.
2. Enterprise-Grade Download & Deployment
For businesses and organizations, UltraViewer offers a dedicated enterprise version with advanced management features. Here’s how to deploy it across multiple devices:
- Download the Enterprise Package: Go to the official website’s "Enterprise" page, fill out the contact form to request the enterprise MSI package (free for small teams, paid for large-scale deployment).
- Batch Installation: Use IT management tools like Group Policy or SCCM to deploy the MSI package to all target devices. The silent installation command is:
msiexec /i UltraViewer_Enterprise.msi /qn(runs without user interaction). - Configure Centralized Settings: After deployment, use the UltraViewer Enterprise Console to set global policies (e.g., fixed passwords, access restrictions, session recording) and monitor device usage.
3. Mac/Linux: How to Use UltraViewer
UltraViewer doesn’t have native Mac/Linux versions, but you can still use it via the following workarounds:
- Mac: Use a Windows virtual machine (Parallels Desktop, VMware Fusion) or Boot Camp to run Windows on your Mac. Then complete "UltraViewer download" and installation within the Windows environment.
- Linux: Install Wine (a Windows compatibility layer) from your distribution’s package manager. Download the Windows installer, right-click it, and select "Open with Wine Windows Program Loader" to install UltraViewer. Note that some features may not work perfectly, but core remote control functions are supported.
4. Verify the Downloaded Version
After "UltraViewer download" and installation, confirm that you have the latest version to access new features and security updates:
- Open UltraViewer, click "Help" > "About UltraViewer."
- Check that the version number is "2026 v6.5.0" (the latest as of 2026). If not, click "Check for Updates" to download and install the latest version automatically.
III. Practical Step 2: Basic UltraViewer Operations for Daily Use
Now that you’ve completed "UltraViewer download" and installation, let’s cover the basic operations you’ll use most frequently—remote connection, file transfer, and voice chat. These steps are simple but essential for most use cases.
1. Remote Connection: The Core Function
Connecting to a remote device is UltraViewer’s primary feature, and it’s designed to be hassle-free:
Scenario 1: Control Another Device (e.g., Help a Friend)
- Step 1: Ask the person with the target device to open UltraViewer and share their "ID" and "Password" (displayed prominently in the main window).
- Step 2: On your device, open UltraViewer, enter their ID in the "Partner ID" field, and their password in the "Password" field.
- Step 3: Click the green "Connect to Partner" button. The target device will receive a pop-up asking for permission—they need to click "Allow" to grant access.
- Step 4: Once connected, you can control their mouse and keyboard, open files, and perform any task as if you were sitting in front of their computer.
Scenario 2: Allow Others to Control Your Device (e.g., Receive Technical Support)
- Step 1: Open UltraViewer and share your "ID" and "Password" with the person who will control your device.
- Step 2: When they send a connection request, a pop-up will appear on your screen. Click "Allow" to grant access, or "Deny" to reject it.
- Step 3: During the session, you can monitor their actions in real time. To end the connection at any time, click the red "Disconnect" button.
Key Tips for Remote Connections
- Temporary vs. Fixed Password: The default password is temporary and changes when UltraViewer restarts. For frequent connections, set a fixed password (Section IV) to avoid re-sharing.
- View-Only Mode: If you don’t want the remote user to control your device (e.g., just show them something), click "Settings" > "Security" > "Allow View-Only Access" before sharing your ID and password.
2. File Transfer: Share Files Between Devices
Transferring files without email or cloud storage is a huge time-saver. Here’s how to do it with UltraViewer:
Send Files to the Remote Device
- Step 1: Establish a remote connection (as described above).
- Step 2: Click the "File Transfer" icon (folder icon) in the UltraViewer toolbar. A new window will open, with your computer’s files on the left and the remote device’s files on the right.
- Step 3: Navigate to the file/folder you want to send on the left panel, select it, and click the right arrow ("Send") button. Alternatively, drag and drop the file from your panel to the remote panel.
- Step 4: The transfer progress will be displayed at the bottom of the window. Once complete, the file will appear in the remote device’s selected folder.
Receive Files from the Remote Device
- The remote user can send files to you by following the same steps (using the left arrow button in their file transfer window).
- You’ll receive a notification when a file is sent—click "Accept" to save it to your default download folder, or "Browse" to choose a different location.
- To check transfer history, click "History" in the file transfer window to see details like file name, size, and transfer time.
3. Voice Chat: Communicate in Real Time
When controlling a remote device, voice chat is often faster than typing. Here’s how to use it:
- Step 1: Establish a remote connection.
- Step 2: Click the "Voice Chat" icon (microphone icon) in the toolbar. Both you and the remote user will need to allow microphone access when prompted.
- Step 3: Speak into your microphone—your voice will be transmitted to the remote device, and you’ll hear their voice in return.
- Step 4: To mute yourself, click the "Mute" icon (slash through the microphone). To end the call, click the "Hang Up" icon.
4. Screenshot & Screen Recording: Document the Session
Whether you need to save a troubleshooting step or record a tutorial, UltraViewer’s screenshot and screen recording features are useful:
- Screenshot: Click the "Screenshot" icon (camera icon) to capture the entire remote screen. The screenshot is saved to your "Pictures" folder by default.
- Screen Recording: Click the "Record" icon (video camera icon) to start recording the remote session. Choose the output format (MP4 or WMV) and click "Start." Click "Stop" when you’re done—the video is saved to your "Videos" folder.
IV. Practical Step 3: Advanced UltraViewer Features for Power Users
Once you’re comfortable with basic operations, explore these advanced features to enhance your remote experience—especially useful for IT professionals, businesses, and frequent users.
1. Fixed Password & Access Control: Secure Frequent Connections
If you regularly connect to the same device (e.g., your office PC), setting a fixed password and restricting access will save time and improve security:
Set a Fixed Password
- On the remote device (e.g., your office PC), open UltraViewer.
- Click "Settings" (gear icon) in the top right corner.
- Select "Security" from the left menu.
- Check "Enable Fixed Password" and enter a strong password (at least 8 characters, including letters, numbers, and symbols).
- Click "Save" to apply the changes. Now, you can use this fixed password to connect to the device without asking for a new temporary password every time.
Restrict Access to Trusted Devices
- In the "Security" settings, enable "Allow Only Listed IDs."
- Click "Add" and enter the UltraViewer ID of your trusted device (e.g., your home PC’s ID).
- Click "OK" to save. Now, only devices with the listed IDs can connect to the remote device, preventing unauthorized access.
2. Multi-Session Management: Control Multiple Devices at Once
IT support teams or users who manage multiple devices will benefit from UltraViewer’s multi-session feature:
- Open Multiple Sessions: Connect to the first device as usual. To connect to a second device, click "File" > "New Session," enter the second device’s ID and password, and click "Connect." Each session opens in a separate window.
- Switch Between Sessions: Click the window of the session you want to focus on, or use the "Window" menu to switch quickly.
- Manage Sessions: You can minimize, maximize, or close individual sessions without affecting others. To close all sessions at once, click "File" > "Close All Sessions."
3. Remote Printing: Print Files from a Remote Device
If you need to print a file from a remote device to your local printer, UltraViewer’s remote printing feature makes it possible:
- Step 1: Establish a remote connection.
- Step 2: On the remote device, open the file you want to print (e.g., a Word document).
- Step 3: Select "Print" from the file menu. In the printer selection window, choose "UltraViewer Virtual Printer."
- Step 4: Click "Print"—the file will be sent to your local printer, and you’ll receive a notification to start printing.
4. Enterprise Features: For Teams & Organizations
For businesses, UltraViewer’s enterprise version offers additional features to streamline remote support and management:
- Centralized Management Console: Monitor all remote sessions, manage user permissions, and generate reports on session duration, file transfers, and more.
- Custom Branding: Add your company logo and name to the UltraViewer interface for a professional look when providing support to clients.
- Priority Support: Access 24/7 technical support from UltraViewer’s team to resolve issues quickly.
- Unlimited File Transfer Size: Upgrade from the 10GB free limit to transfer large files (e.g., video files, software installers) without restrictions.
V. Practical Step 4: Troubleshooting Common UltraViewer Issues
Even with a smooth "UltraViewer download" and installation, you may encounter problems. Below are the most common issues and their solutions, organized by scenario:
1. Issues During "UltraViewer Download"
- Slow Download: Switch to a faster network or clear your browser cache. If using a corporate network, check if the download is blocked by a firewall (ask your IT team for help).
- Downloaded File Is Corrupted: Delete the corrupted installer and download it again from the official website. Avoid third-party download sites, as they may host modified, unsafe versions.
- Browser Warns About the File: Most browsers flag unknown installers as potentially unsafe—this is normal. Confirm the file is from https://ultraviewer-cn.com and click "Keep" or "Allow" to proceed.
2. Connection Issues
- Connection Failed: Invalid ID/Password: Double-check the ID and password—ensure there are no typos, and the password is the latest one (temporary passwords change after UltraViewer restarts).
- Connection Refused: The remote user may have clicked "Deny" by mistake. Ask them to check for the connection request and click "Allow."
- Firewall/Antivirus Blocking the Connection: Ensure UltraViewer is allowed through Windows Firewall and your antivirus software. Temporarily disable antivirus software to test (re-enable it afterward).
- Network Error: Both devices need a stable internet connection. If the remote device is on a corporate network, ask the IT team to open the necessary ports (UltraViewer uses ports 5938 and 5939, but P2P technology often bypasses port forwarding requirements).
3. Performance Issues
- Laggy Remote Screen: Reduce the remote device’s screen resolution, close background apps, or enable "Low Quality Mode" in UltraViewer (click "Screen" > "Low Quality Mode").
- Unresponsive Mouse/Keyboard: Disconnect and reconnect the session. If the issue persists, restart UltraViewer on both devices.
- Slow File Transfer: Compress large files before transferring, ensure both devices have fast internet, and avoid transferring files during peak network hours.
4. Audio/Video Issues
- No Sound in Voice Chat: Check that both devices have working microphones/speakers, and UltraViewer has permission to access them. Restart the voice chat or the remote session.
- Screen Recording Has No Sound: Ensure the "Record Audio" option is enabled when starting the recording (click "Settings" > "Recording" to confirm).
VI. Conclusion: From "UltraViewer Download" to Expertise, Remote Access Made Easy
UltraViewer proves that remote control software doesn’t have to be complex or expensive. With its intuitive interface, stable performance, and comprehensive features, it’s the perfect tool for anyone needing to access or control a device remotely—whether for personal use, technical support, or business collaboration.
By following this guide, you’ve learned how to:
- Safely complete "UltraViewer download" from the official website, avoiding third-party risks.
- Install UltraViewer on Windows (and work around it for Mac/Linux).
- Master basic operations like remote connection, file transfer, and voice chat.
- Unlock advanced features like fixed passwords, multi-session management, and remote printing.
- Troubleshoot common issues to ensure a seamless experience.
The key to getting the most out of UltraViewer is to start with the basics and gradually explore advanced features as your needs grow. Whether you’re a casual user helping a family member or an IT professional managing dozens of devices, UltraViewer’s flexibility and reliability will save you time and effort.
Now, visit the official website (https://ultraviewer-cn.com) to complete "UltraViewer download" and start enjoying the convenience of efficient remote access. With UltraViewer, distance is no longer a barrier to productivity!
Would you like me to create a printable UltraViewer quick reference cheat sheet summarizing the key operations, shortcuts, and troubleshooting steps? It’ll help you quickly access critical information without navigating the full guide.