Introduction: The Rise of Remote Access & Why UltraViewer Is a Top Choice
In today’s digital landscape, remote access software has become a necessity for individuals and businesses alike. Whether you’re working from home, providing technical support to clients across the globe, or accessing important files from your office computer while traveling, a reliable remote desktop tool can save you time, money, and frustration. Among the many options available, UltraViewer stands out for its simplicity, security, and affordability—and the first step to leveraging its benefits is a successful UltraViewer download.
UltraViewer has gained popularity in recent years due to its user-centric design and robust feature set. Unlike many remote access tools that require complex configurations or expensive subscriptions, UltraViewer offers a straightforward solution that caters to both beginners and advanced users. It supports essential functions like remote control, file transfer, screen sharing, and real-time chat, all wrapped in an intuitive interface that requires no technical expertise to navigate.
This comprehensive guide is designed to walk you through every step of the UltraViewer journey—from finding the official UltraViewer download source to mastering advanced features that will make you a remote access pro. Updated for 2025, it includes the latest information on UltraViewer’s features, compatibility, and troubleshooting tips, ensuring you have all the tools you need to make the most of this powerful software. Whether you’re using UltraViewer for personal use or to streamline your business operations, this guide has you covered.
Understanding UltraViewer: What It Is & Who It’s For
Before you proceed with the UltraViewer download, it’s important to understand what the software does and whether it’s the right fit for your needs.
What Is UltraViewer?
UltraViewer is a remote desktop application developed by DucFabulous that allows users to connect to and control another computer from anywhere with an internet connection. It uses a secure ID and password system to initiate connections, ensuring that only authorized users can access remote devices. The software is designed primarily for two use cases: remote technical support and collaborative work.
As of 2025, UltraViewer’s latest version (6.6.124) offers a range of features that make it a versatile tool:
- Secure remote control of Windows computers (7, 8, 10, 11).
- Real-time chat and voice communication during remote sessions.
- Secure file transfer between local and remote devices.
- Screen sharing for presentations and tutorials.
- Multi-session control (manage multiple remote computers at once).
- Session recording for documentation and training.
- Clipboard sharing for seamless copy-paste functionality.
Who Can Benefit from UltraViewer?
UltraViewer is suitable for a wide range of users:
- Individuals & Families: Help loved ones with tech issues without having to be physically present. Access your home computer from work or vice versa to retrieve important files.
- IT Professionals: Provide remote support to clients efficiently, manage multiple workstations, and troubleshoot issues without on-site visits.
- Freelancers & Remote Workers: Access your office computer or client devices from anywhere, collaborate with team members, and share files securely.
- Small Businesses: Streamline IT support, reduce travel costs, and enable remote collaboration among employees—all at an affordable price.
- Educators & Trainers: Conduct remote training sessions, share screens to demonstrate concepts, and provide one-on-one support to students.
Key Benefits of UltraViewer
- User-Friendly: Simple interface that’s easy to navigate, even for beginners.
- Affordable: Free version for basic use, and premium plans that are significantly cheaper than competitors like TeamViewer.
- Secure: Encrypted connections, unique session IDs, and password protection to keep data safe.
- Lightweight: Small installer size (4MB) and low system resource usage, ensuring it runs smoothly on most computers.
- No Account Required: Use basic features without creating an account—perfect for casual users.
The Critical Guide to Safe UltraViewer Download
One of the most important steps in using UltraViewer is ensuring you download the software from a trusted source. With cyber threats on the rise, downloading from unauthorised websites can expose your device to malware, viruses, or spyware. To avoid these risks, follow this guide to a safe UltraViewer download.
Why the Official UltraViewer Download Is Essential
The only way to guarantee a safe, authentic version of UltraViewer is to download it from the official website: https://ultraviewer-cn.com. Here’s why:
- Genuine Software: The official UltraViewer download page provides the latest, unmodified version of the software, free from malware or hidden threats.
- Security Updates: Official downloads include the latest security patches and bug fixes, protecting your device from vulnerabilities.
- Compatibility: The official installer ensures compatibility with your Windows version (7, 8, 10, 11), reducing the risk of installation errors.
- Customer Support: If you encounter issues during download or installation, the official website offers resources and support to help you resolve them.
Avoid third-party download sites, as they often distribute modified versions of UltraViewer that may contain adware, spyware, or viruses. These versions may also lack critical security updates, putting your data at risk. Additionally, some third-party sites may charge for the software, even though UltraViewer’s basic version is free.
Pre-Download Checklist
Before you start the UltraViewer download, ensure your device meets the following requirements:
- Operating System: Windows 7, 8, 10, or 11 (32-bit or 64-bit). UltraViewer does not currently support macOS, Linux, or mobile devices, though macOS support is in development.
- Hardware: At least 512MB of RAM, 10MB of free hard disk space, and a 1GHz or faster processor.
- Internet Connection: A stable internet connection with a minimum speed of 1Mbps (faster for smoother remote sessions).
- Permissions: Administrative privileges on your computer to install software.
It’s also a good idea to close any unnecessary applications and temporarily disable your antivirus software (as mentioned earlier) to prevent interference with the download and installation process.
Step-by-Step UltraViewer Download Process
Follow these steps to download UltraViewer safely and efficiently:
- Open your web browser and go to https://ultraviewer-cn.com. This is the official UltraViewer download site—bookmark it for future reference.
- On the homepage, look for the “Download” button. It’s prominently displayed at the top of the page, making it easy to find.
- Click the “Download” button. The download will start automatically. If it doesn’t, right-click the button and select “Save Link As” to choose where to save the installer file.
- Wait for the download to complete. The installer file (UltraViewer_Setup.exe) is only 4MB, so it should take less than a minute on most internet connections.
- Once the download is finished, locate the file in your browser’s download folder or the location you selected. Do not run the file yet—proceed to the installation section below.
Installing UltraViewer: A Detailed Walkthrough
Now that you’ve completed the UltraViewer download, it’s time to install the software. The installation process is straightforward and takes just a few minutes.
Running the Installer
- Navigate to the downloaded UltraViewer_Setup.exe file. Double-click it to launch the installation wizard.
- If you see a User Account Control (UAC) prompt asking for permission to make changes to your device, click “Yes.” This is required to install software on Windows.
- The installation wizard will open with a welcome screen. Select your preferred language from the dropdown menu (UltraViewer supports over 20 languages) and click “Next.”
- Read the End User License Agreement (EULA) carefully. To proceed, you must accept the terms by checking the box next to “I accept the agreement” and clicking “Next.”
- Choose the installation directory. The default location is “C:\Program Files\UltraViewer,” but you can click “Browse” to select a different folder if you prefer. Click “Next.”
- Select additional tasks. You can choose to create a desktop shortcut (recommended for easy access) and add UltraViewer to your startup programs (so it launches automatically when you turn on your computer). Customize these options based on your needs and click “Next.”
- Review your installation settings. Ensure the language, directory, and additional tasks are correct, then click “Install” to begin the installation.
- The installation progress bar will appear. Wait for it to reach 100%—this should take 1-2 minutes.
- Once the installation is complete, the wizard will display a “Completing the UltraViewer Setup Wizard” screen. Check the box next to “Launch UltraViewer” and click “Finish.” The software will open automatically.
Post-Installation Setup
After installing UltraViewer, take a few minutes to configure the basic settings to optimize your experience:
- When UltraViewer launches for the first time, you’ll see the main dashboard with your unique ID and password. Write down or save these credentials for future reference.
- Click the “Options” button (gear icon) in the top-right corner to access the settings menu.
- In the “General” tab, you can set your display name (which will be shown to remote users) and configure startup options.
- In the “Hotkeys” tab, customize the keyboard shortcuts for common actions like toggling chat, pausing the session, or ending the connection.
- In the “Security” tab, you can enable or disable features like automatic password refresh and session permission prompts.
- In the “Update” tab, ensure “Check for updates automatically” is enabled so you receive the latest version of UltraViewer with new features and security patches.
Verifying a Successful Installation
To confirm that UltraViewer is installed correctly:
- Check for the UltraViewer desktop shortcut (if you selected that option during installation).
- Open the software and verify that your ID and password are displayed in the main dashboard.
- Test the chat feature by clicking the “Chat” button—it should open a blank chat window.
- Check for updates by clicking “Help” > “Check for updates.” If an update is available, follow the prompts to install it.
If you encounter any issues during installation, refer to the troubleshooting section later in this guide or contact UltraViewer’s customer support through the official website.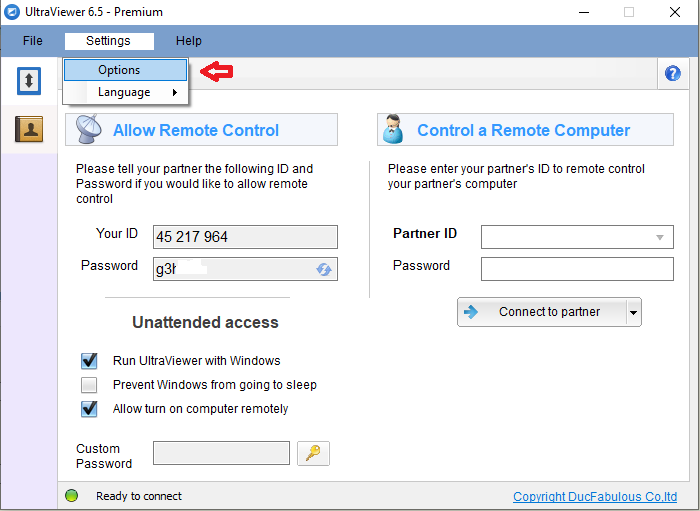
Mastering the UltraViewer Interface
UltraViewer’s interface is designed to be intuitive, but taking the time to familiarize yourself with its components will help you use the software more efficiently. Let’s break down the main elements of the interface.
The Main Dashboard
The main dashboard is the heart of UltraViewer, divided into two core sections:
Your ID Section
- Your ID: A unique 9-digit number that identifies your computer. Share this with anyone who needs to access your computer remotely.
- Password: A random 6-digit password that works with your ID to secure the connection. You can refresh the password by clicking the circular arrow icon next to it—this is recommended if you’re sharing access with someone you don’t trust long-term.
- Allow Remote Control: A toggle switch that enables or disables remote access to your computer. When disabled, no one can connect to your device even if they have your ID and password.
Partner ID Section
- Partner ID: A field where you enter the 9-digit ID of the remote computer you want to access.
- Password: A field where you enter the 6-digit password of the remote computer.
- Connect to Partner: The button that initiates the remote connection once you’ve entered the ID and password.
- File Transfer: A button that opens the file transfer interface, allowing you to send or receive files with the remote computer (even before establishing a remote control session).
- Screen Share: A button that lets you share your screen with the remote computer instead of controlling theirs.
The Toolbar
The toolbar is located at the top of the UltraViewer window and provides quick access to essential functions:
- Minimize: Reduces UltraViewer to the system tray.
- Maximize/Restore: Resizes the window to fit your screen or restores it to its previous size.
- Close: Closes the UltraViewer application.
- Options: Opens the settings menu (gear icon).
- Help: Provides access to the user manual, update checker, and about section.
The Chat Window
The built-in chat window allows you to communicate with the remote user in real time. To open it:
- Click the “Chat” button in the main dashboard or use the default hotkey (F1).
- The chat window will appear, displaying your messages and the remote user’s messages.
- Type your message in the input field at the bottom and press Enter to send it.
- To close the chat window, click the “X” in the top-right corner or press F1 again.
You can customize the chat window’s appearance (e.g., font size, color) in the “Options” menu under “Chat.”
The File Transfer Interface
The file transfer interface lets you exchange files between your local computer and the remote device. To access it:
- Click the “File Transfer” button in the main dashboard.
- The interface is split into two panes:
- Local Files: Displays the files and folders on your computer.
- Remote Files: Displays the files and folders on the remote computer (once connected).
- To transfer a file, select it in one pane and click “Send” (to send to the other device) or drag and drop it to the other pane.
- A progress bar will show the status of the transfer, and you’ll receive a notification when it’s complete.
Establishing Remote Connections: Step-by-Step
Now that you’re familiar with the interface, let’s dive into the most important part of using UltraViewer: establishing remote connections. We’ll cover both scenarios—allowing someone to access your computer and accessing another computer remotely.
Scenario 1: Allowing Remote Access to Your Computer
If you need someone to help you with a tech issue or access files on your computer:
- Open UltraViewer and locate your ID and password in the “Your ID” section.
- Share these credentials with the person who will be accessing your computer. Use a secure communication channel (e.g., encrypted messaging app, email) to share the password.
- The remote user will enter your ID and password into their UltraViewer interface and click “Connect to Partner.”
- You’ll receive a pop-up notification asking for permission to allow the connection. The notification will display the remote user’s ID and display name (if they’ve set one).
- Click “Allow” to grant access. You can also check the box next to “Remember this ID and allow future connections” if you trust the user and want to skip the permission prompt next time.
- Once the connection is established, you’ll see a message in the UltraViewer window indicating that you’re connected to the remote user.
- The remote user will now have control of your mouse and keyboard. You can monitor their actions in real time, and use the chat feature to communicate with them.
- To end the connection, click the “Disconnect” button in the top-right corner of the UltraViewer window, press Ctrl+Alt+D, or close the UltraViewer application.
Scenario 2: Accessing a Remote Computer
If you need to access another computer (e.g., your office PC, a client’s device):
- Obtain the remote computer’s UltraViewer ID and password from the device’s owner.
- Open your UltraViewer software and enter the remote ID into the “Partner ID” field.
- Enter the remote password into the “Password” field. Double-check the credentials to ensure they’re correct—typos are a common cause of connection issues.
- Click the “Connect to Partner” button.
- The remote user will receive a permission prompt asking them to allow the connection. They need to click “Allow” for the connection to be established.
- Once connected, the remote computer’s desktop will appear in a window on your screen. You can use your mouse and keyboard to control the remote device, just as if you were sitting in front of it.
- To navigate the remote desktop:
- Move your mouse to control the remote mouse.
- Click to perform left or right clicks on the remote computer.
- Type on your keyboard to enter text on the remote computer.
- To switch between your local computer and the remote desktop, click on the respective window. UltraViewer runs in the background, so you can multitask without ending the connection.
- When you’re finished, click the “Disconnect” button to terminate the session.
Advanced Connection Tips
- Unattended Access: If you need to access a remote computer regularly (e.g., your office PC), you can set up unattended access. In the remote computer’s UltraViewer settings, go to “Options” > “Security” and check “Allow unattended access.” Set a permanent password, and you’ll be able to connect without the remote user’s permission.
- Connection Quality: If you’re experiencing lag or poor video quality, adjust the connection settings. Go to “Options” > “Display” and reduce the screen resolution or color depth. You can also enable “Low Bandwidth Mode” for slower internet connections.
- Session Locking: To prevent unauthorized access to the remote computer during a session, you can lock the remote user’s screen. Go to “Tools” > “Lock Remote Screen” in the UltraViewer menu. The remote user will need to enter their Windows password to unlock it.
Exploring UltraViewer’s Advanced Features
UltraViewer offers more than just basic remote control—it has a range of advanced features that can help you work more efficiently. Let’s explore some of the most useful ones.
Multi-Session Control
If you need to manage multiple remote computers at once (e.g., an IT technician supporting multiple clients), UltraViewer’s multi-session control feature is a game-changer. Here’s how to use it:
- Establish a connection to the first remote computer as usual.
- To open a second session, click “File” > “New Window” in the UltraViewer menu. A new UltraViewer window will open.
- Enter the ID and password of the second remote computer and click “Connect to Partner.”
- Repeat this process for additional computers—UltraViewer allows you to have as many sessions open as your computer’s resources can handle.
- To switch between sessions, click on the respective UltraViewer window or use the Alt+Tab keyboard shortcut.
- Each session is independent, so you can transfer files, use chat, or perform actions in one session without affecting the others.
Session Recording
Session recording is a useful feature for documenting troubleshooting steps, training purposes, or keeping a record of client interactions. Here’s how to use it:
- Start a remote session with the computer you want to record.
- Click the “Record” button (camera icon) in the UltraViewer toolbar.
- A pop-up window will appear, asking you to select the location where you want to save the recording. Choose a folder and click “Save.”
- The recording will start immediately. You’ll see a red dot in the top-left corner of the UltraViewer window to indicate that recording is in progress.
- To pause the recording, click the “Pause” button (pause icon) in the toolbar. To resume, click it again.
- To stop the recording, click the “Stop” button (square icon) in the toolbar. The recording will be saved as an MP4 file, which is compatible with most media players.
You can customize the recording settings (e.g., video quality, frame rate, audio recording) in the “Options” menu under “Recording.”
Clipboard Sharing
Clipboard sharing allows you to copy content from your local computer and paste it into the remote computer (and vice versa), eliminating the need to email or transfer small files manually. Here’s how it works:
- Ensure you have an active remote session.
- On your local computer, select the text, image, or file you want to copy and press Ctrl+C.
- Switch to the remote computer’s window and press Ctrl+V. The content will be pasted into the remote computer.
- To copy content from the remote computer to your local computer, select the content on the remote computer (using your mouse and keyboard) and press Ctrl+C. Then switch to your local computer and press Ctrl+V.
Clipboard sharing works for text, images, and files up to 100MB. For larger files, use the file transfer feature instead.
Multi-Monitor Support
If the remote computer has multiple monitors, UltraViewer allows you to access all of them without switching between displays on the remote device. Here’s how to use this feature:
- Establish a remote connection to the computer with multiple monitors.
- Click the “Display” button in the UltraViewer toolbar.
- A dropdown menu will appear, listing all the monitors connected to the remote computer (e.g., “Monitor 1,” “Monitor 2”).
- Select the monitor you want to view. The UltraViewer window will switch to display that monitor’s content.
- To view all monitors at once, select “Show All Monitors” from the dropdown menu. The UltraViewer window will split to display all monitors side by side.
- To adjust the size of the monitor displays, drag the edges of the UltraViewer window or use the zoom controls in the toolbar.
Voice Communication
In addition to text chat, UltraViewer supports voice communication during remote sessions. This is useful for real-time discussions with the remote user, especially when troubleshooting complex issues. Here’s how to use it:
- Establish a remote session.
- Click the “Voice” button (microphone icon) in the UltraViewer toolbar.
- A pop-up window will appear, asking you to select your audio input (microphone) and output (speakers) devices. Select the appropriate devices and click “OK.”
- The voice chat will start automatically. You can adjust the volume using the slider in the voice chat window.
- To mute your microphone, click the “Mute” button in the voice chat window.
- To end the voice chat, click the “Close” button in the voice chat window or click the “Voice” button in the toolbar again.
UltraViewer for Business: Boosting Efficiency & Reducing Costs
UltraViewer is not just a tool for personal use—it’s also a valuable asset for businesses looking to streamline their operations and reduce costs. Let’s explore how businesses can benefit from UltraViewer.
Cost Savings
One of the biggest advantages of UltraViewer for businesses is its affordability. Compared to competitors like TeamViewer, which charges hundreds of dollars per year for business plans, UltraViewer’s premium plans are much more budget-friendly:
- UltraViewer Lite: $47.88 per year, ideal for small teams with basic remote access needs.
- UltraViewer Premium: $95.88 per year, offering unlimited endpoint connections and advanced features like unattended access and session recording.
The free version of UltraViewer is also suitable for small businesses with limited needs, as it allows unlimited use with no time restrictions. This can save businesses thousands of dollars per year compared to expensive enterprise remote access solutions.
Improved IT Support
For businesses with internal IT teams, UltraViewer can significantly improve the efficiency of technical support:
- IT technicians can resolve issues remotely, eliminating the need for on-site visits and reducing downtime for employees.
- Multi-session control allows technicians to support multiple employees at once, increasing productivity.
- Session recording lets technicians document troubleshooting steps, making it easier to resolve similar issues in the future.
- Secure connections ensure that sensitive company data remains protected during support sessions.
Enhanced Remote Collaboration
With more teams working remotely than ever before, collaboration tools are essential. UltraViewer facilitates seamless collaboration by allowing team members to:
- Share screens to present ideas, project updates, or training materials.
- Work on documents together in real time, even if they’re in different locations.
- Transfer files securely without using email or third-party file-sharing services.
- Communicate via text or voice chat during collaborative sessions.
Client Support
For businesses that provide technical support to external clients, UltraViewer is a professional, reliable solution:
- Clients can easily grant access to their computers without having to install complex software.
- The user-friendly interface reduces the need for clients to have technical knowledge.
- Secure connections build trust with clients, showing that you take their data security seriously.
- Session recording allows you to provide a record of the support provided, which can be useful for billing or documentation purposes.
Troubleshooting Common UltraViewer Problems
While UltraViewer is generally reliable, you may encounter issues from time to time. Here are some of the most common problems and how to fix them.
UltraViewer Download Issues
- Problem: The download doesn’t start or is slow.
- Solution: Ensure you’re using the official link https://ultraviewer-cn.com. Clear your browser’s cache and cookies, and disable any download managers that may be interfering. If the problem persists, try a different browser or check your internet connection.
Installation Errors
- Problem: The installer fails to run or returns an error.
- Solution: Run the installer as an administrator (right-click the file and select “Run as administrator”). Disable your antivirus software temporarily, as it may be blocking the installer. Ensure your Windows version is up to date with the latest service packs. If you’re upgrading from an older version of UltraViewer, uninstall the old version first before installing the new one.
Connection Issues
- Problem: Unable to connect to a remote computer.
- Solution:
- Double-check the partner’s ID and password for typos.
- Ensure both devices have a stable internet connection.
- Verify that UltraViewer is allowed through the firewall on both devices (add it to the list of exceptions in Windows Firewall).
- If the remote computer is on a corporate network, ensure that the network administrator hasn’t blocked UltraViewer’s ports (TCP 5900 and 5800).
- Restart UltraViewer on both devices and try again.
Lag or Freezing During Sessions
- Problem: The remote session is laggy or freezes.
- Solution:
- Close unnecessary applications on both the local and remote computers to free up resources.
- Reduce the screen resolution or color depth in UltraViewer’s display settings.
- Switch to a wired internet connection if using Wi-Fi.
- Disable bandwidth-intensive activities (e.g., streaming, downloading) on both devices during the session.
- Update UltraViewer to the latest version, as updates often include performance improvements.
File Transfer Failures
- Problem: Unable to transfer files between devices.
- Solution:
- Ensure the remote user has granted file transfer permission (they may need to click “Allow” in a pop-up prompt).
- Check that the file isn’t open on either device—closed files transfer more reliably.
- Verify that there’s enough free space on the destination device.
- For large files, compress them into a ZIP folder before transferring.
- Restart the remote session and try transferring the file again.
Chat or Voice Communication Issues
- Problem: Chat messages aren’t sending or voice chat isn’t working.
- Solution:
- Check that the chat/voice feature is enabled in UltraViewer’s settings.
- Ensure your microphone and speakers are working properly (test them with another application).
- For voice chat, select the correct audio devices in UltraViewer’s voice settings.
- Restart the remote session and try again.
Conclusion: Elevate Your Remote Access Experience with UltraViewer
UltraViewer is a powerful, user-friendly, and affordable remote access tool that caters to the needs of individuals and businesses alike. From the moment you complete the UltraViewer download from https://ultraviewer-cn.com to mastering advanced features like multi-session control and session recording, this software simplifies remote access and enhances productivity.
Whether you’re using it to help a family member with tech issues, collaborate with remote team members, or provide technical support to clients, UltraViewer’s intuitive interface and robust feature set make it a top choice in 2025. Its compatibility with all modern Windows versions, lightweight design, and secure connection protocol set it apart from competitors, while its affordable pricing makes it accessible to users of all budgets.
To get started, visit the official website and download UltraViewer today. Follow the step-by-step guide in this article to install the software, set up your first remote connection, and explore its advanced features. With UltraViewer, you’ll be able to access and control remote computers with ease, no matter where you are in the world.