Introduction: Why UltraViewer Stands Out for Remote Control Needs
In an era where remote work, technical support, and global collaboration have become indispensable, the demand for reliable remote access software has skyrocketed. Whether you’re an IT professional tasked with troubleshooting client devices, a freelancer needing to access your office computer from home, or a family member helping a loved one navigate tech challenges, having a tool that’s secure, user-friendly, and efficient is non-negotiable. This is where UltraViewer shines—and the journey to unlocking its full potential begins with a seamless UltraViewer download.
UltraViewer has emerged as a leading choice among remote desktop solutions, especially for users seeking a balance between functionality and simplicity. Unlike many competitors that overwhelm users with complex setups or restrictive free plans, UltraViewer offers a lightweight, intuitive platform that caters to both personal and business needs. From real-time chat during remote sessions to secure file transfers and multi-computer control, it packs essential features without the steep learning curve. But to leverage these benefits, the first step is to execute a safe and correct UltraViewer download from the official source.
This comprehensive guide will walk you through every aspect of UltraViewer, starting with the critical UltraViewer download process and moving through installation, setup, advanced features, and troubleshooting. We’ll ensure you not only get the software up and running but also master its capabilities to enhance your remote access experience. Whether you’re a first-time user or looking to upgrade your skills, this 2025 updated guide is designed to be your go-to resource for all things UltraViewer.
The Importance of a Safe UltraViewer Download
Before diving into the technicalities of using UltraViewer, it’s crucial to emphasize the significance of a secure UltraViewer download. With the rise of malicious software and counterfeit applications, downloading from untrusted sources can expose your device to viruses, malware, or data breaches. Many third-party websites offer modified versions of UltraViewer that may contain hidden threats or lack critical security updates. To avoid these risks, always opt for the official UltraViewer download from https://ultraviewer-cn.com.
The official UltraViewer download page guarantees that you’re getting the latest, most secure version of the software—compatible with Windows 7, 8, 10, and 11 (the only operating systems supported as of 2025, with macOS support currently in development ). The installer file is lightweight, typically around 4MB, ensuring a fast download even on slower internet connections. Additionally, the official UltraViewer download comes with automatic update notifications, so you’ll never miss out on bug fixes, performance improvements, or new features.
Another key advantage of the official UltraViewer download is access to genuine customer support. If you encounter any issues during download or installation, the official website provides resources and contact information to resolve your queries promptly. Third-party downloads, on the other hand, often lack this support, leaving you stranded if problems arise. For businesses handling sensitive client data, a secure UltraViewer download is not just a recommendation—it’s a necessity to maintain compliance and protect confidential information.
Step-by-Step UltraViewer Download & Installation Guide
Preparing for UltraViewer Download
Before initiating the UltraViewer download, take a moment to ensure your device meets the minimum requirements. As mentioned, UltraViewer is compatible with Windows 7, 8, 10, and 11 (32-bit and 64-bit versions). Your computer should have at least 512MB of RAM, 10MB of free hard disk space, and a stable internet connection to complete the download and establish remote connections. There’s no need for advanced hardware—UltraViewer is designed to run smoothly on most standard PCs.
It’s also advisable to temporarily disable any non-essential antivirus software during the UltraViewer download and installation process. While UltraViewer is 100% safe, some antivirus programs may flag the installer as a potential threat due to its remote access capabilities. You can re-enable the antivirus once the installation is complete.
Initiating the UltraViewer Download
- Open your preferred web browser (Chrome, Firefox, Edge, etc.) and navigate to the official UltraViewer download page at https://ultraviewer-cn.com. This is the only trusted source for the authentic UltraViewer software.
- On the homepage, locate the prominent “Download” button. It’s typically positioned at the top of the page or in a dedicated section labeled “UltraViewer Download.”
- Click the “Download” button to start the process. The download should begin automatically within a few seconds. If it doesn’t, right-click the button and select “Save Link As” to manually choose the download location on your device.
- Wait for the installer file (usually named “UltraViewer_Setup.exe”) to download. Given its small size (around 4MB), this should take no more than a minute on a standard internet connection.
Installing UltraViewer After Download
Once the UltraViewer download is complete, follow these steps to install the software:
- Locate the downloaded installer file in your browser’s default download folder or the location you selected earlier.
- Double-click the “UltraViewer_Setup.exe” file to launch the installation wizard. You may see a User Account Control (UAC) prompt asking for permission to make changes to your device—click “Yes” to proceed.
- The installation wizard will open with a welcome screen. Select your preferred language (UltraViewer supports multiple languages, including English, Chinese, Spanish, French, and German) and click “Next.”
- Read the End User License Agreement (EULA) carefully. Check the box next to “I accept the agreement” and click “Next.”
- Choose the destination folder where you want to install UltraViewer. The default location is usually “C:\Program Files\UltraViewer,” but you can click “Browse” to select a different folder if needed. Click “Next.”
- Select additional tasks, such as creating a desktop shortcut or adding UltraViewer to your startup programs. These options are recommended for easy access, but you can customize them based on your preferences. Click “Next.”
- Review your installation settings and click “Install” to begin the process. The installation will take 1-2 minutes to complete.
- Once the installation is finished, check the box next to “Launch UltraViewer” and click “Finish.” The software will open automatically, and you’re ready to start using it.
Verifying the UltraViewer Download & Installation
After installation, it’s a good practice to verify that you have the latest version of UltraViewer. To do this:
- Open UltraViewer and click on the “Help” menu in the top-right corner of the interface.
- Select “About UltraViewer” from the dropdown menu.
- A window will appear displaying the version number (e.g., 6.6.124, the latest version as of 2025). Compare this with the version listed on the official UltraViewer download page to ensure you’re up to date.
- If an update is available, you can download it directly from within the software by clicking “Check for updates” in the “About UltraViewer” window.
Navigating the UltraViewer Interface: A Beginner’s Guide
Now that you’ve completed the UltraViewer download and installation, let’s familiarize yourself with the software’s user-friendly interface. One of UltraViewer’s biggest strengths is its simplicity—even users with limited technical knowledge can navigate it with ease.
The Main Dashboard
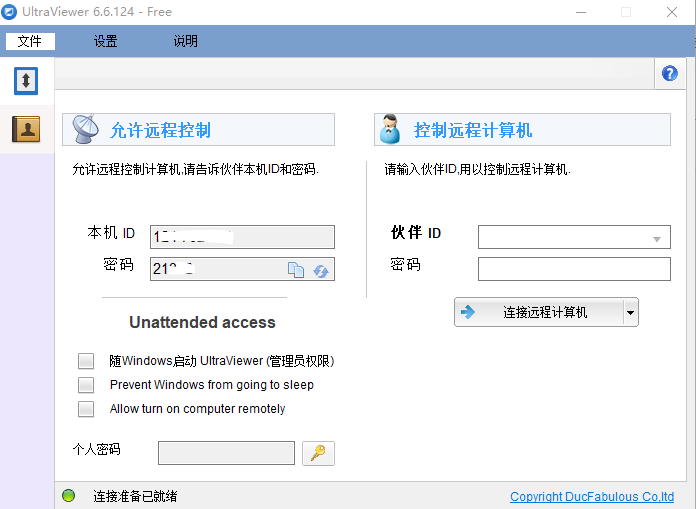
When you launch UltraViewer, you’ll be greeted by the main dashboard, which is divided into two primary sections: “Your ID” and “Partner ID.”
- Your ID Section: This displays your unique UltraViewer ID and password. Share these credentials with anyone who needs to access your computer remotely. You can change your password by clicking the “Refresh” button next to it—this generates a new random password for enhanced security.
- Partner ID Section: This is where you enter the ID and password of the remote computer you want to access. Simply type in the partner’s ID and password, then click the “Connect to partner” button to establish the connection.
Key Buttons & Features on the Interface
- File Transfer: Located below the partner ID section, this button allows you to transfer files between your local computer and the remote device during a session. Click it to open a file explorer window, select the files you want to send or receive, and follow the prompts.
- Chat: UltraViewer includes a built-in chat feature that lets you communicate with the remote user in real time. Click the “Chat” button to open the chat window—you can toggle it on and off using the F1 hotkey or a custom hotkey of your choice.
- Screen Share: If you want to share your screen with the remote user instead of controlling theirs, click the “Screen Share” button. This is useful for presentations, tutorials, or collaborative work.
- Options: The “Options” button (represented by a gear icon) gives you access to advanced settings. Here, you can customize hotkeys, adjust security settings, configure display options, and manage update preferences.
Customizing the Interface for Your Needs
UltraViewer allows you to tailor the interface to your workflow. For example:
- You can resize the main window to fit your screen or minimize it to the system tray when not in use.
- The chat window can be dragged to any position on the screen, and you can adjust its transparency to avoid obstructing your view of the remote desktop.
- In the “Options” menu, you can change the default hotkeys for common actions like toggling chat, pausing the remote session, or ending the connection. This is particularly helpful if the default hotkeys conflict with other software you use.
Establishing Your First Remote Connection with UltraViewer
Now that you’re familiar with the interface, let’s walk through the process of establishing a remote connection—whether you’re accessing another computer or allowing someone to access yours.
Allowing Remote Access to Your Computer
If you need someone (like an IT support technician or family member) to access your computer remotely:
- Open UltraViewer and locate your unique ID and password in the “Your ID” section.
- Share these credentials with the person who will be accessing your computer. You can send them via email, text message, or a messaging app—just ensure the communication channel is secure.
- The remote user will enter your ID and password into their UltraViewer interface and click “Connect to partner.”
- You’ll receive a pop-up notification asking for permission to allow the connection. Click “Allow” to proceed. You can also check the box next to “Remember my choice” if you trust the user and don’t want to be prompted again.
- Once the connection is established, the remote user will have control of your mouse and keyboard. You can monitor their actions in real time, and use the chat feature to communicate with them if needed.
- To end the connection, click the “Disconnect” button in the top-right corner of the UltraViewer window or press the default hotkey (Ctrl+Alt+D).
Accessing a Remote Computer
If you need to access another computer (e.g., your office PC or a client’s device):
- Obtain the remote computer’s UltraViewer ID and password from the device’s owner.
- Open your UltraViewer software and enter the ID into the “Partner ID” field and the password into the “Password” field.
- Double-check the credentials to ensure they’re correct, then click “Connect to partner.”
- The remote user will receive a permission prompt—they need to click “Allow” to grant you access.
- Once connected, you’ll see the remote computer’s desktop on your screen. You can use your mouse and keyboard to navigate, open applications, troubleshoot issues, or transfer files.
- To switch between your local computer and the remote desktop, simply click on the respective window. UltraViewer runs in the background, so you can multitask without ending the connection.
- When you’re done, click “Disconnect” to terminate the session.
Tips for a Smooth Remote Connection
- Ensure both devices have a stable internet connection. A wired connection is preferred for faster, more reliable performance, especially when transferring large files or using resource-intensive applications.
- Close any unnecessary applications on both the local and remote computers to free up system resources. This will help prevent lag during the remote session.
- If you’re experiencing poor video quality or lag, adjust the display settings in UltraViewer. Go to “Options” > “Display” and reduce the screen resolution or color quality for the remote session.
- Use the built-in chat feature to communicate with the remote user instead of phone calls or separate messaging apps. This keeps all communication centralized and avoids distractions.
Advanced UltraViewer Features You Need to Know
While UltraViewer is easy to use for basic remote access, it also offers a range of advanced features that can enhance your productivity—whether you’re using it for personal or business purposes.
Multi-Session Control
One of the most useful advanced features is the ability to control multiple computers simultaneously. This is ideal for IT professionals who need to support multiple clients at once or business owners who manage several remote workstations.
To use multi-session control:
- Establish a connection to the first remote computer as usual.
- Open a new UltraViewer window (click “File” > “New Window” in the top menu).
- Enter the ID and password of the second remote computer and click “Connect to partner.”
- Repeat this process for additional computers—UltraViewer allows you to have multiple remote sessions open at the same time.
- You can switch between sessions by clicking on the respective UltraViewer windows or using the Alt+Tab keyboard shortcut.
Each session is independent, so actions taken in one won’t affect the others. You can transfer files, use chat, or adjust settings for each session individually.
Secure File Transfer
UltraViewer’s file transfer feature is not only convenient but also highly secure. All files transferred between devices are encrypted using industry-standard protocols, ensuring that sensitive data remains protected.
To transfer files during a remote session:
- Click the “File Transfer” button in the UltraViewer interface.
- A file explorer window will open, showing the local files on your computer (left pane) and the remote computer’s files (right pane).
- To send a file from your local computer to the remote device, select the file in the left pane and click “Send” (or drag and drop the file to the right pane).
- To receive a file from the remote computer, select the file in the right pane and click “Receive” (or drag and drop it to the left pane).
- A progress bar will show the status of the transfer. Once complete, the file will be saved to the selected location.
You can transfer multiple files or entire folders at once, and there’s no limit to the file size (though larger files may take longer to transfer depending on your internet speed).
Session Recording
UltraViewer allows you to record remote sessions for future reference. This is useful for training purposes, documenting troubleshooting steps, or maintaining a record of client interactions.
To record a remote session:
- Start a remote connection as usual.
- Click the “Record” button (represented by a camera icon) in the UltraViewer toolbar.
- A pop-up window will ask you to select the save location for the recording file. Choose a folder and click “Save.”
- The recording will start automatically—you’ll see a red dot in the top-left corner of the UltraViewer window to indicate that recording is in progress.
- To stop the recording, click the “Stop” button (represented by a square icon) in the toolbar. The file will be saved in MP4 format, which is compatible with most media players.
You can adjust the recording settings (e.g., video quality, frame rate) in the “Options” menu under “Recording.”
Clipboard Sharing
Clipboard sharing is a small but powerful feature that saves time when working remotely. It allows you to copy text, images, or files from your local computer and paste them directly into the remote desktop (and vice versa).
To use clipboard sharing:
- Ensure the remote session is active.
- Copy the content you want to share from your local computer (Ctrl+C) or the remote computer (Ctrl+C on the remote keyboard).
- Paste the content into the desired location (Ctrl+V) on the other device.
This works for text, images, and even small files. It eliminates the need to email or transfer files manually for simple copy-paste tasks.
Multi-Monitor Support
If the remote computer has multiple monitors, UltraViewer allows you to access all of them seamlessly. This is essential for users who work with complex setups (e.g., graphic designers, video editors, or data analysts).
To switch between remote monitors:
- During a remote session, click the “Display” button in the UltraViewer toolbar.
- Select the monitor you want to view from the dropdown menu (e.g., “Monitor 1,” “Monitor 2”).
- You can also choose “Show all monitors” to view all remote monitors on your local screen at once—though this may reduce the size of each monitor’s display.
UltraViewer for Business: Enhancing Productivity & Support
UltraViewer isn’t just for personal use—it’s also a powerful tool for businesses of all sizes. From small startups to large enterprises, it offers features that streamline remote support, improve collaboration, and reduce costs.
Cost-Effective Remote Support
For IT teams, UltraViewer provides a cost-effective alternative to expensive remote support software like TeamViewer. While TeamViewer’s cheapest business plan starts at $298.8 per year, UltraViewer’s premium plan begins at just $95.88 per year—offering unlimited endpoint connections at a fraction of the cost.
The free version of UltraViewer is also suitable for small businesses with basic needs, as it allows unlimited use with no time restrictions (unlike TeamViewer’s free version, which limits sessions to 5 minutes after repeated use). This makes it an ideal choice for startups or businesses with tight budgets.
Secure Client Interactions
When providing support to clients, security is paramount. UltraViewer’s secure connection protocol ensures that all remote sessions are encrypted, protecting sensitive client data from unauthorized access. Each session uses a unique ID and password, and the host user maintains full control over the session—they can end the connection at any time if they suspect suspicious activity.
Additionally, the official UltraViewer download from https://ultraviewer-cn.com ensures that businesses are using a genuine, malware-free version of the software, reducing the risk of data breaches or compliance issues.
Streamlined Collaboration
For remote teams, UltraViewer facilitates seamless collaboration. Team members can share their screens to present ideas, work on documents together in real time, or troubleshoot issues collectively. The built-in chat and file transfer features eliminate the need for separate communication tools, keeping all collaboration within a single platform.
UltraViewer also supports unattended access (available in the premium version), which allows team members to access remote computers without the need for someone to be physically present. This is useful for accessing servers, updating software, or retrieving files outside of working hours.
Troubleshooting Common UltraViewer Issues
While UltraViewer is reliable, you may encounter occasional issues during download, installation, or use. Here are some common problems and their solutions:
UltraViewer Download Failed
- Issue: The download doesn’t start or is interrupted.
- Solution: Ensure you’re using the official UltraViewer download link https://ultraviewer-cn.com. Clear your browser’s cache and cookies, then try again. If the problem persists, switch to a different browser or check your internet connection.
Installation Error
- Issue: The installer fails to launch or returns an error message.
- Solution: Disable your antivirus software temporarily (as mentioned earlier) and try running the installer again. Ensure you have administrative privileges on your computer—right-click the installer file and select “Run as administrator.” If you’re using an older version of Windows, make sure it’s updated with the latest service packs.
Cannot Establish a Remote Connection
- Issue: You’re unable to connect to a remote computer, or the connection is dropped.
- Solution: Double-check the partner’s ID and password to ensure they’re correct. Verify that both devices have a stable internet connection. If the remote computer is behind a firewall, ensure that UltraViewer is allowed through the firewall (add it to the list of exceptions in Windows Firewall settings). If the problem persists, ask the remote user to restart UltraViewer and try again.
Lag or Poor Video Quality
- Issue: The remote session is laggy, or the video quality is poor.
- Solution: Close unnecessary applications on both devices to free up resources. Reduce the screen resolution or color quality in the UltraViewer display settings. If using a wireless connection, switch to a wired connection for better stability. You can also try disabling other bandwidth-intensive activities (e.g., streaming video, downloading large files) during the session.
File Transfer Failed
- Issue: You’re unable to transfer files between devices.
- Solution: Ensure the remote user has granted file transfer permissions (they may need to click “Allow” in a pop-up prompt). Check that the file you’re trying to transfer isn’t open on either device—closed files transfer more reliably. If the file is too large, consider compressing it into a ZIP folder before transferring.
Why Choose UltraViewer Over Competitors?
With so many remote access tools available, you may wonder why UltraViewer is the right choice. Here’s how it compares to popular alternatives:
UltraViewer vs. TeamViewer
- Pricing: UltraViewer is significantly more affordable, with premium plans starting at $95.88 per year compared to TeamViewer’s $298.8 per year.
- Free Version: UltraViewer’s free version has no time limits, while TeamViewer’s free version restricts sessions to 5 minutes after repeated use.
- Ease of Use: UltraViewer’s interface is simpler and more intuitive, making it better for users with limited technical knowledge. TeamViewer has more advanced features but a steeper learning curve.
UltraViewer vs. AnyDesk
- Compatibility: AnyDesk supports more operating systems (including macOS, Linux, and mobile devices), while UltraViewer currently only supports Windows.
- Speed: Both tools offer fast connections, but UltraViewer is lighter and uses fewer system resources, making it faster on older computers.
- Pricing: UltraViewer’s free version is more generous, while AnyDesk’s free version is limited to personal use only.
UltraViewer vs. RealVNC Viewer
- Features: RealVNC Viewer offers more advanced features like cloud connectivity and customizable branding, but it’s more expensive.
- Ease of Setup: UltraViewer’s setup process is simpler—no need to create an account (unless using premium features), while RealVNC requires account registration.
- Security: Both tools offer strong encryption, but UltraViewer’s unique session IDs and passwords provide an extra layer of security for casual users.
Conclusion: Unlock the Power of Remote Access with UltraViewer Download
UltraViewer has established itself as a reliable, user-friendly, and cost-effective remote access solution for both personal and business use. From the moment you complete the UltraViewer download from https://ultraviewer-cn.com to mastering advanced features like multi-session control and secure file transfer, this tool simplifies remote access and enhances productivity.
Whether you’re helping a family member fix a tech issue, collaborating with remote team members, or providing IT support to clients, UltraViewer’s intuitive interface and robust features make the process seamless. Its compatibility with all modern Windows versions, lightweight design, and unlimited free usage (for basic features) set it apart from competitors.
To get started, visit the official website and complete your UltraViewer download today. Follow the step-by-step guide in this article to install the software, set up your first remote connection, and explore its advanced features. With UltraViewer, remote access has never been easier or more secure