In an era where remote work, online collaboration, and distance learning have become integral parts of daily life, the demand for reliable remote desktop software has never been higher. Whether you’re an IT professional needing to provide technical support, a small business owner managing team computers from afar, or a student seeking help with homework from a tutor, having a user-friendly and secure remote access tool is essential. Among the countless options available, UltraViewer stands out as a top choice for millions worldwide, thanks to its simplicity, robust features, and cost-effective pricing. The first step to unlocking its full potential is a successful UltraViewer download, and this comprehensive guide will walk you through every detail—from downloading the software to mastering advanced functions. By the end of this article, you’ll be able to leverage UltraViewer for seamless remote connections, file sharing, and real-time communication, all while ensuring maximum security and efficiency.
What is UltraViewer and Why Should You Choose It?
Before diving into the UltraViewer download process, it’s important to understand what makes this software a preferred solution for both personal and professional use. UltraViewer is a lightweight, powerful remote desktop application designed to facilitate secure connections between computers, regardless of geographical location. Launched over a decade ago, it has evolved to meet the changing needs of users, accumulating more than 40 million downloads globally—a testament to its reliability and user satisfaction .
One of the key advantages of UltraViewer is its accessibility. Unlike many competing tools that require advanced technical knowledge or expensive subscriptions, UltraViewer offers a free version for personal and non-commercial use, with all core remote control features intact. For businesses and power users, the premium version unlocks advanced capabilities like unlimited concurrent sessions, faster connection speeds, and priority support—all at a fraction of the cost of similar software .
UltraViewer’s feature set is tailored to meet diverse needs:
- Secure Remote Control: Access and control another computer in real time, with end-to-end encryption to protect sensitive data. The user on the remote machine can monitor all actions and terminate the connection at any time, ensuring transparency and security .
- Built-in Chat Function: Communicate with the remote user directly through the app’s chat window, eliminating the need for separate messaging tools. You can toggle chat on or off using a customizable hotkey (default F1) for uninterrupted workflow .
- File Sharing: Transfer files between connected computers quickly and securely, directly from the chat interface. This feature is invaluable for sending documents, software updates, or troubleshooting tools during remote support sessions .
- Multi-Computer Control: Manage multiple remote sessions simultaneously, making it ideal for IT professionals supporting multiple clients or business owners overseeing several office computers .
- Cross-Windows Compatibility: Supports all Windows operating systems from XP to 11, as well as Windows Server editions, ensuring compatibility with older machines and modern devices alike .
Another standout benefit is UltraViewer’s lightweight design. The installation file is only around 1.5 MB, meaning the UltraViewer download process is fast even on slow internet connections, and the software doesn’t consume excessive system resources . This makes it suitable for use on low-spec laptops and desktops, without compromising performance.
Whether you’re a tech novice or an experienced IT professional, UltraViewer’s intuitive interface ensures a steep learning curve. The simple layout, clear navigation, and straightforward connection process make it easy to get started within minutes—after a successful UltraViewer download and installation.
Step-by-Step UltraViewer Download Guide: Ensure Safety and Compatibility
The UltraViewer download process is straightforward, but it’s crucial to source the software from the official website to avoid malware, viruses, or counterfeit versions. Third-party download sites may offer modified installers that compromise your computer’s security or lack key features . Below is a detailed, up-to-date guide to the official UltraViewer download, tailored for different operating systems and user needs.
Pre-Download Checks: Confirm System Requirements
Before initiating the UltraViewer download, ensure your computer meets the minimum system requirements to run the software smoothly:
- Operating System: Windows XP, Vista, 7, 8, 10, 11, or any Windows Server edition (32-bit or 64-bit). While UltraViewer primarily supports Windows, there are workarounds for macOS and Linux users (covered later in this guide) .
- Processor: 1 GHz or faster CPU (dual-core recommended for multiple concurrent sessions).
- RAM: At least 512 MB (1 GB or more for optimal performance).
- Storage: A minimum of 10 MB free disk space (the installer is only 1.5 MB, with minimal additional space required for updates) .
- Internet Connection: Stable broadband connection (DSL or faster) for seamless remote connections.
These requirements are modest, meaning UltraViewer can run on most computers in use today—from older laptops to high-performance desktops.
Official UltraViewer Download: Windows (Recommended)
The majority of users will be downloading UltraViewer for Windows, and the official process is designed to be quick and secure. Follow these steps:
- Open your preferred web browser (Chrome, Firefox, Edge, etc.) and navigate to the official UltraViewer download page: https://ultraviewer-cn.com. This is the only trusted source for the genuine UltraViewer installer .
- Once on the homepage, locate the “Download” button. It’s prominently displayed in the upper section of the page, often highlighted in a contrasting color for easy visibility.
- Click the “Download” button. The website will automatically detect your Windows version (32-bit or 64-bit) and initiate the download of the compatible installer. If detection fails, you can manually select the correct version from the dropdown menu labeled “Choose OS Version.”
- Wait for the download to complete. Depending on your internet speed, this should take only a few seconds to a minute. The installer file will be named something like “UltraViewer_Setup.exe” and will appear in your browser’s download folder (or the location you specified for downloads).
UltraViewer Download for macOS and Linux (Workarounds)
While UltraViewer is primarily designed for Windows, macOS and Linux users can still access its features through emulation or compatibility layers. Here’s how to proceed:
- macOS: Use a Windows virtual machine (e.g., Parallels Desktop, VMware Fusion) or Boot Camp to run Windows on your Mac. Once Windows is set up, follow the Windows UltraViewer download guide above to install the software.
- Linux: Use Wine, a compatibility layer that allows Windows applications to run on Linux. Install Wine via your distribution’s package manager, then download the Windows installer from https://ultraviewer-cn.com and run it through Wine. Note that some advanced features may not work perfectly on Linux, so this is recommended for basic use only.
Portable UltraViewer Download: No Installation Required
For users who need to use UltraViewer on multiple computers without installing it each time, the portable version is an excellent option. The portable UltraViewer download is available on the official website and offers the following benefits:
- No installation needed—simply run the executable file from a USB drive or external storage.
- Takes up minimal space (around 2 MB) and leaves no traces on the host computer.
- Retains core features like remote control, chat, and file sharing.
To download the portable version:
- Visit https://ultraviewer-cn.com and scroll down to the “Portable Version” section.
- Click the “Download Portable UltraViewer” button.
- Save the ZIP file to your desired location, extract it, and run “UltraViewer_Portable.exe” to launch the software.
Critical Notes for a Safe UltraViewer Download
- Avoid Third-Party Sites: Never download UltraViewer from untrusted sources, such as free software portals or file-sharing platforms. These sites often bundle the installer with adware, spyware, or viruses that can harm your computer .
- Check File Integrity: After downloading, scan the installer with your antivirus software to ensure it’s free of malware. The official UltraViewer installer is always safe, but this extra step provides peace of mind.
- Update to the Latest Version: The UltraViewer download from the official site always includes the latest version, which features bug fixes, security patches, and new functionalities. Avoid using outdated versions, as they may have vulnerabilities or compatibility issues .
Step-by-Step Installation Guide After UltraViewer Download
Once you’ve completed the UltraViewer download, the next step is installation. The process is simple and takes only a few minutes, even for users with limited technical experience. Follow these steps for a smooth setup:
Installation on Windows (Standard Version)
- Locate the UltraViewer installer file you downloaded (usually in the “Downloads” folder). Double-click the file to launch the installation wizard.
- If prompted by User Account Control (UAC) to allow the app to make changes to your device, click “Yes.”
- The installation wizard will open with a welcome screen. Click “Next” to proceed.
- Read the End User License Agreement (EULA). Check the box next to “I accept the terms in the license agreement” and click “Next.”
- Choose the installation location. The default path is usually “C:\Program Files\UltraViewer,” but you can click “Browse” to select a different folder. Click “Next” to continue.
- Select additional tasks (optional):
- Create a desktop shortcut: Recommended for easy access.
- Add UltraViewer to the Start menu: Ensures the software is accessible from the Start menu.
- Associate UltraViewer with remote connection files: Useful if you frequently receive connection files from others.Check the boxes for the tasks you want and click “Next.”
- Click “Install” to begin the installation. The progress bar will show the status of the process, which takes 1–2 minutes.
- Once installation is complete, check the box next to “Launch UltraViewer” and click “Finish.” The software will open automatically.
Setting Up the Portable Version
The portable version requires no installation—simply extract the ZIP file and run the executable. However, you may want to configure a few settings for convenience:
- Extract the portable UltraViewer files to a USB drive or folder.
- Double-click “UltraViewer_Portable.exe” to launch the software.
- Go to “Options” > “Save Settings” and check “Save settings to portable file” to ensure your preferences are retained when using the software on different computers.
Post-Installation Setup: Customize Your UltraViewer Experience
After installation, take a few minutes to customize UltraViewer to suit your needs:
- Language Settings: UltraViewer supports multiple languages, including English, Chinese, Spanish, French, and more. To change the language, go to “Options” > “Language” and select your preferred language from the dropdown menu.
- Display Settings: Adjust the screen resolution, color quality, and scaling to optimize the remote control experience. Go to “Options” > “Display” to make these changes.
- Hotkey Configuration: Customize hotkeys for common actions like toggling chat, sending Ctrl+Alt+Del, or ending the session. Navigate to “Options” > “Hotkeys” to set your preferred shortcuts.
- Security Settings: Enable additional security features like session encryption (always enabled by default) and password protection for your own computer. Go to “Options” > “Security” to configure these settings.
How to Use UltraViewer: Master Remote Control, File Sharing, and More
Now that you’ve completed the UltraViewer download and installation, it’s time to learn how to use the software’s core features. UltraViewer’s interface is intuitive, with all key functions easily accessible from the main window. Below is a detailed guide to using UltraViewer for common tasks:
Understanding the UltraViewer Interface
When you launch UltraViewer, the main window is divided into two sections:
- Your ID and Password: This section displays a unique ID and password for your computer. Share these with others to allow them to connect to your machine.
- Partner ID and Password: Enter the ID and password of the remote computer you want to connect to in these fields.
Additional features are accessible via the menu bar at the top:
- File Transfer: Access the file sharing tool to send or receive files.
- Chat: Open the chat window to communicate with the remote user.
- Options: Customize settings for display, security, hotkeys, and more.
- Help: Access the user manual, FAQ, and technical support.
Establishing a Remote Connection (Control Another Computer)
To connect to a remote computer using UltraViewer, follow these steps:
- Ask the user of the remote computer to send you their UltraViewer ID and password. They can find this information in the “Your ID and Password” section of their UltraViewer window.
- In your UltraViewer window, enter the remote user’s ID in the “Partner ID” field and their password in the “Password” field.
- Click the “Connect to Partner” button. A confirmation message will appear, asking if you want to initiate the connection. Click “Yes.”
- The remote user will receive a prompt asking for permission to allow the connection. Once they click “Allow,” the connection will be established, and you’ll see the remote computer’s screen in your UltraViewer window.
Allowing Remote Access to Your Computer
If you want someone else to connect to your computer, follow these steps:
- Launch UltraViewer and locate your unique ID and password in the main window.
- Share your ID and password with the person who will be connecting to you (e.g., via email, text message, or phone).
- When the other user initiates the connection, you’ll receive a pop-up notification asking for permission. Click “Allow” to grant access, or “Deny” to reject the connection.
- While the connection is active, you can monitor all actions performed by the remote user. To end the connection at any time, click the “Disconnect” button in the UltraViewer window or close the software.
Using the Chat Feature During Remote Sessions
Communication is key during remote support or collaboration, and UltraViewer’s built-in chat feature makes it easy to stay in touch:
- During an active remote session, click the “Chat” button in the UltraViewer toolbar (or press the default hotkey F1) to open the chat window.
- Type your message in the input field and press Enter to send it. The remote user will receive the message instantly and can reply in the same window.
- To minimize distractions, click the “Hide Chat” button or press the hotkey again to toggle the chat window off.
File Sharing: Send and Receive Files Securely
Transferring files between connected computers is simple with UltraViewer:
- During a remote session, click the “File Transfer” button in the toolbar (or go to “Tools” > “File Transfer”).
- The file transfer window will open, showing two panels: your computer’s files (left) and the remote computer’s files (right).
- To send a file to the remote computer: Navigate to the file on your computer, select it, and click the “Send” button (or drag and drop the file to the remote panel).
- To receive a file from the remote computer: The remote user will need to send the file, and you’ll receive a notification. Click “Accept” to save the file to your computer (you can choose the save location).
All file transfers are encrypted, ensuring that sensitive data remains secure during transmission . You can also pause or cancel transfers at any time if needed.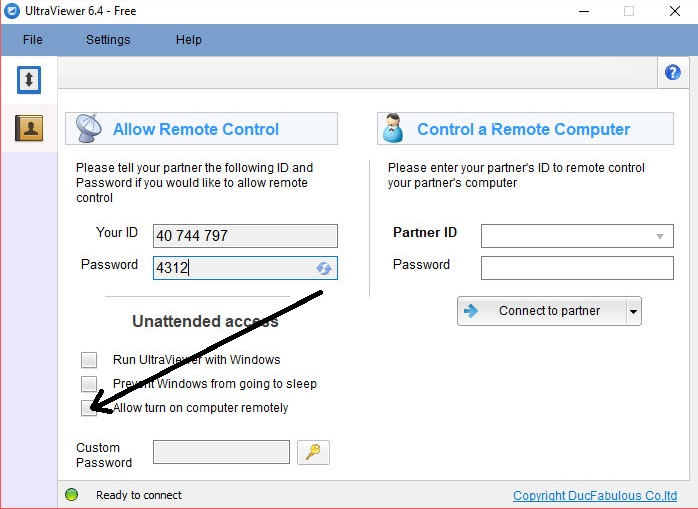
Advanced Features: Multi-Session Control and Screen Sharing
For power users, UltraViewer offers advanced features that enhance productivity:
- Multi-Session Control: To control multiple computers at once, repeat the connection process for each computer. Each session will open in a separate UltraViewer window, allowing you to switch between them easily. This is ideal for IT professionals supporting multiple clients or business owners managing several office machines .
- Screen Sharing: If you want to share your screen with others without giving them control, go to “Options” > “Share Screen Only” before connecting. This allows the remote user to view your screen but not interact with it.
- Remote Reboot: If the remote computer needs to be restarted (e.g., after installing software), go to “Tools” > “Remote Reboot” and select “Reboot and Reconnect.” UltraViewer will automatically re-establish the connection after the computer restarts.
Troubleshooting Common Issues After UltraViewer Download
While UltraViewer is reliable, you may encounter occasional issues during setup or use. Below are solutions to the most common problems:
Connection Failed After UltraViewer Download
- Check ID and Password: Ensure you entered the correct partner ID and password. Typos are the most common cause of connection failures.
- Verify Internet Connection: Both computers must have a stable internet connection. If the connection is weak, try moving closer to the router or switching to a wired connection.
- Firewall/Antivirus Blocking: UltraViewer may be blocked by your firewall or antivirus software. Add UltraViewer to the list of allowed applications in your firewall settings and disable antivirus temporarily (re-enable after testing).
- Outdated Version: If you’re using an older version, the connection may fail due to compatibility issues. Download the latest version from https://ultraviewer-cn.com and try again .
Slow or Laggy Remote Control
- Reduce Display Quality: Lower the screen resolution or color quality in UltraViewer’s display settings to reduce bandwidth usage.
- Close Background Apps: Close unnecessary applications on both computers to free up system resources and improve connection speed.
- Check Bandwidth: Ensure no other devices on the network are using excessive bandwidth (e.g., streaming video or downloading large files).
File Transfer Issues
- File Size Limit: The free version of UltraViewer has a file size limit for transfers (usually 2 GB). For larger files, use the premium version or compress the file before transferring.
- Permission Denied: If you can’t send or receive files, the remote user may have restricted file transfer permissions. Ask them to check their UltraViewer security settings.
UltraViewer Not Launching After Installation
- Reinstall the Software: Uninstall UltraViewer, restart your computer, and complete a fresh UltraViewer download from the official site.
- Run as Administrator: Right-click the UltraViewer shortcut and select “Run as administrator” to bypass permission issues.
- Check System Requirements: Ensure your computer meets the minimum requirements (e.g., sufficient RAM and storage).
If you encounter any other issues, visit the UltraViewer support page (accessible via the “Help” menu in the software) or contact customer support for assistance.
UltraViewer Free vs. Premium: Which Version Is Right for You?
After completing the UltraViewer download and using the free version, you may wonder if upgrading to premium is worth it. Below is a detailed comparison of the two versions to help you decide:
UltraViewer Free Version
- Ideal For: Personal use, occasional remote support, and basic home office needs.
- Key Features:
- Remote control of one computer at a time.
- Basic chat and file sharing (up to 2 GB per file).
- End-to-end encryption.
- Compatible with all Windows versions.
- Limitations:
- No unlimited concurrent sessions.
- Slower connection speeds compared to premium.
- No priority support.
- Limited file transfer size.
UltraViewer Premium Version
- Ideal For: IT professionals, small businesses, freelancers, and users who need frequent remote access.
- Key Features:
- Unlimited concurrent remote sessions.
- Faster connection speeds (up to 10x faster than free).
- Unlimited file transfer size.
- Priority technical support.
- Advanced security features (e.g., session recording, two-factor authentication).
- Custom branding (for businesses).
- Pricing: Affordable subscription plans, with discounts for annual billing. Prices start at $9.99 per month for a single user, making it much cheaper than competitors like TeamViewer or AnyDesk .
To upgrade to premium, open UltraViewer, go to “Help” > “Upgrade to Premium,” and follow the on-screen instructions. You can also purchase a premium license directly from https://ultraviewer-cn.com.
Security Best Practices for Using UltraViewer
Security is a top priority when using remote desktop software, and UltraViewer takes this seriously with built-in encryption and safety features. However, following these best practices will further protect your data and devices:
- Never Share Your ID and Password with Strangers: Only share your UltraViewer credentials with people you trust, such as colleagues, family members, or verified IT professionals.
- Change Your Password Regularly: UltraViewer allows you to generate a new password at any time. Go to “Options” > “Security” > “Generate New Password” to enhance security.
- Enable Session Notification: Configure UltraViewer to notify you whenever a remote connection is established. This ensures you’re always aware of who is accessing your computer.
- Use Two-Factor Authentication (Premium Only): The premium version offers two-factor authentication for an extra layer of security. Enable this feature in the security settings.
- End Sessions When Not in Use: Always disconnect from remote sessions when you’re done, even if you trust the other user. This prevents unauthorized access if the remote computer is compromised.
- Keep UltraViewer Updated: Regularly check for updates via the “Help” > “Check for Updates” menu. Updates include security patches that address vulnerabilities .
Conclusion: Unlock Seamless Remote Access with UltraViewer Download
UltraViewer is a versatile, user-friendly, and secure remote desktop solution that meets the needs of individuals, freelancers, and small businesses alike. The UltraViewer download process is quick and straightforward, and the software’s intuitive interface ensures you can start using it within minutes—even if you’re not tech-savvy. Whether you need to provide remote support, access your home computer while traveling, or collaborate with team members from afar, UltraViewer has all the features you need to get the job done efficiently.
By following the steps outlined in this guide, you’ve learned how to safely download UltraViewer from the official site https://ultraviewer-cn.com, install it on your computer, and master core features like remote control, chat, and file sharing. You’ve also discovered troubleshooting tips to resolve common issues and security best practices to protect your data.
If you’re still using outdated remote desktop software or struggling with complicated tools, it’s time to make the switch. The UltraViewer download is free for personal use, so you can try it risk-free and experience the benefits for yourself. For businesses and power users, the premium version offers unbeatable value with advanced features and unlimited access.
Don’t let geographical barriers limit your productivity. Download UltraViewer today and enjoy seamless, secure remote access from anywhere in the world.