In an era where remote work, distance learning, and global collaboration have become indispensable, reliable remote desktop software is no longer a luxury but a necessity. UltraViewer has emerged as a leading solution, trusted by over 100,000 users worldwide for its user-friendly interface, robust security, and cost-effective pricing. However, to unlock its full potential, proper UltraViewer download from an official source and a clear understanding of its features are crucial. This comprehensive guide will walk you through the safe UltraViewer download process, step-by-step setup, advanced usage techniques, and troubleshooting tips, ensuring you can leverage this powerful tool for seamless remote access, technical support, and team collaboration.
1. Why UltraViewer Stands Out: Key Reasons to Choose UltraViewer Download
Before diving into the download and usage details, it’s essential to understand why UltraViewer has become a preferred choice over competitors like TeamViewer and AnyDesk. Its unique combination of features, affordability, and accessibility makes UltraViewer download a smart decision for both personal and professional users.
1.1 Cost-Effective Solution with Free Core Features
One of the most compelling reasons for UltraViewer download is its cost efficiency. Unlike premium remote desktop tools that charge exorbitant fees for commercial use, UltraViewer offers full free access to core features for personal users, with no restrictions on usage time or connection frequency. For businesses and power users, its paid plans are significantly more affordable: UltraViewer Lite ($45.88/year), UltraViewer Professional ($71.88/year), and UltraViewer Premium ($95.88/year) – a fraction of the cost of TeamViewer’s $300+/year personal license. This pricing model allows small businesses, freelancers, and IT support teams to access advanced remote control capabilities without breaking the bank.
1.2 Robust Security for Safe Remote Connections
Security is a top priority when choosing remote desktop software, and UltraViewer delivers on this front. The software uses military-grade AES-256 encryption to protect all data transmitted during remote sessions, including screen content, file transfers, and chat messages. Each session generates a unique ID and password, ensuring only authorized users can access the remote computer. As the host, you maintain full visibility of all activities during the session and can terminate the connection at any time, providing an extra layer of control. For users handling sensitive data, this level of security makes UltraViewer download a reliable choice for compliant remote operations.
1.3 User-Friendly Interface for All Skill Levels
Whether you’re a tech novice or an IT professional, UltraViewer’s intuitive design ensures a smooth user experience. The software features a clean, straightforward interface with clearly labeled controls, making it easy to initiate connections, transfer files, and adjust settings without extensive training. Even users with limited computer knowledge can complete UltraViewer download, installation, and basic setup in minutes, eliminating the learning curve associated with more complex tools. This accessibility has made UltraViewer a popular choice for providing technical support to friends, family, and clients who may not be tech-savvy.
1.4 Comprehensive Feature Set for Versatile Use
UltraViewer packs a punch with features that cater to diverse remote access needs. Key functionalities include seamless remote desktop control, real-time screen sharing, secure file transfer (via drag-and-drop or chat window), built-in text and voice chat, multi-monitor support, and clipboard sharing. The latest version (6.6.124, released in July 2025) also adds session recording, unattended access, and customizable hotkeys, enhancing its utility for both personal and business scenarios. Whether you need to troubleshoot a remote computer, collaborate on a project with team members, or access your work PC from home, UltraViewer’s features have you covered – making UltraViewer download a versatile investment.
1.5 Cross-Platform Compatibility
UltraViewer supports all major operating systems, including Windows (XP, 7, 8, 10, 11, and Windows Server) and macOS (10.13 and above), with Linux compatibility in beta testing. It also offers mobile app support, allowing you to control computers from your smartphone or tablet. This cross-platform flexibility means you can use UltraViewer to connect different devices seamlessly, regardless of the operating system. Additionally, UltraViewer is a lightweight, portable tool that can be run from a USB drive without full installation, making it ideal for on-the-go technical support.
2. Safe UltraViewer Download: Step-by-Step Guide for All Platforms
The first and most critical step to using UltraViewer is ensuring a safe and legitimate UltraViewer download. Using unauthorised sources can lead to malware infections, data breaches, or outdated software with limited functionality. Below is a detailed guide to downloading UltraViewer from the official website https://ultraviewer-cn.com, tailored to different operating systems.
2.1 Pre-Download Preparation
Before initiating UltraViewer download, take a few moments to prepare your device for a smooth installation:
- Check your internet connection: Ensure a stable, high-speed internet connection to avoid download interruptions. A wired connection is recommended for faster and more reliable downloads.
- Verify system requirements: For Windows users, confirm your OS is Windows XP or later (Windows 10/11 is recommended for optimal performance). Mac users need macOS 10.13 or higher, with native support for M1/M2 chips.
- Disable unnecessary software: Temporarily turn off antivirus or firewall programs that may block the download or installation. UltraViewer’s official installation package is safe, so you can re-enable these tools after setup.
- Free up storage space: UltraViewer is a lightweight tool – the Windows installer is around 5MB, and the Mac version is approximately 8MB. Ensure you have at least 50MB of free space to accommodate the software and temporary files.
2.2 Windows UltraViewer Download & Installation
Windows is the most widely used operating system for remote desktop purposes, and UltraViewer offers full compatibility with all modern Windows versions. Follow these steps for a successful UltraViewer download and installation:
- Access the official website: Open your preferred web browser (Chrome, Firefox, Edge, etc.) and navigate to https://ultraviewer-cn.com. This is the official source for safe UltraViewer download, ensuring you get the latest, malware-free version.
- Locate the download section: On the homepage, look for the “Download” button – typically prominently displayed in the top navigation bar or main hero section. Click on “Windows Version” to initiate the download.
- Choose the appropriate version: The website will automatically detect your Windows version (32-bit or 64-bit) and recommend the compatible installer. If you need a specific version (e.g., portable edition), scroll down to the “Download Options” section and select “UltraViewer Portable” for a USB-ready version.
- Initiate the download: Click the “Download Now” button. The installer file (UltraViewer_Setup.exe) will start downloading. Depending on your internet speed, the download should complete in 1-2 minutes.
- Run the installer: Once the download is finished, locate the installer file in your “Downloads” folder and double-click it. If prompted by User Account Control (UAC) to allow the app to make changes to your device, click “Yes.”
- Complete the installation wizard: The setup wizard will guide you through the process. You can choose “Quick Install” to use default settings (installs to C:\Program Files\UltraViewer) or “Custom Install” to select a different installation directory. We recommend “Custom Install” to avoid cluttering your system drive.
- Finish setup: Check the box next to “Create a desktop shortcut” for easy access, then click “Install.” The installation will take 2-3 minutes, after which you’ll see a “Installation Complete” message. Click “Finish” to launch UltraViewer.
2.3 Mac UltraViewer Download & Installation
Mac users can enjoy seamless remote control with UltraViewer’s native macOS version, designed to integrate with the Mac ecosystem and support Apple’s silicon chips. Here’s how to complete UltraViewer download and installation on Mac:
- Visit the official site: Go to https://ultraviewer-cn.com using your Mac’s web browser (Safari, Chrome, etc.).
- Select the Mac version: Click on the “Download” tab and choose “Mac Version” from the dropdown menu. The website will detect your macOS version and provide the appropriate .dmg installer.
- Download the installer: Click “Download Mac Version” – the installer file (UltraViewer.dmg) will begin downloading. The file size is around 8MB, so the download should be quick (30 seconds to 1 minute on a fast connection).
- Mount the disk image: Once the download is complete, locate the .dmg file in your “Downloads” folder and double-click it. A disk image window will open, displaying the UltraViewer icon and the “Applications” folder shortcut.
- Install the software: Drag the UltraViewer icon into the “Applications” folder shortcut. This will copy the software to your Applications directory – a process that takes 1-2 minutes.
- Authorize the app: The first time you launch UltraViewer from Applications, macOS may display a security prompt saying “UltraViewer is an app downloaded from the internet. Are you sure you want to open it?” Click “Open” to proceed. This is a standard macOS security measure for third-party apps.
- Complete setup: UltraViewer will launch automatically after installation. You may need to grant screen recording and accessibility permissions in System Preferences > Security & Privacy to enable full remote control functionality.
2.4 Mobile UltraViewer Download (Android & iOS)
For users who need to control computers on the go, UltraViewer offers mobile apps for Android and iOS. Here’s how to download and set up the mobile version:
- Android UltraViewer Download:
- Open the Google Play Store on your Android device.
- Search for “UltraViewer Remote Control” (ensure the developer is DucFabulous Research).
- Tap “Install” to download and install the app. Alternatively, you can visit https://ultraviewer-cn.com from your mobile browser and click “Android Version” to download the APK file (enable “Unknown Sources” in Settings > Security to install from APK).
- iOS UltraViewer Download:
- Open the App Store on your iPhone or iPad.
- Search for “UltraViewer” and select the official app.
- Tap “Get” (or the cloud icon if you’ve downloaded it before) to install. You may need to authenticate with Face ID, Touch ID, or your Apple ID password.
- Mobile Setup:
- Launch the UltraViewer app on your mobile device.
- You’ll see a screen displaying your mobile device’s ID and password (for others to connect to your phone) and fields to enter a remote computer’s ID and password (to control a PC/Mac).
- Grant the app necessary permissions (camera, microphone, storage) to enable features like screen sharing and file transfer.
3. Getting Started with UltraViewer: Basic Setup & First Connection
After completing UltraViewer download and installation, setting up your first remote connection is straightforward. Whether you’re providing support to someone else or accessing your own computer remotely, follow these steps to get connected.
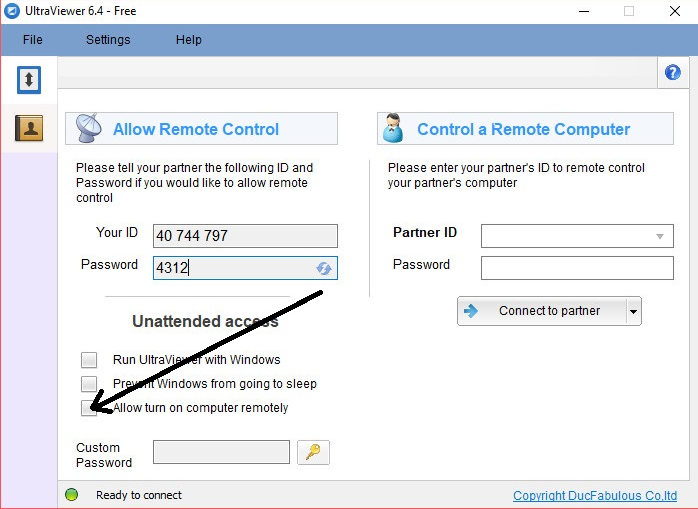
3.1 Understanding UltraViewer’s Interface
When you launch UltraViewer for the first time, you’ll be greeted with a simple, two-panel interface:
- Left Panel (Your ID/Password): This section displays your unique ID and randomly generated password. Share these credentials with the person who will control your computer (e.g., an IT support technician).
- Right Panel (Partner ID/Password): Use this section to connect to a remote computer. Enter the partner’s ID and password (provided by them) and click “Connect” to initiate the session.
- Menu Bar: At the top of the window, you’ll find menu options for “File,” “Edit,” “View,” “Tools,” and “Help.” Here, you can access advanced features like file transfer, session recording, and settings.
- Quick Access Toolbar: Below the menu bar, there are icons for common functions: chat, file transfer, screen capture, full-screen mode, and disconnect.
3.2 Initiating a Remote Connection (Controller Side)
If you need to control another computer (e.g., to help a friend troubleshoot or access your work PC), follow these steps:
- Obtain the partner’s credentials: Ask the person on the remote computer to launch UltraViewer and share their ID and password (displayed in the left panel of their interface).
- Enter the credentials: In your UltraViewer window, go to the right panel (“Control Remote Computer”) and type the partner’s ID and password into the respective fields.
- Establish the connection: Click the “Connect” button (or press Enter). UltraViewer will send a connection request to the remote computer.
- Wait for approval: The remote user will receive a pop-up notification asking to allow the connection. Once they click “Allow,” the connection will be established in 2-3 seconds.
- Start controlling: You now have full control over the remote computer’s mouse and keyboard. You can navigate the desktop, open applications, edit files, and perform any other tasks as if you were sitting in front of it.
3.3 Allowing a Remote Connection (Host Side)
If you need someone else to control your computer (e.g., to receive technical support), the process is even simpler:
- Launch UltraViewer: Open the software on your computer. Your ID and password will be automatically generated and displayed in the left panel.
- Share your credentials: Provide your ID and password to the person who will control your computer. You can copy the ID and password using the “Copy” buttons next to each field for easy sharing.
- Accept the connection request: When the controller enters your credentials and clicks “Connect,” you’ll see a pop-up window with the controller’s ID and a “Allow” button. Click “Allow” to grant access.
- Monitor the session: You can watch all activities on your screen in real time. If you need to take back control or end the session at any time, click the “Disconnect” button in the UltraViewer toolbar or close the software.
3.4 Customizing Your First Connection
To enhance your remote control experience, customize these basic settings before or during your first session:
- Display Quality: Click “View” in the menu bar and select “Display Quality” (Low, Medium, High). Choose a lower quality for slow internet connections to reduce lag.
- Full-Screen Mode: Press F11 or click the “Full-Screen” icon in the toolbar to switch to full-screen mode, giving you a larger view of the remote desktop.
- Chat Function: Click the “Chat” icon to open a text chat window with the remote user. This is useful for communicating while you work (e.g., explaining changes you’re making).
- Screen Capture: Use the “Screen Capture” icon to take screenshots of the remote desktop. Screenshots are saved to your default “Pictures” folder.
4. Advanced UltraViewer Features: Maximize Productivity After Download
Once you’re comfortable with basic remote connections, explore these advanced features to get the most out of your UltraViewer download. These tools are especially valuable for business users, IT professionals, and anyone who relies on remote access regularly.
4.1 Secure File Transfer
UltraViewer’s file transfer feature allows you to send and receive files between local and remote computers quickly and securely – no need for email attachments or cloud storage services. Here’s how to use it:
- Initiate file transfer: During a remote session, click the “File Transfer” icon in the toolbar (or go to “Tools” > “File Transfer”).
- Navigate file systems: A dual-panel window will open. The left panel shows your local computer’s files, and the right panel displays the remote computer’s files.
- Transfer files:
- To send a file to the remote computer: Select the file/folder in the left panel, click “Send” (or drag and drop it to the right panel).
- To receive a file from the remote computer: Select the file/folder in the right panel, click “Receive” (or drag and drop it to the left panel).
- Monitor progress: A progress bar will show the transfer status. UltraViewer supports large file transfers (up to 10GB) and resume functionality if the connection is interrupted.
For added convenience, you can also transfer files directly through the chat window by dragging and dropping files into the chat box. All file transfers are encrypted with AES-256, ensuring your data remains secure during transmission.
4.2 Unattended Access
Unattended access is a game-changer for users who need to access their own computers remotely (e.g., accessing work files from home or managing a server). It allows you to connect to a remote computer without someone being physically present to approve the connection. Here’s how to set it up:
- Configure the remote computer:
- On the computer you want to access remotely, launch UltraViewer and go to “Tools” > “Settings” > “Unattended Access.”
- Check the box next to “Enable Unattended Access.”
- Set a permanent password (different from the random session password) and confirm it. This password will be used to connect to the computer without approval.
- Click “OK” to save the settings.
- Connect remotely:
- On your local computer (or mobile device), launch UltraViewer.
- Enter the remote computer’s ID and the permanent unattended access password you set.
- Click “Connect” – the connection will be established immediately, with no need for approval from the remote side.
Unattended access is ideal for regular remote work, server management, or accessing personal files while traveling. You can disable it at any time by unchecking “Enable Unattended Access” in the settings.
4.3 Session Recording
Session recording allows you to record remote sessions for training, documentation, or compliance purposes. This feature is particularly useful for IT teams training new staff or businesses that need to keep records of client support sessions. Here’s how to use it:
- Start recording: During a remote session, click “Tools” > “Record Session” (or press the custom hotkey you’ve set). A red recording indicator will appear in the corner of the screen.
- Customize recording settings: Before starting, go to “Tools” > “Settings” > “Recording” to choose the output format (MP4, AVI, WMV), video quality, and save location. You can also enable audio recording to capture chat or voice conversations.
- Stop recording: Click “Tools” > “Stop Recording” (or use the hotkey) when you’re done. The recording will be saved to your specified location.
Session recordings are encrypted and can only be accessed by users with permission to view the saved files, ensuring privacy and compliance.
4.4 Multi-Monitor Support
If the remote computer has multiple monitors, UltraViewer allows you to switch between them seamlessly – a critical feature for professionals who use dual or triple monitors for work. Here’s how to navigate multi-monitor setups:
- View monitor layout: During a session, click “View” > “Multi-Monitor” to see a thumbnail preview of all connected monitors.
- Switch between monitors: Click on the thumbnail of the monitor you want to view, or use the hotkeys (Ctrl+1, Ctrl+2, etc.) to switch quickly.
- Extend view: Select “Extend View” to see all monitors side by side in a single window, or “Full-Screen Each Monitor” to view each monitor in full-screen mode.
Multi-monitor support ensures you can access all parts of the remote computer’s desktop without missing important windows or applications, making it easier to work on complex projects remotely.
4.5 Customizable Hotkeys
UltraViewer allows you to set custom hotkeys for frequently used functions, saving you time and streamlining your workflow. Here’s how to configure hotkeys:
- Access hotkey settings: Go to “Tools” > “Settings” > “Hotkeys.”
- Customize functions: You’ll see a list of common functions (e.g., disconnect, full-screen, file transfer) with default hotkeys. Click on a function to change its hotkey – simply press the key combination you want to use (e.g., Ctrl+F for file transfer).
- Save changes: Click “OK” to apply your custom hotkeys. You can reset to default at any time by clicking “Reset to Default.”
Popular hotkeys to customize include:
- Disconnect: Ctrl+D
- Full-Screen Mode: F11
- File Transfer: Ctrl+F
- Chat: Ctrl+C
- Screen Capture: Ctrl+S
5. UltraViewer for Specific Use Cases: Tailored Tips After Download
UltraViewer’s versatility makes it suitable for a wide range of use cases. Below are tailored tips for common scenarios, helping you optimize the software for your specific needs.
5.1 UltraViewer for IT Technical Support
IT professionals and support teams rely on remote desktop software to resolve issues without visiting clients’ premises. UltraViewer’s features are designed to streamline technical support workflows:
- Quick connection: Share a link to https://ultraviewer-cn.com with clients so they can easily complete UltraViewer download and installation – no technical expertise required.
- Screen sharing: Use the “Share Screen” feature (instead of full control) to demonstrate solutions to clients. Click “Tools” > “Share Screen” to let the client view your screen while you explain a process.
- Remote troubleshooting: Use the “Task Manager” access (Tools > Remote Task Manager) to close unresponsive applications or check system resources on the client’s computer.
- Multi-session management: With UltraViewer Premium, you can manage multiple remote connections simultaneously, allowing you to support multiple clients at once without switching between windows.
5.2 UltraViewer for Remote Work & Team Collaboration
Remote teams can use UltraViewer to collaborate on projects, share files, and stay connected, even when working from different locations:
- Real-time collaboration: Multiple team members can connect to the same remote computer (e.g., a shared server or project PC) to edit documents, update spreadsheets, or work on presentations together.
- File sharing: Use the built-in file transfer feature to share large project files without relying on external tools like Dropbox or Google Drive, reducing latency and improving security.
- Meeting support: Share your screen during virtual meetings to present ideas, walk through projects, or troubleshoot issues with team members. The built-in chat and voice features eliminate the need for separate communication tools.
- Unattended access to work PCs: Set up unattended access on your work computer so you can access files, applications, and network resources from home or while traveling – perfect for hybrid work models.
5.3 UltraViewer for Distance Learning & Education
Teachers and students can use UltraViewer to facilitate remote learning, provide one-on-one support, and share educational materials:
- Tutoring sessions: Teachers can connect to students’ computers to help with homework, explain concepts, or review assignments in real time.
- Screen sharing for lessons: Teachers can share their screens to present lectures, slideshows, or educational videos, with students able to follow along and ask questions via chat.
- File distribution: Send worksheets, study guides, or assignment instructions directly to students’ computers using the file transfer feature, ensuring everyone has access to the materials they need.
- Technical support for students: Help students troubleshoot technical issues with their devices (e.g., software installation, internet connectivity) without needing to meet in person.
5.4 UltraViewer for Personal Use
For personal users, UltraViewer is a handy tool for helping friends and family with computer issues or accessing your own devices remotely:
- Help loved ones: Connect to family members’ computers to fix software problems, install updates, or set up new applications – ideal for those who aren’t tech-savvy.
- Access home PC from elsewhere: Set up unattended access on your home computer to access photos, videos, or important files while you’re away (e.g., on vacation or at a friend’s house).
- Gaming assistance: Help friends troubleshoot gaming setup issues or walk them through game installations remotely.
- Device management: Manage multiple devices in your home (e.g., a home server, smart TV box) from a single computer, saving time and effort.
6. Troubleshooting Common UltraViewer Issues After Download
While UltraViewer is reliable, you may encounter occasional issues during download, installation, or use. Below are solutions to the most common problems, ensuring a smooth experience.
6.1 UltraViewer Download Issues
- Slow download speed: Check your internet connection and close other bandwidth-heavy applications (e.g., video streaming services, large file downloads). If the issue persists, try downloading from https://ultraviewer-cn.com using a different browser or device.
- Download interrupted: Restart the download and ensure your internet connection is stable. If using a wireless connection, switch to a wired connection for more reliability.
- Antivirus blocking the download: Temporarily disable your antivirus software (ensure it’s a trusted program) and restart the download. Remember to re-enable it after installation – UltraViewer’s official installer is safe and won’t contain malware.
6.2 Installation Problems
- Windows installation failed: Ensure you have administrative privileges on your computer (right-click the installer and select “Run as administrator”). If you’re using an older Windows version (e.g., XP), download the compatible legacy version from https://ultraviewer-cn.com’s “Older Versions” section.
- Mac installation issues: If the .dmg file won’t open, check that your macOS version meets the requirements (10.13 or higher). If you see a “File is damaged” error, go to System Preferences > Security & Privacy > General and click “Allow Anyway” to bypass the security block.
- Mobile app installation failed: For Android, ensure “Unknown Sources” is enabled if downloading via APK. For iOS, check that you have enough storage space and a stable internet connection. Restart the App Store/Google Play Store if the download gets stuck.
6.3 Connection Issues
- Cannot connect to remote computer: Verify that both computers have UltraViewer running and are connected to the internet. Ensure you’ve entered the correct ID and password (check for typos). If the remote computer is behind a firewall, ensure port 5900 (used by UltraViewer) is open.
- Connection is laggy or slow: Reduce the display quality (View > Display Quality > Low) to minimize data transfer. Close unnecessary applications on both local and remote computers to free up system resources. If using a wireless connection, move closer to the router or switch to a wired connection.
- Connection drops unexpectedly: Check for internet outages on both sides. Update UltraViewer to the latest version (Help > Check for Updates) – outdated versions may have stability issues. If the problem persists, restart both computers and try again.
6.4 Feature-Related Issues
- File transfer not working: Ensure both users have granted file transfer permissions (the host may need to allow file access in the UltraViewer settings). Check that the destination folder has enough storage space and isn’t read-only.
- Screen sharing not displaying correctly: Update your graphics drivers on both computers. If using multiple monitors, switch to single-monitor mode to see if the issue resolves. For Mac users, ensure screen recording permissions are enabled (System Preferences > Security & Privacy > Screen Recording).
- Chat/voice not working: Check that your microphone and speakers are working and selected as the default audio devices. Ensure the chat window is open and not minimized. Update UltraViewer to the latest version to fix any audio-related bugs.
7. UltraViewer vs. Competitors: Why UltraViewer Download Is the Better Choice
With numerous remote desktop tools available, it’s important to understand how UltraViewer stacks up against competitors like TeamViewer and AnyDesk. Here’s a detailed comparison to help you see why UltraViewer download is the smarter choice for most users.
7.1 Pricing
| Feature | UltraViewer | TeamViewer | AnyDesk |
|---|---|---|---|
| Personal Use | Free (unlimited) | Free (limited sessions) | Free (limited features) |
| Basic Paid Plan | $45.88/year (Lite) | $309/year (Personal) | $199/year (Essentials) |
| Premium Paid Plan | $95.88/year (Premium) | $1,249/year (Premium) | $499/year (Professional) |
| Enterprise Plan | Custom pricing | $2,499+/year (Corporate) | Custom pricing |
UltraViewer’s pricing is significantly more affordable, especially for small businesses and freelancers. Its free plan offers unlimited usage for personal users, while TeamViewer’s free plan restricts commercial use and may cut connections after frequent use.
7.2 Features
All three tools offer core remote control features, but UltraViewer stands out with its balance of functionality and ease of use:
- UltraViewer: Offers all essential features (file transfer, chat, screen sharing) plus advanced tools like session recording, unattended access, and multi-monitor support – all at a lower price. It’s more user-friendly for beginners.
- TeamViewer: Has more enterprise-focused features (e.g., centralized management, SSO integration) but is more complex and expensive. Overkill for personal or small business use.
- AnyDesk: Known for fast connection speeds but lacks some advanced features (e.g., session recording in the free plan) and has higher pricing than UltraViewer.
7.3 Security
All three tools use strong encryption (AES-256), but UltraViewer’s unique session ID and password system adds an extra layer of security. It also allows hosts to monitor and terminate sessions at any time, giving users more control over their data. TeamViewer has faced security breaches in the past, while UltraViewer’s smaller user base and regular updates make it less of a target for hackers.
7.4 Ease of Use
UltraViewer’s simple interface and straightforward setup make it the best choice for users with limited technical knowledge. TeamViewer and AnyDesk have more complex interfaces with more settings, which can be overwhelming for beginners. UltraViewer’s portable version also allows for quick use without installation – a major advantage for on-the-go support.
8. Conclusion: Unlock Seamless Remote Access with UltraViewer Download
In today’s connected world, reliable remote desktop software is essential for personal productivity, business collaboration, and technical support. UltraViewer stands out as a top choice, offering a winning combination of affordability, security, ease of use, and comprehensive features. By completing UltraViewer download from the official website https://ultraviewer-cn.com, you ensure a safe, legitimate installation that gives you access to all the tools you need for seamless remote control.
Whether you’re an IT professional providing technical support, a remote worker collaborating with team members, a teacher facilitating distance learning, or a personal user helping friends and family, UltraViewer adapts to your needs. Its multi-platform support, advanced features like unattended access and file transfer, and user-friendly interface make it accessible to users of all skill levels.
With UltraViewer, you can save time and money, eliminate the need for in-person visits, and work from anywhere in the world – all while enjoying secure, fast, and reliable remote access. If you haven’t already, visit https://ultraviewer-cn.com today to complete your UltraViewer download and experience the future of remote desktop software.