Introduction: Why UltraViewer Stands Out in Remote Access Software
In an era where remote work, distance learning, and global collaboration have become indispensable, the demand for reliable remote control software has skyrocketed. Among the myriad of options available, UltraViewer has emerged as a leading choice for millions of users worldwide, boasting over 40 million downloads and a reputation for simplicity, security, and functionality . Whether you’re an IT professional providing technical support, a teacher conducting online classes, or a family member helping a loved one with their computer, UltraViewer offers a user-friendly solution that eliminates geographical barriers.
The first step to unlocking the power of this tool is a seamless UltraViewer download and installation process. Many users struggle with complicated software setups or questionable download sources that compromise security, but with the official UltraViewer download from https://ultraviewer-cn.com, you can ensure a safe and hassle-free experience. This comprehensive tutorial will walk you through every aspect of UltraViewer—from finding the right UltraViewer download link to mastering advanced features—so you can leverage remote control technology with confidence.
In this guide, we’ll cover everything a beginner needs to know, as well as advanced tips for power users. We’ll emphasize the importance of choosing the official UltraViewer download to avoid malware, explain how to install UltraViewer on different Windows operating systems, and provide step-by-step instructions for establishing secure remote connections. By the end of this article, you’ll not only have completed a successful UltraViewer download but also be able to use the software to support clients, collaborate with colleagues, or assist family members from anywhere in the world.
Part 1: Understanding UltraViewer—Key Features and Benefits
Before diving into the UltraViewer download and installation process, it’s essential to understand what makes this software a top choice for remote access. UltraViewer is a freemium remote control tool designed to facilitate real-time support and collaboration between computers. Unlike some paid alternatives, it offers core features for free, making it accessible to individual users, small businesses, and educational institutions alike .
Core Features of UltraViewer
- Secure Remote Connections: UltraViewer prioritizes data security with encrypted connections, ensuring that sensitive information remains protected during remote sessions. This is particularly crucial for business users handling confidential client data or personal users sharing access to their computers .
- Built-in Chat Functionality: The integrated chat window allows users to communicate in real time while controlling a remote computer. You can toggle the chat on or off using a customizable hotkey (default is F1), making it easy to provide instructions or ask questions without switching between applications .
- Multi-Computer Control: With UltraViewer, you can control multiple computers simultaneously or share your screen with multiple users, making it ideal for team collaborations, online training sessions, or IT support teams managing multiple clients .
- File Sharing Capabilities: The software allows for easy file transfer between connected computers directly through the chat window. This eliminates the need for third-party file-sharing services and ensures that files are transferred securely within the UltraViewer environment .
- User-Friendly Interface: UltraViewer’s intuitive design means that even users with limited technical knowledge can navigate the software with ease. The main dashboard displays all necessary connection details, and the installation process requires no advanced setup .
- Wide Windows Compatibility: UltraViewer supports all major Windows operating systems, including Windows XP, 7, 8, 10, 11, and Windows Server versions. This broad compatibility ensures that you can connect to almost any Windows-based computer without compatibility issues .
Who Can Benefit from UltraViewer?
- IT Support Professionals: UltraViewer allows technicians to provide remote support to clients without the need for on-site visits, saving time and reducing travel costs .
- Educators and Trainers: Teachers can use UltraViewer to conduct online classes, demonstrate software usage, and provide one-on-one support to students regardless of their location.
- Small Business Owners: Entrepreneurs can manage their business computers from home, collaborate with remote team members, and access important files while traveling.
- Family Members: Help elderly relatives or less tech-savvy family members troubleshoot computer issues without having to be physically present .
- Remote Workers: Access your work computer from home or while traveling, ensuring that you can stay productive no matter where you are.
The versatility and accessibility of UltraViewer make it a valuable tool for anyone in need of reliable remote access. To experience these benefits, the first step is to complete a safe and successful UltraViewer download from the official source.
Part 2: How to Safely Complete UltraViewer Download in 2026
One of the most critical steps in using UltraViewer is ensuring that you download the software from a trusted source. Many third-party websites offer UltraViewer download links, but these can often contain malware, adware, or outdated versions of the software that may not function properly or could compromise your computer’s security. For this reason, we strongly recommend downloading UltraViewer directly from the official website: https://ultraviewer-cn.com.
Step 1: Navigate to the Official UltraViewer Download Page
Open your preferred web browser (Chrome, Firefox, Edge, etc.) and enter https://ultraviewer-cn.com into the address bar. This will take you to the official UltraViewer website, where you can access the latest version of the software. The official site is regularly updated to provide the most recent releases, ensuring that you get access to new features and security patches .
Once on the homepage, look for the “Download” button—this is typically prominently displayed to make the UltraViewer download process as straightforward as possible. Avoid clicking on pop-up ads or links that claim to be “fast downloads” or “accelerated versions,” as these are often from untrusted sources.
Step 2: Choose the Right Version for Your Operating System
UltraViewer is currently compatible with all Windows operating systems, from Windows XP to Windows 11, as well as Windows Server editions . The latest version (as of 2026) is UltraViewer 6.6.124, which weighs in at just 4MB—making it a lightweight download that won’t take up significant storage space on your computer .
When you click the download button on https://ultraviewer-cn.com, the website will automatically detect your operating system and recommend the appropriate version. However, if you need to download UltraViewer for a different computer (e.g., a Windows 7 machine when you’re using Windows 11), you can navigate to the “Downloads” section of the site to select the specific version you need.
Step 3: Initiate the UltraViewer Download and Verify the File
After clicking the download button, your browser will prompt you to save the installation file. Choose a location on your computer that’s easy to find (e.g., the Desktop or Downloads folder) and click “Save.” The download process should only take a few seconds, even on slower internet connections, due to the software’s small file size .
Once the download is complete, locate the installation file (typically named “UltraViewer_Setup.exe”) and scan it with your antivirus software to ensure it’s free of malware. While the official UltraViewer download is safe, this extra step provides peace of mind, especially if you’re downloading software for a work computer or one that contains sensitive data.
Step 4: Troubleshooting Common UltraViewer Download Issues
If you encounter problems during the UltraViewer download process, here are some common solutions:
- Slow Download Speeds: If the download is taking longer than expected, check your internet connection. You can also try closing other applications that are using bandwidth or switching to a wired connection if you’re on Wi-Fi.
- Download Failed: If the download fails, clear your browser’s cache and cookies, then try again. You can also try using a different browser to access https://ultraviewer-cn.com.
- Antivirus Blocking the Download: Some antivirus programs may flag the UltraViewer installation file as a potential threat (a false positive). If this happens, add the file to your antivirus exceptions list or temporarily disable your antivirus software during the download and installation process (remember to re-enable it afterward).
By following these steps, you can complete a safe and successful UltraViewer download. The next step is to install the software and configure it for your needs.
Part 3: Step-by-Step UltraViewer Installation Guide
Once you’ve completed the UltraViewer download from https://ultraviewer-cn.com, the installation process is quick and straightforward. UltraViewer’s installer is designed to be user-friendly, so even if you’re not tech-savvy, you can have the software up and running in just a few minutes.
Step 1: Run the Installation File
Locate the UltraViewer installation file you downloaded (e.g., “UltraViewer_Setup.exe”) and double-click it to launch the installer. If you’re using Windows 10 or 11, you may see a User Account Control (UAC) prompt asking for permission to run the file. Click “Yes” to proceed—this is a standard security measure to ensure that you authorize the installation.
Step 2: Choose the Installation Type
The UltraViewer installer will present you with two installation options:
- Standard Installation: This is the recommended option for most users. It automatically installs all necessary components and creates a desktop shortcut for easy access. The standard installation uses the default installation path (typically “C:\Program Files\UltraViewer”).
- Custom Installation: If you want to choose a different installation path, select which components to install, or avoid creating a desktop shortcut, choose the custom installation option. This is ideal for advanced users who want more control over where the software is installed .
For most users, the standard installation is sufficient. Simply click “Next” to proceed with the standard installation, or select “Custom” if you need to adjust the settings.
Step 3: Accept the License Agreement
Before proceeding with the installation, you’ll need to accept the UltraViewer license agreement. Read through the terms carefully (though they’re standard for most software) and click the checkbox next to “I accept the agreement.” Then click “Next” to continue.
Step 4: Complete the Installation
After choosing your installation type and accepting the license agreement, click “Install” to begin the installation process. The installer will copy the necessary files to your computer—this should only take 1-2 minutes. Once the installation is complete, you’ll see a “Completion” screen with an option to launch UltraViewer immediately. Leave this checkbox selected and click “Finish” to start using the software.
Step 5: First Launch and Initial Setup
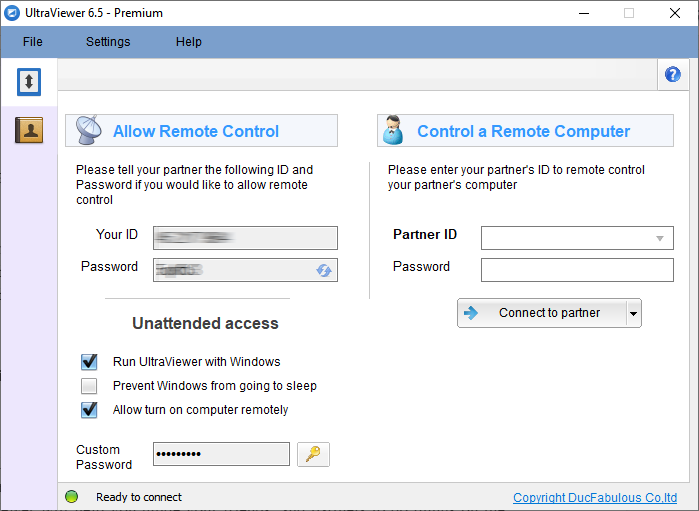
When you launch UltraViewer for the first time, you’ll be greeted with the main dashboard. The interface is clean and intuitive, with two main sections:
- Your ID and Password: This section displays a unique ID and password that identifies your computer. You’ll need to share this with anyone who wants to connect to your computer remotely .
- Partner ID and Password: This section is where you’ll enter the ID and password of the computer you want to connect to remotely .
You may also be prompted to allow UltraViewer through your Windows Firewall. Click “Allow access” to ensure that the software can establish remote connections—this is a necessary step for UltraViewer to function properly.
That’s it! You’ve successfully completed the UltraViewer download and installation process. Now it’s time to learn how to use UltraViewer to establish remote connections.
Part 4: How to Use UltraViewer for Remote Control—Beginner to Advanced
Now that you’ve installed UltraViewer, let’s explore how to use its core features. Whether you want to control another computer or allow someone to control yours, UltraViewer makes the process simple. We’ll start with the basics of establishing a remote connection and then move on to advanced features like file sharing, chat, and multi-computer control.
Basic: Establishing a Remote Connection
To connect to another computer using UltraViewer, follow these steps:
- Ensure Both Computers Have UltraViewer Installed: For a remote connection to work, both the computer you’re using (the controller) and the computer you want to control (the target) must have UltraViewer installed. If the target computer doesn’t have UltraViewer, ask the user to complete an UltraViewer download from https://ultraviewer-cn.com and install the software .
- Get the Target Computer’s ID and Password: Ask the user of the target computer to open UltraViewer and share their ID and password (displayed in the “Your ID and Password” section of the main dashboard) .
- Enter the ID and Password in Your UltraViewer: On your computer, open UltraViewer and enter the target computer’s ID and password in the “Partner ID and Password” section. Double-check the credentials to ensure they’re correct—typos are a common cause of connection issues.
- Click “Connect to Partner”: Once you’ve entered the correct ID and password, click the “Connect to Partner” button. The target computer will receive a prompt asking for permission to allow the connection—they’ll need to click “Allow” to proceed .
- Start Controlling the Remote Computer: After the connection is established, you’ll see the target computer’s screen displayed on your monitor. You can use your mouse and keyboard to control the remote computer just as if you were sitting in front of it .
Allowing Someone to Control Your Computer
If you need someone to help you with a computer issue, follow these steps to allow remote control:
- Open UltraViewer and locate your unique ID and password on the main dashboard.
- Share Your ID and Password with the person who will be controlling your computer. You can share this via email, text message, or any other communication method.
- Wait for the Connection Request: When the other person enters your ID and password into their UltraViewer and clicks “Connect to Partner,” you’ll receive a pop-up notification asking for permission to allow the connection.
- Accept the Connection: Click “Allow” to grant the other person access to your computer. You’ll be able to see everything they do on your screen, and you can take back control at any time by moving your mouse or pressing a key .
- End the Connection: When you’re done, simply close UltraViewer to terminate the connection. The next time you open UltraViewer, your password will automatically reset for security .
Advanced Feature 1: Using the Chat Function
UltraViewer’s built-in chat feature allows you to communicate with the user of the remote computer in real time. This is especially useful for providing instructions, asking questions, or clarifying tasks during a remote session .
To use the chat function:
- Establish a Remote Connection as described above.
- Open the Chat Window: Once connected, you’ll see a small chat icon in the UltraViewer toolbar (usually located at the top of the remote screen). Click this icon to open the chat window.
- Send Messages: Type your message in the text box at the bottom of the chat window and press “Enter” to send it. The other user will receive the message immediately and can reply in the same window.
- Toggle Chat On/Off: If the chat window is distracting, you can toggle it on or off using the F1 key (default) or a custom hotkey. To set a custom hotkey, go to “Options” > “Hotkeys” in UltraViewer and assign a new key for toggling chat .
Advanced Feature 2: File Sharing
UltraViewer allows you to transfer files between connected computers without using external services like email or cloud storage. This is a secure and convenient way to share documents, photos, or other files during a remote session .
To share files using UltraViewer:
- Establish a Remote Connection and open the chat window.
- Attach a File: Click the “Attach” icon (usually a paperclip) in the chat window and select the file you want to send from your computer.
- Send the File: Click “Send” to transfer the file. The other user will receive a notification that a file is being sent and can choose where to save it on their computer.
- Receive Files: If the other user sends you a file, you’ll receive a prompt asking where to save it. Select a location and click “Save” to download the file.
All file transfers are encrypted, so you can be confident that your files are secure during the transfer process.
Advanced Feature 3: Multi-Computer Control
UltraViewer allows you to control multiple computers simultaneously, which is ideal for IT professionals managing multiple clients or team leaders collaborating with several team members .
To control multiple computers:
- Establish a Connection to the First Computer using the steps outlined earlier.
- Open a New UltraViewer Window: Click “File” > “New Window” in the UltraViewer menu bar to open a second instance of the software.
- Connect to the Second Computer: Enter the ID and password of the second computer in the new UltraViewer window and click “Connect to Partner.”
- Switch Between Connections: You can switch between the different remote sessions by clicking on the UltraViewer windows in your taskbar. Each session is independent, so you can perform different tasks on each remote computer.
You can open as many UltraViewer windows as needed, but keep in mind that each remote session will use some system resources. If you’re controlling multiple computers at once, ensure that your computer has enough RAM and processing power to handle the load.
Advanced Feature 4: Customizing UltraViewer Settings
UltraViewer allows you to customize a variety of settings to tailor the software to your needs. To access the settings, click “Options” in the UltraViewer menu bar. Here are some useful settings to explore:
- Security Settings: You can change how often your password resets, enable two-factor authentication (for added security), and set permissions for remote users (e.g., whether they can transfer files or only view your screen).
- Display Settings: Adjust the resolution of the remote screen, enable full-screen mode, or set the remote screen to fit your monitor.
- Hotkeys: Customize hotkeys for common tasks like toggling chat, ending the connection, or switching between multiple sessions.
- Language Settings: UltraViewer supports multiple languages, so you can change the interface language to your preferred language.
By customizing these settings, you can make UltraViewer work more efficiently for your specific use case.
Part 5: UltraViewer Security Tips—Protecting Your Data During Remote Sessions
While UltraViewer is designed with security in mind, it’s important to take additional precautions to protect your computer and data during remote sessions. Here are some key security tips to keep in mind:
1. Only Share Your ID and Password with Trusted Individuals
Your UltraViewer ID and password are the keys to accessing your computer remotely. Never share them with people you don’t trust, and avoid posting them online or sending them via unsecure channels (e.g., public forums or unencrypted email) .
2. Reset Your Password Regularly
UltraViewer automatically resets your password each time you close and reopen the software, but you can also manually reset it by clicking the “Reset Password” button in the main dashboard. This is a good practice if you’ve shared your password with someone and want to prevent them from connecting again without your permission.
3. Monitor Remote Sessions Closely
When someone is controlling your computer remotely, always keep an eye on the screen to ensure they’re only performing the tasks you authorized. If you see them accessing files or applications you didn’t approve of, you can take back control immediately by moving your mouse or pressing a key—this will temporarily pause the remote user’s control .
4. End Sessions When Not in Use
Never leave a remote session running if you’re not actively using it. Close UltraViewer as soon as the task is complete to terminate the connection and prevent unauthorized access.
5. Keep UltraViewer Updated
Regularly updating UltraViewer ensures that you have the latest security patches and bug fixes. You can check for updates by clicking “Help” > “Check for Updates” in the UltraViewer menu bar. Alternatively, the software may prompt you to update when a new version is available. To ensure you always have the latest version, we recommend downloading updates directly from https://ultraviewer-cn.com rather than third-party sources.
6. Use a Strong Antivirus Program
Even with UltraViewer’s built-in security features, it’s important to have a reliable antivirus program installed on your computer. This will help detect and remove any malware that may try to exploit the remote connection.
By following these security tips, you can use UltraViewer with confidence, knowing that your computer and data are protected.
Part 6: Troubleshooting Common UltraViewer Issues
While UltraViewer is generally reliable, you may encounter occasional issues during setup or use. Here are some common problems and their solutions:
Issue 1: Unable to Establish a Remote Connection
- Solution 1: Double-check the partner ID and password to ensure they’re entered correctly. Even a single typo can prevent the connection from being established.
- Solution 2: Ensure that both computers are connected to the internet. A weak or unstable internet connection can also cause connection issues.
- Solution 3: Verify that UltraViewer is allowed through the Windows Firewall on both computers. If the firewall is blocking UltraViewer, the connection won’t work.
- Solution 4: Update UltraViewer to the latest version. Outdated versions may have compatibility issues that prevent connections. You can download the latest version from https://ultraviewer-cn.com.
Issue 2: Remote Screen Is Lagging or Freezing
- Solution 1: Check your internet speed. A slow internet connection is the most common cause of lag during remote sessions. Try closing other applications that are using bandwidth or switching to a wired connection.
- Solution 2: Reduce the resolution of the remote screen. Lowering the resolution can reduce the amount of data being transferred, which can improve performance.
- Solution 3: Close unnecessary applications on the target computer. If the target computer is running multiple resource-intensive programs, it may cause the remote session to lag.
Issue 3: Chat Function Isn’t Working
- Solution 1: Ensure that the chat window is enabled. Press F1 (or your custom hotkey) to toggle the chat on/off.
- Solution 2: Check if the remote user has muted the chat. Some users may accidentally mute the chat, preventing messages from being sent or received.
- Solution 3: Restart UltraViewer. Sometimes, restarting the software can resolve minor glitches with the chat function.
Issue 4: File Transfer Failed
- Solution 1: Check the file size. UltraViewer supports file transfers of all sizes, but very large files may take longer to transfer and can fail if the internet connection is unstable. Try transferring smaller files first to test the connection.
- Solution 2: Ensure that the target computer has enough storage space to receive the file. If the target computer’s hard drive is full, the file transfer will fail.
- Solution 3: Disable any antivirus software that may be blocking the file transfer. Some antivirus programs flag file transfers from remote connections as potential threats.
Issue 5: UltraViewer Crashes Unexpectedly
- Solution 1: Update UltraViewer to the latest version. Crashes are often caused by bugs that are fixed in newer releases.
- Solution 2: Reinstall UltraViewer. If updating doesn’t work, uninstall the software and then complete a fresh UltraViewer download from https://ultraviewer-cn.com and reinstall it.
- Solution 3: Check your computer’s system requirements. UltraViewer is lightweight, but older computers with limited RAM or processing power may struggle to run the software.
If you’re still experiencing issues after trying these solutions, you can contact UltraViewer’s customer support through the official website for further assistance.
Part 7: UltraViewer vs. Other Remote Control Software—Why Choose UltraViewer?
With so many remote control tools available, you may be wondering why UltraViewer is the right choice for you. Let’s compare UltraViewer to some popular alternatives to highlight its unique advantages:
UltraViewer vs. TeamViewer
TeamViewer is one of the most well-known remote control software options, but it comes with a high price tag for commercial use. UltraViewer, on the other hand, offers core features for free, making it a more affordable option for small businesses and individual users . Both tools offer similar features (remote control, file sharing, chat), but UltraViewer’s interface is more intuitive for beginners, and the UltraViewer download and installation process is faster due to its smaller file size.
UltraViewer vs. AnyDesk
AnyDesk is another popular remote control tool, but it has limited free features. UltraViewer’s free version includes all core features, while AnyDesk’s free version restricts commercial use and has limitations on file transfer speeds. UltraViewer also has better Windows compatibility, supporting older operating systems like Windows XP, which AnyDesk no longer supports.
UltraViewer vs. Chrome Remote Desktop
Chrome Remote Desktop is a free tool that’s easy to use, but it requires both users to have the Chrome browser installed. UltraViewer is a standalone application, so there’s no need for a browser. Chrome Remote Desktop also lacks features like built-in chat and file sharing, which are essential for many users.
Key Advantages of UltraViewer
- Free Core Features: Unlike many alternatives, UltraViewer offers remote control, file sharing, chat, and multi-computer control for free.
- Lightweight and Fast: With a file size of just 4MB, UltraViewer downloads and installs quickly, and it doesn’t slow down your computer .
- User-Friendly Interface: UltraViewer’s simple design makes it accessible to users of all technical levels .
- Wide Compatibility: Supports all major Windows operating systems, from Windows XP to Windows 11 .
- Secure Connections: Encrypted connections and automatic password resets ensure that your data is protected .
For most users, UltraViewer offers the perfect balance of features, ease of use, and affordability. The simple UltraViewer download process and intuitive interface make it a top choice for anyone in need of reliable remote control software.
Conclusion: Unlock the Power of Remote Control with UltraViewer
UltraViewer is a versatile, secure, and user-friendly remote control tool that makes it easy to connect with computers anywhere in the world. Whether you’re providing technical support, collaborating with colleagues, or helping family members, UltraViewer eliminates geographical barriers and streamlines the remote access process.
The key to getting the most out of UltraViewer is starting with a safe and successful UltraViewer download from the official website: https://ultraviewer-cn.com. By downloading from the official source, you ensure that you get the latest version of the software, free from malware or other security threats. Once installed, UltraViewer’s intuitive interface and powerful features make it easy to establish remote connections, share files, and communicate with other users.
In this tutorial, we’ve covered everything you need to know to use UltraViewer effectively—from the initial UltraViewer download and installation to advanced features like multi-computer control and custom settings. We’ve also provided security tips to protect your data and troubleshooting solutions to resolve common issues.
As remote work and collaboration continue to grow in importance, having a reliable remote control tool like UltraViewer is essential. With over 40 million downloads worldwide and a reputation for excellence, UltraViewer is a trusted choice for individuals, small businesses, and educational institutions alike .
So what are you waiting for? Complete your UltraViewer download today from https://ultraviewer-cn.com and start experiencing the convenience and flexibility of remote control technology. Whether you’re working from home, supporting clients, or staying connected with loved ones, UltraViewer has everything you need to stay productive and connected—no matter where you are in the world.