1. Introduction: Why UltraViewer Stands Out as a Top Remote Desktop Solution
In an era where remote work, technical support, and global collaboration have become indispensable, the demand for reliable, user-friendly, and cost-effective remote desktop software has skyrocketed. Among the myriad of options available, UltraViewer has emerged as a standout choice, trusted by over 100,000 users worldwide for its seamless performance, robust security, and intuitive design . Whether you’re a tech professional providing remote support to clients, a business owner managing distributed teams, or an individual helping family members troubleshoot their computers, UltraViewer delivers the tools needed to connect and collaborate from anywhere.
What sets UltraViewer apart from competitors like TeamViewer and AnyDesk? For starters, it offers a completely free version for personal use with no hidden restrictions, making it accessible to casual users . For businesses and power users, its paid plans are significantly more affordable—with options ranging from $45.88 to $95.88 per year—compared to the hundreds or thousands of dollars required for premium licenses of other software . Beyond cost, UltraViewer excels in core functionalities: lightning-fast connection speeds, military-grade AES-256 encryption, multi-monitor support, built-in chat and voice communication, and secure file transfer . It’s lightweight too, requiring only 2MB of storage space for installation, ensuring it doesn’t bog down your system .
The first step to unlocking these powerful features is a safe and reliable UltraViewer download. With countless third-party websites offering modified or outdated versions of remote desktop software—many of which carry malware, adware, or security vulnerabilities—choosing the official channel is non-negotiable. The only way to guarantee you’re getting the latest, most secure version of UltraViewer is to complete your UltraViewer download directly from the official website: https://ultraviewer-cn.com. This ensures you have access to all current features, critical security patches, and seamless compatibility with your operating system. Whether you’re using Windows, macOS, or even preparing for future Linux support, the official UltraViewer download portal provides tailored installers for every supported platform.
In this comprehensive tutorial, we’ll guide you through every aspect of UltraViewer—from the initial UltraViewer download and installation process to mastering advanced remote control techniques. We’ll cover step-by-step setup instructions for different devices, explore core and premium features in detail, share real-world use cases, and troubleshoot common issues. By the end, you’ll be equipped to leverage UltraViewer for efficient remote work, technical support, and collaboration—all starting with a secure UltraViewer download.
2. UltraViewer Download Guide: Safe Installation Across All Platforms
Before diving into UltraViewer’s features, it’s crucial to complete a proper UltraViewer download and installation. This section walks you through the process for Windows, macOS, and mobile devices, highlighting best practices to ensure a smooth setup. Remember, the official https://ultraviewer-cn.com is your only trusted source for UltraViewer download—avoid third-party links to protect your device and data.
2.1 Windows: UltraViewer Download and Installation (All Versions)
Windows remains the most widely used operating system for remote desktop access, and UltraViewer offers full compatibility with all modern Windows versions, including Windows XP, Vista, 7, 8, 10, and Windows Server editions . The UltraViewer download for Windows is optimized for both 32-bit and 64-bit systems, with an automatic detection feature to ensure you get the right installer.
Step-by-Step UltraViewer Download for Windows
- Access the Official Portal: Open your preferred browser (Chrome, Edge, Firefox, etc.) and navigate to https://ultraviewer-cn.com. The website’s clean, user-friendly interface makes finding the UltraViewer download section straightforward—no complicated navigation required.
- Select Windows Download: The homepage automatically detects your operating system, so you’ll see a prominent “Download for Windows” button. Click this to initiate the UltraViewer download. If the detection fails, scroll to the “Downloads” tab and manually select “Windows Desktop Version.”
- Monitor the Download Progress: The UltraViewer download file is approximately 2MB, so it will complete in seconds even on slower internet connections. You can track the progress in your browser’s download bar—look for the file named “UltraViewer_Setup.exe.”
- Run the Installer: Once the UltraViewer download finishes, locate the installer file in your “Downloads” folder (or the location you specified) and double-click it. A User Account Control (UAC) prompt may appear—click “Yes” to allow the installation.
- Complete the Setup Wizard: The installation wizard is intuitive and requires minimal input:
- Choose your preferred language (UltraViewer supports over 20 languages, including English, Spanish, French, and Chinese).
- Accept the End User License Agreement (EULA) to proceed.
- Select the installation directory (the default path is recommended for most users).
- Click “Install” and wait for the process to complete (typically 1–2 minutes).
- Launch UltraViewer: After installation, a shortcut will be created on your desktop. Check the “Launch UltraViewer” box before clicking “Finish” to open the software immediately. You’ll be greeted with the main interface, displaying your unique ID and temporary password—essential for remote connections.
Key Notes for Windows UltraViewer Download
- Compatibility Check: Ensure your Windows version meets the minimum requirements (Windows XP or later). For optimal performance, use Windows 10 or 11.
- Administrator Rights: If you encounter “permission denied” errors during installation, right-click the installer and select “Run as administrator.”
- Automatic Updates: After UltraViewer download and installation, enable automatic updates to receive the latest features and security patches. Go to “Settings” > “General” > “Check for updates automatically.”
2.2 macOS: UltraViewer Download and Setup (Latest Versions)
While UltraViewer was initially Windows-focused, the latest versions now support macOS (Catalina 10.15 and later), making it a versatile choice for cross-platform users . The UltraViewer download for macOS maintains the same lightweight design and core features as the Windows version, with adaptations for Apple’s operating system.
Step-by-Step UltraViewer Download for macOS
- Visit the Official Site: Open Safari or your preferred browser and go to https://ultraviewer-cn.com. The website will detect your macOS and display the “Download for Mac” button.
- Initiate the UltraViewer Download: Click “Download for Mac” to start downloading the .dmg installer file. The file size is around 3MB, so it will finish quickly.
- Mount the Installer: Locate the downloaded .dmg file (usually in the “Downloads” folder) and double-click it. A new window will open, showing the UltraViewer icon and the “Applications” folder.
- Install UltraViewer: Drag the UltraViewer icon into the “Applications” folder to complete the installation. This process copies the software to your applications directory, ensuring easy access.
- Authorize the App: macOS has strict security measures for apps downloaded outside the App Store. When you launch UltraViewer for the first time, you may see a warning: “UltraViewer cannot be opened because it is from an unidentified developer.” To resolve this:
- Go to “System Settings” > “Privacy & Security.”
- Scroll to the “Security” section and click “Open Anyway” (this option appears for a few minutes after the warning).
- Confirm by clicking “Open” in the subsequent prompt. This authorization is only required once.
- Set Up Preferences: Launch UltraViewer from the Applications folder. The first launch will prompt you to set your language and enable notifications (optional). Your unique ID and password will appear on the main screen—save these for future connections.
Key Notes for macOS UltraViewer Download
- macOS Version Check: UltraViewer supports macOS 10.15 (Catalina) and later. Older versions like Mojave or High Sierra may not run the latest UltraViewer updates.
- Firewall Permissions: Ensure your macOS firewall allows UltraViewer to communicate. Go to “System Settings” > “Network” > “Firewall” > “Options” and add UltraViewer to the allowed apps list.
- File Transfer Access: To enable file transfer between your Mac and remote devices, grant UltraViewer access to your files and folders in “System Settings” > “Privacy & Security” > “Files and Folders.”
2.3 Mobile Devices: UltraViewer Download for iOS and Android
While UltraViewer’s primary focus is desktop-to-desktop remote control, mobile apps (iOS and Android) allow you to access and manage remote computers on the go. The mobile UltraViewer download is available on official app stores, ensuring security and compatibility.
UltraViewer Download for iOS (iPhone/iPad)
- Open the App Store on your iOS device (iPhone or iPad running iOS 14.0 or later).
- Search for “UltraViewer Remote Control” (ensure the developer is “DucFabulous” to avoid impostor apps).
- Tap “Get” (or the cloud icon if you’ve downloaded it before) to start the UltraViewer download and installation.
- Once installed, open the app and log in with your UltraViewer account (or create one for free).
- To connect to a remote computer, enter the host’s ID and password—you’ll have access to basic remote control, screen sharing, and chat features.
UltraViewer Download for Android
- Open the Google Play Store on your Android device (running Android 9.0 or later).
- Search for “UltraViewer” and select the official app by DucFabulous.
- Tap “Install” to begin the UltraViewer download. The app is lightweight (under 5MB) and won’t consume excessive storage.
- After installation, launch the app and grant necessary permissions (screen recording, file access, and network access) to enable full functionality.
- Enter the remote computer’s ID and password to establish a connection. The Android app supports advanced features like file transfer and multi-monitor navigation.
2.4 Troubleshooting Common UltraViewer Download Issues
Even with a straightforward process, you may encounter issues during UltraViewer download or installation. Here are solutions to the most frequent problems:
- Slow Download Speed: If the UltraViewer download is taking longer than expected, switch to a wired internet connection or close bandwidth-heavy apps (streaming services, cloud backups). Refresh the https://ultraviewer-cn.com page and restart the download.
- Corrupted Installer: A failed or corrupted UltraViewer download can cause installation errors. Delete the incomplete file, clear your browser cache, and re-download from the official site. For macOS, verify the .dmg file’s checksum if available.
- Installation Failed on Windows: Ensure you have enough disk space (at least 10MB free) and administrator rights. Disable antivirus software temporarily (some tools flag legitimate UltraViewer installers as false positives) and retry.
- macOS “Unidentified Developer” Error: Follow the steps in Section 2.2 to authorize the app via System Settings. Avoid third-party UltraViewer download sources, as they may distribute modified, unsafe versions.
- Mobile App Crashes: After UltraViewer download on iOS or Android, ensure your device’s operating system is up to date. Uninstall and reinstall the app if crashes persist, and contact UltraViewer support if the issue continues.
3. Mastering UltraViewer: Core Features and Step-by-Step Usage
Once you’ve completed your UltraViewer download and installation, it’s time to explore its powerful features. UltraViewer’s strength lies in its simplicity—even users with limited technical experience can set up remote connections in minutes—while still offering advanced tools for professionals. This section breaks down the core functionalities with step-by-step guides.
3.1 Understanding the UltraViewer Interface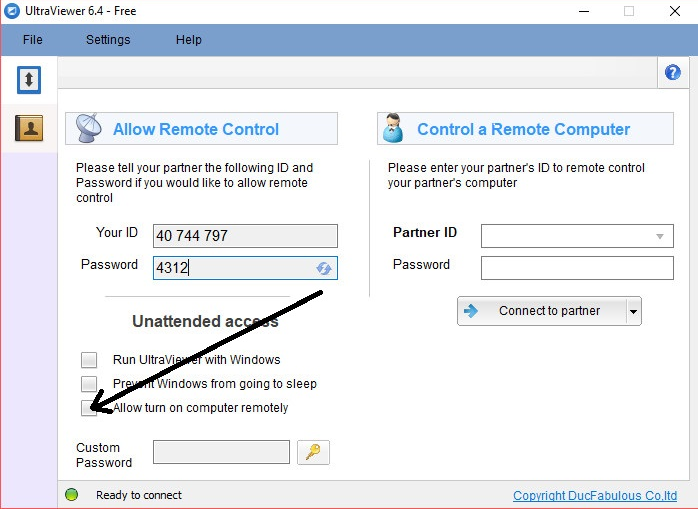
The UltraViewer interface is designed for clarity and efficiency, with all key features accessible from the main window. Familiarize yourself with these elements before making your first connection:
- Your ID and Password: The top section of the main window displays your unique, permanent ID and a temporary password (automatically regenerated when you restart UltraViewer). Share these with others to allow them to control your computer remotely.
- Partner ID and Password Fields: Below your credentials, enter the remote computer’s ID and password to initiate a connection.
- Connection Buttons: “Connect” (to control the remote computer) and “File Transfer” (to exchange files without full remote control) are prominently displayed.
- Menu Bar: Access “Settings,” “Language,” “Help,” and “Exit” from the menu bar. The “Settings” tab allows customization of hotkeys, display quality, security options, and more.
- Chat Window: Once connected, a floating chat window appears, enabling real-time text communication with the remote user .
- Toolbar: During a remote session, a toolbar at the top of the screen provides quick access to screen sharing, file transfer, screenshot, and disconnect options.
3.2 Initiating and Accepting Remote Connections
The primary function of UltraViewer is remote control, and the process is straightforward for both the controller (local user) and the host (remote user).
For the Controller (Initiating a Connection)
- Ensure both you and the remote user have completed UltraViewer download and installation, and the software is running on both computers.
- Ask the remote user to share their UltraViewer ID and password (displayed on their main window).
- Enter the remote ID and password into the corresponding fields on your UltraViewer interface.
- Click “Connect” to establish the connection. You may see a prompt asking for confirmation—click “OK” to proceed.
- Within a few seconds (depending on internet speed), the remote computer’s screen will appear on your monitor. You can now control the mouse and keyboard as if you were sitting in front of it .
For the Host (Accepting a Connection)
- Run UltraViewer and share your ID and password with the controller (only share with trusted individuals).
- When the controller initiates the connection, you’ll receive a pop-up notification asking for permission. Click “Allow” to grant access.
- You can monitor all activities of the controller in real time—their mouse movements and keystrokes are visible on your screen .
- To regain control at any time, simply move your mouse or press any key—the controller’s access will be temporarily paused until you release control.
- To end the session, click “Disconnect” in the UltraViewer toolbar or close the software entirely.
3.3 Key Features Explained: From Basic to Advanced
UltraViewer offers a comprehensive suite of features to enhance remote collaboration and support. Below are the most useful tools, with step-by-step usage guides:
3.3.1 Secure File Transfer
Transferring files between local and remote computers is seamless with UltraViewer, and all transfers are encrypted with AES-256 security to protect sensitive data .
- Initiate File Transfer:
- Enter the remote user’s ID and password, then click “File Transfer” (instead of “Connect”) to open the file transfer window.
- The window is split into two panels: left (your local files) and right (the remote computer’s files).
- Navigate to the file/folder you want to send, select it, and click “Send” (or drag and drop it into the remote panel).
- The transfer progress is displayed, and both users receive a notification when it’s complete.
- Transfer During Remote Session:
- While controlling a remote computer, click the “File Transfer” icon in the session toolbar.
- Follow the same steps as above to send or receive files. This is ideal for troubleshooting—you can send drivers, software installers, or documents directly to the remote device.
3.3.2 Screen Sharing and Display Customization
UltraViewer allows you to share your screen with the remote user or view theirs in high quality, with options to adjust display settings for better performance.
- Adjust Display Quality:
- During a remote session, click the “Display” icon in the toolbar.
- Select from “High Quality” (best for static content), “Balanced” (default, ideal for most tasks), or “Low Quality” (for slow internet connections to reduce latency).
- Full-Screen Mode:
- Click the “Full-Screen” button in the session toolbar to expand the remote screen to your entire monitor.
- Press “Esc” to exit full-screen mode.
- Multi-Monitor Support:
- If the remote computer has multiple monitors, click the “Monitor” icon in the toolbar to select which screen you want to control.
- You can switch between monitors seamlessly or view all monitors at once (select “All Monitors” from the dropdown) .
3.3.3 Built-in Chat and Voice Communication
Clear communication is essential during remote support or collaboration, and UltraViewer integrates text and voice chat to eliminate the need for separate communication tools .
- Text Chat:
- During a remote session, the floating chat window is visible by default. If not, click the “Chat” icon in the toolbar.
- Type your message in the input field and press “Enter” to send. Both users can see the conversation in real time.
- To minimize the chat window, click the “-” button—you can reopen it anytime from the toolbar.
- Voice Chat:
- For verbal communication, click the “Voice Chat” icon in the session toolbar.
- Ensure your microphone and speakers are connected and selected in UltraViewer’s “Settings” > “Audio” tab.
- The voice chat uses minimal bandwidth, ensuring clear audio even on moderate internet connections.
3.3.4 Screenshot and Session Recording
Capture important moments or document troubleshooting steps with UltraViewer’s built-in screenshot and session recording features.
- Take a Screenshot:
- During a remote session, click the “Screenshot” icon in the toolbar.
- Select the area of the screen you want to capture (or choose “Full Screen”).
- The screenshot is automatically saved to your default “Pictures” folder (Windows) or “Photos” app (macOS). You can also copy it to the clipboard and paste it into a document or chat.
- Record a Session:
- Click the “Record” icon in the session toolbar to start recording. A red dot indicates the recording is in progress.
- To stop recording, click the “Stop” icon. The video file (in MP4 format) is saved to your specified directory.
- Session recording is useful for training purposes, documenting technical issues, or keeping a record of client support interactions.
3.3.5 Unattended Access (Premium Feature)
For users who need to access their own computers remotely (e.g., accessing work files from home) or provide ongoing support to clients, UltraViewer’s unattended access feature is invaluable. This requires a premium license.
- Set Up Unattended Access:
- Go to “Settings” > “Security” > “Unattended Access.”
- Enable the feature and set a permanent password (different from the temporary session password).
- Save the settings—you can now access the computer remotely without the host being present or granting permission each time.
- To connect, enter the remote computer’s ID and your set unattended password into your UltraViewer interface and click “Connect.”
3.3.6 Customizable Hotkeys
UltraViewer allows you to customize hotkeys for common actions, streamlining your workflow during remote sessions.
- Configure Hotkeys:
- Go to “Settings” > “Hotkeys.”
- Select the action you want to assign a hotkey to (e.g., “Disconnect,” “Full Screen,” “File Transfer”).
- Press the desired key combination (e.g., Ctrl+F for full screen) and click “Save.”
- You can also import/export hotkey settings if you use UltraViewer on multiple devices .
4. UltraViewer for Different Use Cases: Tips and Best Practices
UltraViewer’s versatility makes it suitable for a wide range of scenarios, from personal use to enterprise-level support. Below are tailored tips and best practices for the most common use cases, all built on the foundation of a secure UltraViewer download.
4.1 Personal Use: Helping Friends and Family
Many people use UltraViewer to assist friends or family members with computer issues—no need to travel or walk them through steps over the phone.
- Best Practices:
- Share your UltraViewer ID and password only with trusted individuals. Avoid sharing with strangers to prevent unauthorized access.
- Use the “View Only” mode (available in settings) if you just need to show something instead of controlling the remote computer.
- For less tech-savvy users, guide them through the UltraViewer download process via phone call. The lightweight installer and simple interface make it easy for them to set up.
- Use the chat feature to explain your actions as you troubleshoot—this helps the other user understand what’s being done and why.
- Example Scenario: Your parents are struggling to install a new photo editing software on their Windows PC. You walk them through UltraViewer download from https://ultraviewer-cn.com, get their ID and password, connect remotely, and install the software for them. You can also show them how to use basic features via screen sharing and chat.