In an era where remote work, technical support, and long-distance collaboration have become mainstream, a reliable remote control tool is no longer a luxury but a necessity. UltraViewer stands out as a lightweight, secure, and user-friendly solution, trusted by millions of users worldwide for its stable connection, low latency, and comprehensive features. However, to unlock its full potential and avoid security risks, the first critical step is to complete a safe and official UltraViewer download. This article provides a detailed, up-to-date guide for 2025, covering everything from platform-compatible UltraViewer download steps to basic setup, core functions, and practical application scenarios. Whether you’re a remote worker, IT technician, or someone needing to assist family members with device issues, this tutorial will help you master UltraViewer like a pro.
I. Why Choose Official UltraViewer Download? Safety, Completeness, and Reliability
1. Absolute Security Against Malware
2. Access to the Latest, Feature-Complete Version
3. Comprehensive Technical Support
II. 2025 UltraViewer Download: Step-by-Step Guide for All Platforms
1. UltraViewer Download for Windows (10/11)
- Step 1: Open your preferred browser (Chrome, Edge, Firefox, etc.) and navigate to the official UltraViewer download page via https://ultraviewer-cn.com. The website automatically detects your operating system, so you won’t need to manually select the Windows version.
- Step 2: Locate the “Download for Windows” button on the homepage (prominently displayed in the center or under the “Download” tab). Click it to start the download. The installer size is approximately 5MB, making the UltraViewer download quick even on slow networks.
- Step 3: Once the download is complete, find the installer file (usually named “UltraViewer_Setup.exe”) in your browser’s download folder. Double-click the file to launch the installation wizard.
- Step 4: The wizard will guide you through the process. First, accept the user agreement, then choose an installation directory (the default path is recommended for most users to avoid compatibility issues). You can also select whether to create a desktop shortcut for quick access.
- Step 5: Click “Install” and wait for the process to finish (typically 1-2 minutes). Once installed, UltraViewer will launch automatically, and you’ll see a desktop shortcut for future use.
2. UltraViewer Download for Mac (macOS 11+)
- Step 1: Visit https://ultraviewer-cn.com using Safari or Chrome. The website will detect your Mac system and display the “Download for Mac” button.
- Step 2: Click the button to download the .dmg installer file. Unlike Windows, Mac downloads do not require additional plugins— the file will save directly to your “Downloads” folder.
- Step 3: Double-click the .dmg file to mount the installer. A new window will open, showing the UltraViewer icon and the “Applications” folder icon.
- Step 4: Drag the UltraViewer icon into the “Applications” folder to complete the installation. This is the standard Mac installation method, ensuring the app is properly integrated into your system.
- Step 5: Navigate to the “Applications” folder and launch UltraViewer. The first time you open it, macOS may prompt you to allow access (since UltraViewer is not downloaded from the App Store). Go to “System Settings > Privacy & Security” and click “Open Anyway” to authorize the app.
3. UltraViewer Download for Android (Android 8.0+)
- Step 1: There are two official ways to complete UltraViewer download for Android:
- Option 1: Visit https://ultraviewer-cn.com via your Android browser. Tap the “Download for Android” button, which will redirect you to the official Google Play Store page (for global users) or a secure direct download link (for regions where Play Store is unavailable).
- Option 2: Open the Google Play Store, search for “UltraViewer Remote Control,” and select the official app (developed by “UltraViewer Team”). Tap “Install” to start the download.
- Step 2: Once downloaded, the app will install automatically. After installation, open UltraViewer and grant the necessary permissions (camera, microphone, storage, and accessibility) to enable full functionality—these permissions are required for remote control, file transfer, and video calls.
- Step 3: Log in with your UltraViewer account (or create one for free) to sync settings across devices. The mobile interface is streamlined for touchscreens, with large buttons for easy navigation.
4. UltraViewer Download for iOS (iPhone/iPad)
- Step 1: Open the App Store on your iOS device and search for “UltraViewer.” Select the official app and tap “Get” to start the download.
- Step 2: Alternatively, visit https://ultraviewer-cn.com via Safari and tap “Download for iOS” to redirect to the App Store.
- Step 3: After installation, open UltraViewer and log in. You’ll need to enter the ID and password of the computer you want to control (provided by the host device) to establish a connection.
III. Post-Download Setup: 5-Minute Configuration for Remote Control
1. Host Setup (Device to Be Controlled)
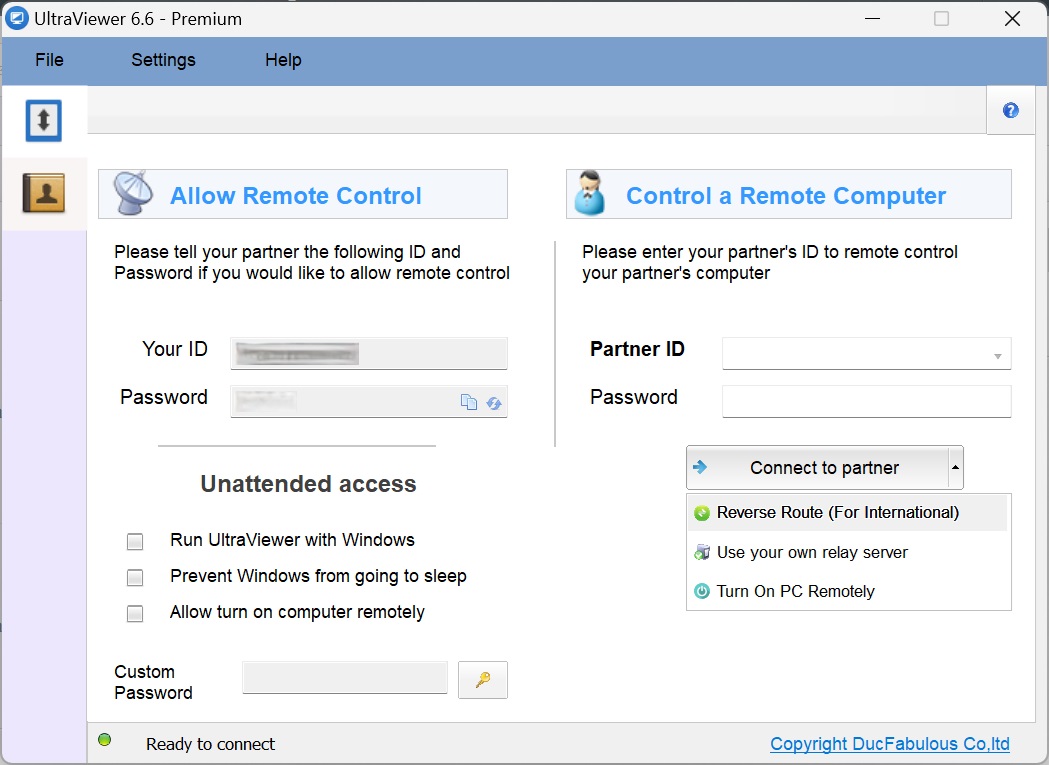
- Step 1: Launch UltraViewer. You’ll see a main interface displaying your “ID” and “Password”—these are unique credentials that clients will use to connect to your device.
- Step 2: Customize your password (optional but recommended). Click the “Change Password” button to set a memorable, secure password (avoid simple combinations like “123456”). This prevents unauthorized access.
- Step 3: Configure security settings. Go to “Settings > Security” and enable “Allow only trusted clients” if you want to restrict access to specific users. You can also set a session time limit or enable two-factor authentication for added security.
- Step 4: Adjust connection settings. In “Settings > Connection,” you can choose the image quality (High/Medium/Low) to balance speed and clarity—lower quality is ideal for slow networks. You can also enable “Auto-accept connections” if you frequently collaborate with the same clients (not recommended for public devices).
2. Client Setup (Device Initiating Control)
- Step 1: Open UltraViewer and enter the host’s “ID” and “Password” in the “Control Remote PC” section. Double-check the credentials to avoid connection errors.
- Step 2: Click “Connect” to establish the remote session. The first time you connect, the host may need to accept the request (unless “Auto-accept” is enabled).
- Step 3: Once connected, you’ll see the host’s screen in your UltraViewer window. Familiarize yourself with the control toolbar at the top of the screen, which includes options for file transfer, chat, screen recording, and more.
3. Network Requirements for Stable Connection
- Use a broadband connection with a minimum speed of 1 Mbps (upload and download).
- Avoid public Wi-Fi networks for sensitive tasks, as they may be insecure or slow.
- If connecting to a remote device behind a firewall, ensure the host has allowed UltraViewer through their firewall settings (the installer usually does this automatically, but manual configuration may be needed for corporate networks).
IV. Core Features of UltraViewer: How to Maximize Productivity
1. Remote Control: Full Access to Another Device
- How to use: After connecting to the host device, you can use your mouse and keyboard to navigate the remote screen. The control is real-time with low latency (typically <0.5 seconds for stable networks).
- Useful tips:
- Use the “Full Screen” button in the toolbar to expand the remote screen for better visibility.
- Enable “Disable Remote Keyboard/Mouse” if you want to prevent the host from interfering during the session (e.g., when troubleshooting).
- Use the “Ctrl+Alt+Del” shortcut (available in the toolbar) to access the host’s task manager or login screen.
2. File Transfer: Securely Share Files Between Devices
- How to use:
- Click the “File Transfer” button in the toolbar to open the file manager.
- The left panel shows your local files, and the right panel shows the host’s files. Navigate to the desired folder on both sides.
- Select the files you want to transfer, then click “Send” (client to host) or “Receive” (host to client). The transfer progress is displayed in a pop-up window.
- Key advantages:
- Supports large files (up to 4GB per transfer) with resume capability—if the connection is interrupted, the transfer will pick up where it left off.
- All files are encrypted during transfer, ensuring data security.
- No file size restrictions for UltraViewer Pro users (free users can transfer up to 100MB per file).
3. Remote Chat: Real-Time Communication During Sessions
- How to use: Click the “Chat” button in the toolbar to open the chat window. Type your message and press Enter to send it to the host. The host can reply directly in the same window.
- Features:
- Supports text messages, emojis, and file attachments (e.g., screenshots of issues).
- Chat history is saved locally on both devices for future reference.
- For voice communication, use the “Voice Call” button (requires microphone access on both devices).
4. Screen Recording & Screenshot: Document Sessions for Reference
- How to use:
- Screen recording: Click the “Record” button in the toolbar to start recording. Click “Stop” when done— the video will be saved as an MP4 file in your default download folder.
- Screenshot: Click the “Screenshot” button to capture the current remote screen. The image is saved as a PNG file and can be edited or shared directly.
- Pro tips:
- Adjust recording quality in “Settings > Recording” to save storage space (low quality is sufficient for most troubleshooting sessions).
- Enable “Auto-record sessions” if you need to document all remote interactions (ideal for IT teams).
5. Multi-Session Management: Control Multiple Devices Simultaneously
- How to use:
- Connect to the first host device as usual.
- To add another session, click “File > New Connection” and enter the second host’s ID and password.
- Switch between sessions using the tabs at the top of the UltraViewer window.
- Limitations: Free users can only have one active session at a time—upgrade to UltraViewer Pro for unlimited multi-session support.
V. Practical Application Scenarios: UltraViewer in Daily Use
1. IT Technical Support: Assist Clients Remotely
- Step-by-step workflow:
- Ask the client to complete UltraViewer download from https://ultraviewer-cn.com and install it on their device.
- Have the client share their UltraViewer ID and password with you (via phone, email, or chat).
- Enter the credentials in your UltraViewer and click “Connect.”
- Once connected, diagnose the issue (e.g., software errors, system crashes, or network problems) using remote control.
- Use the file transfer feature to send troubleshooting tools or updated software to the client’s device.
- Record the session (with the client’s permission) for documentation, then disconnect once the issue is resolved.
2. Remote Work: Access Your Office Computer From Anywhere
- Step-by-step setup:
- Install UltraViewer on your office computer (host) and home computer/mobile device (client).
- Configure the office computer’s UltraViewer settings: enable “Auto-accept connections,” set a secure password, and ensure it’s connected to the internet.
- From your client device, enter the office computer’s ID and password to connect.
- Access your work files, use professional software (e.g., Adobe Creative Suite, AutoCAD), or log into internal company systems—all as if you were at your desk.
- Use the file transfer feature to sync work files between your office and client devices (e.g., save a draft from home to your office computer for later editing).
3. Assisting Family Members: Help Loved Ones With Tech Issues
- Step-by-step guide:
- Walk your family member through the UltraViewer download and installation process via phone call. For simplicity, share the official link https://ultraviewer-cn.com via text message.
- Ask them to open UltraViewer and read out their ID and password (write them down to avoid mistakes).
- Connect to their device and resolve the issue—e.g., install software, troubleshoot internet connectivity, or organize files.
- Use the chat feature to explain what you’re doing step-by-step, so they can learn for future reference.
- Disconnect once the issue is fixed, and remind them to keep UltraViewer installed for future assistance.
4. Team Collaboration: Work Together on Shared Projects
- Step-by-step workflow:
- All team members complete UltraViewer download and create accounts.
- The host (e.g., the designer) shares their ID and password with the team.
- Team members connect to the host’s device and view the shared screen.
- Use the chat or voice call feature to discuss changes, and the host can make edits in real-time based on feedback.
- Use the file transfer feature to share project files (e.g., design drafts, code snippets) between team members.
VI. Common UltraViewer Download & Usage Issues (2025 Solutions)
1. UltraViewer Download Is Slow or Fails
- Possible causes: Poor network connection, browser cache issues, or server congestion.
- Solutions:
- Switch to a stable Wi-Fi or Ethernet connection (avoid mobile data for large downloads).
- Clear your browser’s cache and cookies, then restart the download from https://ultraviewer-cn.com.
- Try downloading at off-peak hours (e.g., late at night or early morning) to avoid server congestion.
- If the download fails repeatedly, use a different browser (Chrome or Edge are recommended).
2. Installation Fails or UltraViewer Won’t Launch
- Possible causes: Antivirus/firewall blocking the installer, outdated system version, or residual files from a previous installation.
- Solutions:
- Temporarily disable your antivirus/firewall during installation (remember to re-enable them afterward).
- Check if your system meets the minimum requirements (Windows 10+, macOS 11+, Android 8.0+).
- Uninstall any previous versions of UltraViewer, delete residual files (via a tool like CCleaner), and restart your device before re-downloading.
3. Cannot Establish a Remote Connection
- Possible causes: Incorrect ID/password, network firewall restrictions, or host device offline.
- Solutions:
- Double-check the host’s ID and password (ensure there are no typos or extra spaces).
- Ask the host to verify their internet connection and ensure UltraViewer is running.
- If the host is on a corporate network, ask their IT team to allow UltraViewer through the firewall (port 5900 and 5901 are used for connections).
- Try disabling VPNs on both devices, as they can interfere with the connection.
4. Remote Screen Is Laggy or Blurry
- Possible causes: Slow internet speed, high image quality settings, or too many background apps.
- Solutions:
- Reduce the image quality in UltraViewer’s connection settings (switch from High to Medium/Low).
- Close unnecessary background apps on both the client and host devices to free up bandwidth.
- Use a wired Ethernet connection instead of Wi-Fi for better stability.
5. File Transfer Fails or Is Slow
- Possible causes: Large file size, unstable connection, or insufficient storage on the target device.
- Solutions:
- Split large files into smaller parts (e.g., using WinRAR) before transferring.
- Pause other downloads or streaming services during the file transfer.
- Check that the target device has enough storage space (free up space if needed).