In the era of remote work and global collaboration, reliable remote desktop software has become an indispensable tool for individuals, IT professionals, and businesses alike. UltraViewer stands out as a lightweight, user-friendly, and secure solution that simplifies remote access, technical support, and screen sharing across Windows devices. Whether you need to assist family members with computer issues, manage office computers while traveling, or provide real-time IT support to clients, UltraViewer delivers consistent performance and essential features—all for free. However, to unlock its full potential and ensure a secure experience, a proper UltraViewer download from an official source is crucial. This comprehensive 2025 user guide will walk you through every aspect of UltraViewer, from safe UltraViewer download and installation to advanced usage techniques, helping you master remote control with confidence.
1. Why Choose UltraViewer in 2025? Core Advantages and Latest Updates
Before diving into the UltraViewer download and usage process, it’s essential to understand why this software remains a top choice for remote desktop needs in 2025. UltraViewer has undergone continuous iterations, with the latest version (6.6.124 as of 2025) introducing critical improvements in speed, security, and functionality that set it apart from competitors like TeamViewer and AnyDesk.
1.1 Key Features of 2025 UltraViewer
UltraViewer’s popularity stems from its balance of simplicity and power, catering to both casual users and IT professionals:
- Secure Remote Access: Enjoy end-to-end 256-bit AES encryption for all data transmissions, including remote control sessions, file transfers, and chat communications . The software generates unique random IDs and passwords for each session, with customizable password lengths (4-8 digits/characters) to prevent brute-force attacks .
- Enhanced Performance: The 2025 version boasts 8-20 times faster connection speeds compared to older iterations, with optimized CPU usage that reduces system load by 2-3 times . It supports up to 65,000 colors for high-quality screen rendering, ensuring clear visibility during remote sessions .
- Multi-Monitor Support: Seamlessly switch between multiple remote monitors with a left-click or view all monitors simultaneously with a right-click, solving the common issue of incorrect mouse positioning across displays .
- Unattended Access: Set UltraViewer to start with Windows and configure a private custom password for unattended access—ideal for managing servers or accessing your home computer while away .
- File Transfer & Collaboration: Drag-and-drop files between local and remote devices, share clipboards for text/image transfer, and use built-in chat or voice calls to communicate in real time during sessions .
- Session Recording & Screenshots: Capture screenshots of remote screens or record entire sessions for documentation, training, or auditing purposes .
- DPI Compatibility: Fixed issues with DPI settings above 150% that previously caused UI glitches in the address book and chat windows, ensuring smooth operation on high-resolution displays .
1.2 2025 Latest Updates
The 2025 UltraViewer updates focus on security, stability, and user experience, making it more reliable than ever:
- Captcha/Security Check: Added an extra layer of security to prevent unauthorized access attempts .
- Parallel Server Model: Rebuilt servers to ensure stable connections—if one server goes down, UltraViewer automatically switches to another to avoid session drops .
- Improved Video Playback: Fixed issues with resuming recorded video sessions and added the ability to jump to specific positions in playback .
- Language Support: Updated language files for Croatian, Turkish, Swedish, and Indonesian, expanding accessibility for global users .
- Installation Enhancements: Upgraded to Inno Setup Compiler 6, resolving previous installation bugs and adding support for Vietnamese setup language .
These features and updates make UltraViewer a versatile tool for personal and professional use. However, none of these benefits can be fully enjoyed without a safe UltraViewer download from the official channel—avoiding third-party sites that may bundle malware or distribute outdated versions.
2. UltraViewer Download: Safe, Official Channels for 2025
The first step to using UltraViewer is a secure UltraViewer download. With cyber threats on the rise, downloading software from untrusted sources puts your device and data at risk of viruses, spyware, and data breaches. Below is a detailed guide to the official UltraViewer download process for all supported Windows systems, along with key precautions to ensure a safe installation.
2.1 Supported Operating Systems
UltraViewer is fully compatible with all Windows versions, including:
- Windows XP (32-bit/64-bit)
- Windows 7 (32-bit/64-bit)
- Windows 8/8.1 (32-bit/64-bit)
- Windows 10 (32-bit/64-bit)
- Windows 11 (32-bit/64-bit)
- Windows Server (all editions)
Note: As of 2025, UltraViewer does not support Android, iOS, macOS, or Linux devices. The development team has confirmed plans to release an Android-compatible version in the future, but updates will be announced exclusively on the official website . For now, focus on the Windows UltraViewer download process outlined below.
2.2 Official UltraViewer Download Steps
The only trusted source for UltraViewer download is the official website. Follow these steps to get the latest 2025 version safely:
- Prepare Your Device: Ensure your Windows computer meets the minimum system requirements:
- Processor: 1 GHz or higher
- RAM: 2 GB or more
- Free storage: At least 100 MB
- Stable internet connection (for download and remote sessions)
- Access the Official Download Page: Open your preferred browser (Chrome, Edge, Firefox, etc.) and navigate to the official UltraViewer download link: https://ultraviewer-cn.com. This link guarantees access to the latest, malware-free version of the software.
- Initiate the Download: On the official page, the website will automatically detect your Windows version (32-bit or 64-bit) and display a prominent “Download Now” button. Click this button to start the UltraViewer download. The installation file is only 3.5 MB, so the download should complete in seconds even on slow internet connections .
- Locate the Installation File: Once the download finishes, find the setup file (named “UltraViewer_Setup.exe” by default) in your browser’s download folder or the location you specified for downloads.
2.3 UltraViewer Download Precautions
To avoid risks during UltraViewer download, keep these tips in mind:
- Avoid Third-Party Sites: Never download UltraViewer from file-sharing platforms, unknown blogs, or pop-up ads. These sources often distribute pirated versions with malware or 捆绑软件 (bundled software) that can compromise your device .
- Verify the File Integrity: After download, check the file size (should be around 3.5 MB) and ensure the file extension is “.exe” (not “.exe.zip” or other suspicious formats).
- Disable Unnecessary Antivirus Interference: Some antivirus programs may falsely flag the UltraViewer setup file as suspicious. If this happens, temporarily disable the antivirus (only if you’re certain you’re using the official link) or add the file to your antivirus whitelist .
By following these steps, you can complete a safe UltraViewer download and proceed to installation with confidence.
3. Step-by-Step Installation Guide for 2025 UltraViewer
Once you’ve completed the UltraViewer download, the installation process is straightforward and takes only a few minutes. Follow this step-by-step guide to ensure a smooth setup on your Windows device:
3.1 Installation Process
- Run the Setup File: Double-click the “UltraViewer_Setup.exe” file you downloaded. If Windows prompts you for permission to run the file (User Account Control), click “Yes” to proceed .
- Select Installation Language: The setup wizard will first ask you to choose a language. UltraViewer supports multiple languages, including English, Vietnamese, Croatian, Turkish, and Swedish. Select your preferred language (e.g., English) and click “OK” .
- Accept the License Agreement: Read the end-user license agreement (EULA) carefully. To continue, check the box next to “I agree to the terms of the license agreement” and click “Next” .
- Choose Installation Location: By default, UltraViewer will be installed in “C:\Program Files\UltraViewer”. If you want to install it in a different folder (e.g., D:\Programs), click “Browse” to select a new location. Ensure the target drive has at least 100 MB of free space, then click “Next” .
- Create Desktop Shortcut: Select the option to “Create a desktop shortcut” if you want quick access to UltraViewer. You can also choose to add UltraViewer to the Start Menu. Click “Next” to proceed.
- Start the Installation: Review your settings (language, installation path, shortcuts) and click “Install” to begin the process. The setup wizard will copy files to your computer, and a progress bar will show the installation status .
- Complete Installation: Once the installation is finished, check the box next to “Launch UltraViewer” if you want to open the software immediately. Click “Finish” to close the setup wizard.
3.2 Post-Installation Setup
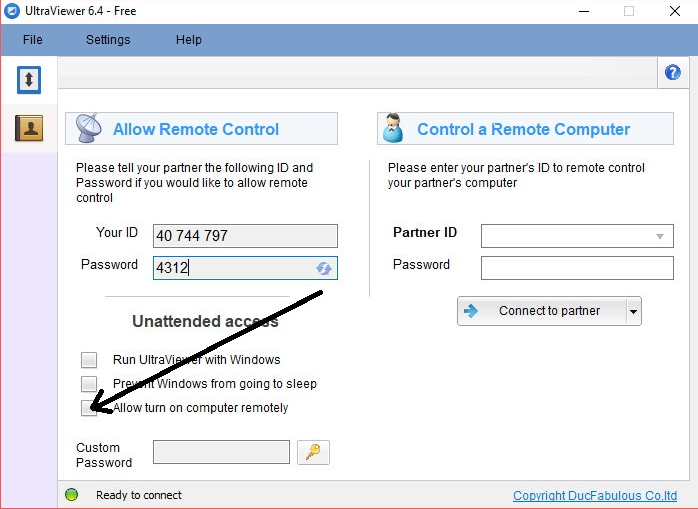
After launching UltraViewer for the first time, you’ll see the main interface with two key sections:
- Your ID & Password: This is your device’s unique identifier and temporary password for remote access. Share these with others if you want them to control your computer .
- Partner ID & Password: Enter the ID and password of the remote computer you want to control here .
Before using UltraViewer, take a moment to configure basic settings:
- Click “Settings” (gear icon) in the top-right corner of the interface.
- Navigate to “Options” > “Access” and enable “Run UltraViewer with Windows” if you want unattended access .
- Set a custom password for unattended access (6-8 digits/characters recommended) for added security.
- Adjust other settings like notification preferences, chat options, and screen resolution to match your needs .
3.3 Common Installation Issues & Solutions
If you encounter problems during installation after UltraViewer download, here are quick fixes for common issues:
- Installation Failed (Missing DLL Files): This usually occurs due to missing Visual C++ runtime libraries. Download and install the latest Visual C++ Redistributable from Microsoft’s official website, then restart the UltraViewer installation .
- Setup File Won’t Run: Ensure you’re using an administrator account. Right-click the setup file and select “Run as administrator” to bypass permission issues .
- Antivirus Blocks Installation: Temporarily disable your antivirus (only if you downloaded from https://ultraviewer-cn.com) or add the setup file to the antivirus whitelist. Most reputable antivirus programs will recognize the official UltraViewer file as safe once whitelisted .
- Insufficient Storage: Free up space on your target drive by deleting unnecessary files. UltraViewer only requires 100 MB, so even small storage 清理 (cleanups) will suffice .
4. Basic UltraViewer Usage: Step-by-Step Tutorial for Beginners
Now that you’ve completed UltraViewer download and installation, let’s explore the core functions that make remote access simple. This section covers the most common use cases, including remote control, file transfer, screen sharing, and chat—all with easy-to-follow steps.
4.1 Initiating a Remote Control Session
Remote control is UltraViewer’s primary function, allowing you to take full control of another Windows computer. Here’s how to set it up:
- On the Remote Computer (Host):
- Launch UltraViewer and locate the “Your ID” and “Password” fields in the main interface. These are automatically generated each time the software opens .
- Share the ID and password with the person who will control the computer (e.g., via phone, email, or messaging app). For unattended access, ensure the host computer has “Run UltraViewer with Windows” enabled and a custom password set .
- On the Local Computer (Controller):
- Open UltraViewer and enter the host’s “Partner ID” in the corresponding field.
- Enter the host’s password in the “Password” field.
- Click the “Connect” button (blue arrow icon) to initiate the session .
- During the Session:
- Once connected, you’ll see the remote computer’s screen in a new window. You can control the mouse and keyboard as if you were sitting in front of the host computer .
- Use the toolbar at the top of the remote screen window to access additional features:
- Full Screen: Click the “Full Screen” button to expand the remote screen to your entire display .
- Screenshot: Capture a screenshot of the remote screen by clicking the camera icon .
- Record: Click the “Record” button to start recording the session (saved as a video file on your local computer) .
- Switch Monitor: Left-click the “Switch Monitor” button to toggle between multiple remote monitors; right-click to view all monitors .
- Turn Off Remote Monitor: Go to “Tools” > “Turn Off Monitor” to turn off the host’s screen for privacy .
- Ending the Session:
- Click the “X” button in the top-right corner of the remote screen window.
- Confirm you want to end the session by clicking “Yes”. The host will receive a notification that the connection has been terminated .
4.2 Transferring Files Between Devices
UltraViewer makes file transfer secure and simple, with no size limits (depending on your internet speed). Here’s how to send or receive files during a remote session:
- During an Active Remote Session:
- Click the “File Transfer” button (folder icon) in the toolbar of the remote screen window.
- A file transfer window will open, showing your local computer’s files on the left and the remote computer’s files on the right .
- To send a file from your local computer to the remote device: Select the file/folder on the left, click “Send”, and choose a destination folder on the remote computer.
- To receive a file from the remote computer: Select the file/folder on the right, click “Receive”, and choose a destination folder on your local device.
- The transfer progress will be displayed, and you’ll get a notification when the transfer is complete .
- File Transfer Without Remote Control:
- If you only need to transfer files (not control the remote computer), open UltraViewer and enter the host’s ID and password.
- Click the “File Transfer” button (instead of “Connect”) to open the file transfer window directly.
- Follow the same steps as above to send or receive files .
4.3 Using Built-in Chat & Voice Communication
Clear communication is essential during remote support or collaboration. UltraViewer’s built-in chat and voice features eliminate the need for separate messaging apps:
- Chat During a Session:
- Click the “Chat” button (speech bubble icon) in the toolbar of the remote screen window.
- A chat window will open, allowing you to send text messages to the host .
- Use hotkey F1 to toggle the chat window on/off quickly during remote control .
- You can also drag and drop files into the chat window to send them (alternate method for file transfer) .
- Voice Calls:
- For real-time voice communication, click the “Voice Call” button (microphone icon) in the toolbar.
- Ensure both devices have microphones and speakers enabled. UltraViewer uses encrypted voice transmission to protect privacy .
- Click the “End Call” button to disconnect the voice chat.
4.4 Screen Sharing (Host View Only)
If you want to share your screen with a remote user without giving them control, use UltraViewer’s screen sharing feature:
- On Your Computer (Sharer):
- Launch UltraViewer and share your “ID” and “Password” with the remote user (viewer).
- In the UltraViewer interface, go to “Settings” > “Options” > “Security” and uncheck “Allow remote control”. This restricts the viewer to only seeing your screen .
- On the Remote Computer (Viewer):
- Enter the sharer’s ID and password in UltraViewer and click “Connect”.
- The viewer will see your screen in real time but cannot control the mouse or keyboard .
- The sharer can pause or stop screen sharing at any time by clicking the “Stop Sharing” button in the toolbar.
5. Advanced UltraViewer Tips & Tricks for 2025
To get the most out of your UltraViewer download, explore these advanced features and optimization techniques. These tips are especially useful for IT professionals, businesses, and frequent remote users.
5.1 Configuring Unattended Access
Unattended access allows you to connect to a remote computer without the host being present (e.g., managing a home server or office PC while traveling). Here’s how to set it up:
- On the Remote Computer (Host):
- Launch UltraViewer and go to “Settings” > “Options” > “Access”.
- Check the box next to “Run UltraViewer with Windows” (ensures the software starts automatically when the computer boots up) .
- Check “Set custom password for unattended access” and enter a strong password (6-8 digits/characters, mixing numbers and letters for security).
- Click “Apply” and “OK” to save settings.
- On Your Local Computer (Controller):
- Open UltraViewer and enter the host’s ID and your custom unattended password.
- Click “Connect” to access the remote computer immediately—no need for the host to share a temporary password .
5.2 Optimizing Performance for Slow Internet
If you’re working with a weak internet connection, use these tips to improve remote session stability:
- Reduce Screen Quality: Go to “Settings” > “Options” > “Display” and select a lower color quality (e.g., 256 colors) to reduce data transfer.
- Disable Wallpaper & Effects: On the remote computer, temporarily disable desktop wallpaper and visual effects to speed up screen rendering.
- Limit File Transfer Size: Compress large files into ZIP folders before transferring to reduce transfer time.
- Close Background Apps: Ask the host to close unnecessary apps (e.g., video players, cloud sync tools) that consume bandwidth or CPU resources .
5.3 Managing Multiple Remote Sessions
UltraViewer allows you to control multiple remote computers simultaneously—ideal for IT professionals supporting multiple clients:
- Open a New Session:
- While already connected to a remote computer, open a new UltraViewer window (go to “File” > “New Window”).
- Enter the ID and password of the second remote computer and click “Connect”.
- Repeat to add more sessions .
- Switch Between Sessions:
- Use the taskbar to switch between open UltraViewer session windows.
- To rename a session (for easier management), right-click the session window and select “Rename” > enter a custom name (e.g., “Client A – Office PC”).
5.4 Using Keyboard Shortcuts for Efficiency
Memorize these UltraViewer keyboard shortcuts to speed up your workflow:
- F1: Toggle chat window on/off
- F2: Toggle full-screen mode
- F3: Capture screenshot
- F4: Start/stop session recording
- Ctrl+Alt+Del: Send Ctrl+Alt+Del to the remote computer (for logging off, task manager, etc.)
- Alt+Tab: Switch between apps on the remote computer
6. UltraViewer vs. Competitors: Why It’s the Best Choice in 2025
With numerous remote desktop tools available, you may wonder why UltraViewer stands out. Let’s compare it to top competitors like TeamViewer and AnyDesk to highlight its unique advantages—especially when combined with a secure UltraViewer download.
6.1 UltraViewer vs. TeamViewer
- Cost: UltraViewer is 100% free for personal and commercial use, with no limitations on session duration or features. TeamViewer’s free version is restricted to non-commercial use and may prompt for a paid license after repeated use .
- Lightweight: UltraViewer’s installation file is only 3.5 MB, while TeamViewer’s is over 200 MB. UltraViewer also uses less CPU and RAM, making it ideal for older or low-spec computers .
- Ease of Use: UltraViewer has a simpler interface with fewer complex settings, making it more user-friendly for beginners. TeamViewer offers more advanced features but has a steeper learning curve .
- Security: Both tools offer end-to-end encryption, but UltraViewer’s random password generation and captcha security check add extra layers of protection against unauthorized access .
6.2 UltraViewer vs. AnyDesk
- Compatibility: UltraViewer supports all Windows versions (including older ones like Windows XP and Windows Server), while AnyDesk has limited support for older Windows systems .
- File Transfer: UltraViewer allows drag-and-drop file transfer directly in the chat window and supports larger files (no size limits), whereas AnyDesk has file transfer size restrictions in the free version .
- Multi-Monitor Support: UltraViewer’s one-click monitor switching is more intuitive than AnyDesk’s multi-monitor management, which requires navigating through menus .
- Unattended Access: UltraViewer’s unattended access setup is simpler (one-time password configuration), while AnyDesk requires additional steps like setting up a “My AnyDesk” account .
For most users—especially those seeking a free, lightweight, and easy-to-use tool—UltraViewer is the clear winner. And with a secure UltraViewer download from https://ultraviewer-cn.com, you get all these benefits without compromising on security.
7. Common UltraViewer Issues & Troubleshooting in 2025
Even with a smooth UltraViewer download and installation, you may encounter occasional issues during use. Below are solutions to the most common problems:
7.1 Connection Issues
- Problem: “Connection Failed” or “Cannot Connect to Server” error.
- Solutions:
- Check internet connection on both devices (restart routers if needed).
- Ensure both devices are running the latest version of UltraViewer (update via “Help” > “Check for Updates”).
- Disable firewalls or antivirus programs temporarily (or add UltraViewer to the allowed list) .
- Verify the host’s ID and password are correct (passwords are case-sensitive).
- Solutions:
- Problem: Session drops frequently.
- Solutions:
- Switch to a wired internet connection (more stable than Wi-Fi).
- Close bandwidth-heavy apps (e.g., video streaming, cloud downloads) on both devices.
- Check if the host computer is set to sleep/hibernate (disable power-saving mode for remote sessions) .
- Solutions:
7.2 Performance Issues
- Problem: Remote screen is laggy or blurry.
- Solutions:
- Reduce screen quality in UltraViewer settings (as outlined in Section 5.2).
- Close background apps on the host computer to free up CPU resources .
- Ensure both devices have the latest graphics card drivers installed.
- Solutions:
- Problem: High CPU usage on the host computer.
- Solutions:
- Update UltraViewer to the latest version (2025 updates reduced CPU usage by 2-3 times) .
- Disable unnecessary features during the session (e.g., session recording, voice chat).
- Lower the remote screen resolution temporarily.
- Solutions:
7.3 Password & Security Issues
- Problem: Forgot unattended access password.
- Solution: On the host computer, open UltraViewer and go to “Settings” > “Options” > “Access”. Uncheck “Set custom password for unattended access”, click “Apply”, then recheck the box and set a new password .
- Problem: “Suspicious Activity Detected” error (brute-force protection).
- Solution: UltraViewer blocks access for 5-30 minutes after multiple incorrect password attempts. Wait for the block to expire, then enter the correct password. If you’re the legitimate user, ensure you’re using the correct password (avoid typos) .
8. Conclusion: Unlock Secure Remote Access with Official UltraViewer Download
UltraViewer has solidified its position as a top-tier remote desktop tool in 2025, thanks to its user-friendly interface, robust security features, and continuous performance improvements. Whether you’re a casual user helping family members, an IT professional providing technical support, or a business managing remote teams, UltraViewer delivers the reliability and functionality you need—all for free.
The key to a safe and seamless experience lies in a proper UltraViewer download from the official channel. By visiting https://ultraviewer-cn.com, you ensure you’re getting the latest, malware-free version with full access to 2025’s new features, including enhanced security, faster connections, and multi-monitor support. Avoid third-party download sites to protect your device from threats and ensure optimal performance.
With this comprehensive tutorial, you now have all the knowledge to complete UltraViewer download, install the software, and master both basic and advanced features. From remote control and file transfer to unattended access and performance optimization, UltraViewer empowers you to stay connected and productive—no matter where you are.
Don’t wait to experience the convenience of secure remote access. Visit https://ultraviewer-cn.com today to complete your UltraViewer download and join millions of users who trust UltraViewer for their remote desktop needs in 2025.