Introduction: Elevate Your Remote Access Game with UltraViewer
In today’s digital landscape, remote desktop software is no longer a luxury—it’s a necessity. For individuals and businesses alike, the ability to access and control computers from anywhere in the world streamlines workflows, reduces costs, and enables seamless collaboration. Among the many tools available, UltraViewer stands out for its exceptional balance of usability, security, and advanced functionality—all offered at no cost. However, many users only scratch the surface of what UltraViewer can do, limiting themselves to basic remote control after a simple UltraViewer download. This comprehensive guide is designed to take you from a beginner to an expert, covering everything from a secure UltraViewer download and installation to advanced features like unattended access, multi-client management, and troubleshooting complex issues.
As with any software, the foundation of a positive UltraViewer experience is a safe and reliable UltraViewer download. The official website https://ultraviewer-cn.com is the only trusted source for the latest version, ensuring you receive all critical security updates, bug fixes, and feature enhancements. In 2025, UltraViewer has introduced several game-changing features, including cross-client copy-pasting, switch-side control, and monitor wake-up, which we’ll explore in detail. Whether you’re an IT professional managing multiple devices, a freelancer collaborating with clients, or a homeowner accessing your home computer while traveling, this guide will help you unlock UltraViewer’s full potential.
It’s important to note that UltraViewer is currently exclusive to Windows operating systems, supporting everything from Windows XP to Windows 11 and Windows Server editions UltraViewer. While MacOS support is in development , Windows users can enjoy a fully optimized experience with regular updates. By following the advice in this guide, you’ll not only learn how to use UltraViewer’s advanced features but also how to optimize performance, enhance security, and resolve common issues—all starting with a proper UltraViewer download.
Part 1: Secure UltraViewer Download – Best Practices for 2025
Before diving into advanced features, it’s crucial to ensure you’ve completed a secure and correct UltraViewer download. Skipping this step or downloading from untrusted sources can lead to security risks, performance issues, and missing features. Below are the best practices for UltraViewer download in 2025, along with common pitfalls to avoid.
Why the Official UltraViewer Download Is Non-Negotiable
In an age of cyber threats, downloading software from unofficial sources is a risky proposition. Third-party websites often distribute modified versions of UltraViewer that may contain malware, adware, or spyware. These compromised versions can steal your personal data, damage your device, or disrupt your remote sessions. Additionally, third-party downloads may be outdated, lacking critical security patches and the latest features like microphone support or switch-side control UltraViewer.
The official https://ultraviewer-cn.com guarantees a safe, authentic version of UltraViewer. The website is encrypted with HTTPS, protecting your data during the download process. Moreover, the official UltraViewer download page is regularly updated to reflect the latest version, ensuring you have access to all new features and bug fixes. For example, the 2025 updates addressed issues like multiple instance errors on low-RAM PCs, chat dialog positioning problems, and compatibility with high-DPI displays UltraViewer—features you won’t get with an outdated third-party download.
Step-by-Step UltraViewer Download for Different Windows Versions
While the UltraViewer download process is largely the same across all Windows versions, there are a few nuances to consider for specific operating systems:
UltraViewer Download for Windows 10/11
- Open your browser and go to https://ultraviewer-cn.com.
- Click the “Download” button at the top of the page. The installer will automatically detect your Windows version and download the compatible file.
- Once the download is complete, locate the “UltraViewer_Setup.exe” file in your Downloads folder.
- Double-click the file to run the installer. Windows 10/11 may display a “User Account Control” prompt—click “Yes” to proceed.
- Follow the installation wizard (detailed in Part 2) to complete the setup.
For Windows 11 users, recent UltraViewer updates fixed DPI scaling issues that previously caused UI elements to display incorrectly UltraViewer. The official UltraViewer download ensures you get this fix, along with optimized performance for Windows 11’s unique features.
UltraViewer Download for Windows 7/8
- Navigate to https://ultraviewer-cn.com in your browser.
- Click “Download” to start the process. The installer is compatible with both 32-bit and 64-bit versions of Windows 7/8.
- After downloading, run the installer. Windows 7/8 may require you to confirm the publisher—select “Run Anyway” if prompted (the publisher is “UltraViewer,” a trusted source).
- Proceed with the installation wizard, ensuring you check “Create a desktop shortcut” for easy access.
Windows 7/8 users should note that UltraViewer is one of the few remote access tools still supporting these legacy systems. The official UltraViewer download ensures compatibility, with no plans to discontinue support in the near future.
UltraViewer Download for Windows Server
- Visit https://ultraviewer-cn.com from your Windows Server device.
- Click “Download” to get the server-optimized installer.
- Run the installer, following the prompts. Recent updates fixed the IE security dialog issue that previously affected Windows Server installations UltraViewer.
- During installation, select “Run UltraViewer with Windows” to ensure the software starts automatically after server restarts.
Windows Server users often rely on UltraViewer for remote server management, and the official download includes features like unattended access and blacklist/whitelist controls that are critical for server security.
Avoiding Common UltraViewer Download Pitfalls
- Don’t use download managers: UltraViewer’s installer is small (3MB), so there’s no need for a download manager. These tools can sometimes corrupt the file or redirect you to unwanted downloads.
- Ignore pop-up ads: Some browsers may display pop-up ads for other software during the UltraViewer download. Close these ads immediately—they’re not related to UltraViewer and may contain malware.
- Check for updates after installation: Even if you just completed an UltraViewer download, open the software and go to “Help” > “Check for Updates” to ensure you have the latest version. Updates are released regularly to fix bugs and add features.
Part 2: Installing UltraViewer – Optimizing Setup for Advanced Use
A proper installation is key to unlocking UltraViewer’s advanced features. While the basic installation process is simple, there are several optimizations you can make to ensure the software runs smoothly and supports advanced workflows like unattended access and multi-client control.
Detailed Installation Steps with Advanced Options
- After completing your UltraViewer download, run the “UltraViewer_Setup.exe” file.
- The welcome screen will appear—click “Next.”
- Read the EULA and select “I accept the terms” > “Next.”
- Choose your installation folder. For advanced users, we recommend installing UltraViewer on a non-system drive (e.g., D: instead of C:) to free up space on your main drive and improve performance.
- Select additional tasks:
- “Create a desktop shortcut”: Essential for quick access.
- “Run UltraViewer when Windows starts”: Critical for unattended access (ensures the software is running even if no one is logged into the computer).
- “Associate .uvr files with UltraViewer”: Allows you to open recorded remote sessions directly by double-clicking them (recent updates fixed compatibility issues with .uvr files from older versions UltraViewer).
- Click “Install” and wait for the process to complete (usually 30 seconds to 1 minute).
- Click “Finish” to launch UltraViewer.
Post-Installation Configuration for Advanced Features
After installation, take the following steps to configure UltraViewer for advanced use:
Enabling Administrative Privileges
Many advanced features, such as modifying blacklists/whitelists and accessing system files on remote devices, require administrative privileges. To enable this:
- Right-click the UltraViewer desktop shortcut.
- Select “Properties” > “Compatibility” tab.
- Check “Run this program as an administrator” > “Apply” > “OK.”
This ensures UltraViewer has the necessary permissions to execute advanced tasks without errors.
Disabling Unnecessary Startup Programs
To optimize performance, close any unnecessary programs that run on startup. This frees up RAM and CPU resources, which is especially important for low-spec computers or when running multiple remote sessions simultaneously. On Windows 10/11:
- Press Ctrl + Shift + Esc to open Task Manager.
- Go to the “Startup” tab.
- Disable any programs you don’t need (e.g., games, media players) by right-clicking them and selecting “Disable.”
Configuring Firewall and Antivirus Exceptions
Firewalls and antivirus software can block UltraViewer’s connection, preventing remote sessions. To avoid this:
- Open Windows Security > “Firewall & network protection.”
- Click “Allow an app through firewall.”
- Click “Change settings” > “Allow another app.”
- Browse to the UltraViewer installation folder (default: C:\Program Files (x86)\UltraViewer) and select “UltraViewer_Desktop.exe.”
- Check both “Private” and “Public” networks > “Add.”
Repeat this process for your third-party antivirus software (e.g., McAfee, Avast) by adding UltraViewer to the exceptions list.
Part 3: Advanced UltraViewer Features You Need to Master
Once you’ve completed the UltraViewer download and optimized installation, it’s time to explore the advanced features that set UltraViewer apart from other remote access tools. These features are designed to enhance productivity, security, and flexibility, making UltraViewer suitable for professional use.
Unattended Access – Access Computers Without Manual Permission
Unattended access is one of UltraViewer’s most valuable advanced features, allowing you to connect to a remote computer without someone being present to grant permission. This is ideal for accessing your home computer while traveling, managing servers, or providing ongoing technical support to clients. Here’s how to set it up:
- On the remote computer (the one you want to access unattended), open UltraViewer.
- In the main window, click the golden key icon labeled “Custom Password.”
- In the pop-up window, enter a strong, unique password (we recommend at least 8 characters, including letters, numbers, and symbols).
- Check the box next to “Run UltraViewer with Windows” to ensure the software starts automatically when the computer boots up.
- Optional: Check “Prevent Windows from going to sleep” (requires a license, but free users can use Windows power settings to disable sleep mode).
- Click “OK” to save your settings.
To access the remote computer unattended:
- On your local computer, open UltraViewer.
- Enter the remote computer’s ID and the custom password you set.
- Click “Connect”—you’ll be granted access immediately, no permission required.
Recent updates improved the security of unattended access by adding captcha verification for suspicious login attempts UltraViewer. This prevents unauthorized access even if your password is compromised.
Switch-Side Control – Toggle Between Local and Remote Control
The switch-side control feature allows you to swap control between your local computer and the remote device during a session. This is perfect for collaborative tasks, such as training sessions or troubleshooting, where both users need to demonstrate actions. Here’s how to use it:
- Start a remote session with the partner’s ID and password.
- On the floating toolbar, click the “Switch Side” button (icon resembles two arrows pointing in opposite directions).
- The remote user will receive a prompt asking if they want to allow the switch. Once they click “Yes,” control will be transferred—you’ll now be able to control their computer, and they’ll be able to control yours.
- To switch back, click the “Switch Side” button again and confirm.
This feature was added in recent updates and has become a favorite among trainers and IT professionals UltraViewer. It eliminates the need to end and restart sessions when control needs to be transferred.
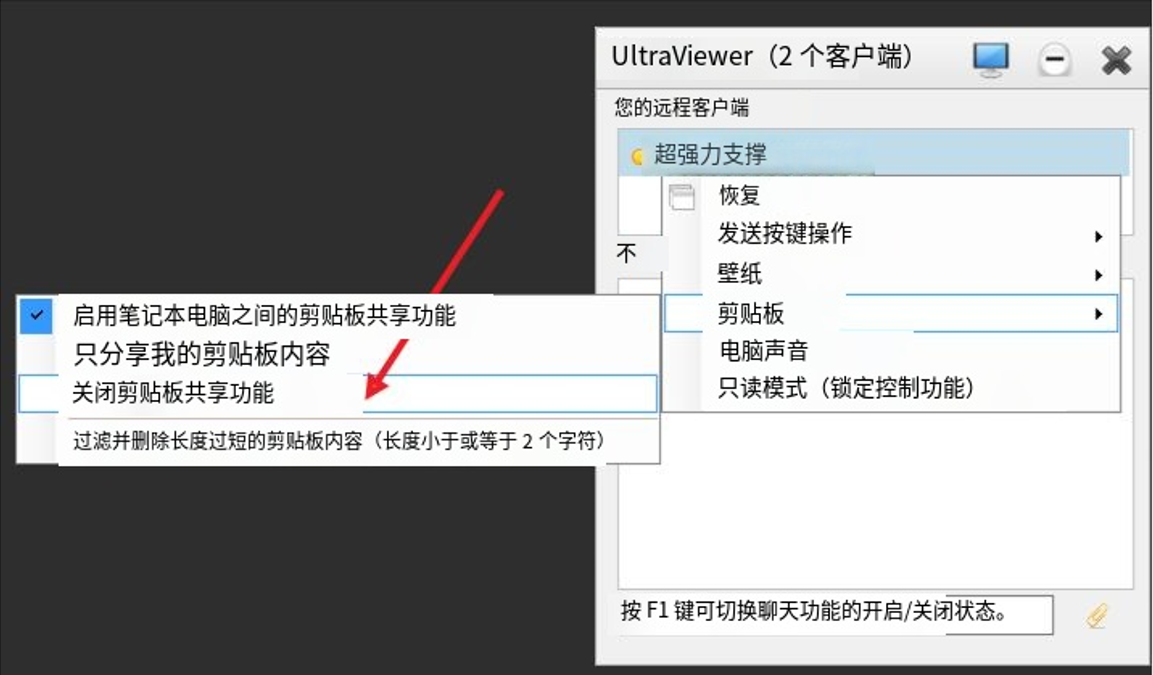
Multi-Client Copy-Pasting – Share Data Between Multiple Remote Devices
UltraViewer now allows you to copy and paste text, images, and files between multiple remote clients—provided all devices have the latest version installed UltraViewer. This is a game-changer for users who manage multiple remote computers, as it eliminates the need to use file transfer or chat for simple data sharing. Here’s how to use it:
- Ensure all remote computers have the latest version of UltraViewer (update via https://ultraviewer-cn.com if necessary).
- Start remote sessions with the desired computers.
- On one remote computer, select the text, image, or file you want to copy (Ctrl + C for text/files).
- Switch to another remote computer (or your local device) and paste (Ctrl + V)—the data will transfer seamlessly.
This feature works in both directions (local to remote and remote to remote) and supports all common file types. It’s particularly useful for IT teams who need to share configuration settings or troubleshooting commands across multiple devices.
Monitor Wake-Up and Lock Screen – Enhance Security and Accessibility
UltraViewer’s monitor wake-up feature allows you to turn on a remote computer’s monitor from sleep mode, even if no one is present UltraViewer. This is useful if the remote computer’s monitor is off and you need to see the screen to perform a task. Here’s how to use it:
- Start a remote session with the unattended access password.
- On the floating toolbar, click the “Turn On Monitor” button.
- The remote computer’s monitor will wake up within a few seconds, allowing you to see and control the screen.
The lock screen feature complements this by securing the remote computer’s physical access during the session:
- During a session, click the “Lock Screen” button on the floating toolbar.
- The remote computer’s screen will lock, requiring a password to unlock (even if someone is physically present).
- To unlock, click “Unlock Screen” and enter the remote computer’s Windows password.
These features are essential for maintaining security when accessing sensitive computers remotely, such as work devices or servers.
Session Logging and Video Recording – Track Activity for Compliance
For businesses and IT teams, session logging and video recording are critical for compliance, training, and troubleshooting. UltraViewer offers both features:
Session Logging
UltraViewer automatically logs all connection attempts, including rejected attempts (marked with the “Rejected” keyword in the log file) UltraViewer. To access the logs:
- Open UltraViewer > “Settings” > “Advanced.”
- Click “Open Log Folder” to view the log files (saved as .txt files).
- The logs include timestamps, connection IDs, and status (successful/rejected), making it easy to track activity.
Video Recording
To record a remote session:
- During the session, click the “Record” button on the floating toolbar.
- The recording will start immediately, capturing all on-screen activity.
- To stop recording, click the “Stop” button. The video is saved as a .uvr file in the default “Videos” folder.
Recent updates fixed issues with playing .uvr files from older versions, ensuring compatibility across updates UltraViewer. You can play the recordings using UltraViewer’s built-in player or convert them to other formats using third-party tools.
Part 4: Troubleshooting Advanced UltraViewer Issues
Even with a proper UltraViewer download and setup, advanced users may encounter complex issues, especially when using features like unattended access or multi-client control. Below are solutions to the most common advanced problems, based on official support documentation UltraViewer.
Unattended Access Not Working
If you can’t connect to a remote computer using unattended access:
- Verify that the remote computer is turned on and connected to the internet.
- Ensure UltraViewer is running on the remote computer (check “Run UltraViewer with Windows” in settings).
- Confirm that you’re using the correct custom password (reset it if necessary by clicking the golden key icon on the remote computer).
- Check if the remote computer’s firewall is blocking UltraViewer—add “UltraViewer_Desktop.exe” to the exceptions list.
- If the remote computer is in sleep mode, use the “Turn On Monitor” feature (requires the latest version from https://ultraviewer-cn.com).
Multi-Client Copy-Pasting Not Functioning
If copy-pasting between remote clients doesn’t work:
- Ensure all remote computers have the latest version of UltraViewer—update via https://ultraviewer-cn.com.
- Verify that administrative privileges are enabled on all devices (right-click UltraViewer shortcut > “Run as administrator”).
- Close and restart all UltraViewer sessions, then try copy-pasting again.
- If the issue persists, check if any security software is blocking clipboard access—add UltraViewer to the exceptions list.
Connection Timeout with High-Speed Internet
If you experience connection timeouts even with a fast internet connection:
- Check your router’s port forwarding settings—ensure port 2112 (UltraViewer’s default port) is forwarded to the remote computer’s IP address.
- Disable any VPN or proxy services, as they can introduce latency or routing issues UltraViewer.
- Switch to Google DNS or Cloudflare DNS to improve connection stability:
- Open “Control Panel” > “Network and Sharing Center” > “Change adapter settings.”
- Right-click your internet connection > “Properties” > “Internet Protocol Version 4 (TCP/IPv4)” > “Properties.”
- Select “Use the following DNS server addresses” and enter 8.8.8.8 (Google DNS) and 8.8.4.4 (alternate).
- Update UltraViewer to the latest version, as recent updates improved connection stability for high-speed networks UltraViewer.
DPI Scaling Issues on High-Resolution Displays
For users with 4K monitors or high-DPI displays, UI elements may appear blurry or misaligned:
- Update UltraViewer to the latest version (recent updates fixed DPI scaling issues for DPI above 150% UltraViewer).
- Right-click the UltraViewer shortcut > “Properties” > “Compatibility” tab.
- Check “Override high DPI scaling behavior” > select “System” from the dropdown menu > “Apply” > “OK.”
- Restart UltraViewer to apply the changes.
Chat Dialog Not Displaying Correctly
If the chat window is not full-width or jumps to the default position:
- Update UltraViewer via https://ultraviewer-cn.com (this issue was fixed in version 6.6.14 and later UltraViewer).
- Disable any screen resolution or display scaling software that may be interfering.
- Restart the remote session—this often resolves temporary UI glitches.
Part 5: UltraViewer Security Best Practices for Advanced Users
As you use UltraViewer for more sensitive tasks, security becomes paramount. Below are best practices to protect your remote sessions, data, and devices.
Securing Unattended Access
- Use a strong, unique custom password for unattended access—avoid using the same password for multiple accounts.
- Change your custom password regularly (every 3-6 months) to reduce the risk of unauthorized access.
- Enable captcha verification (built into the latest version) to block brute-force attacks UltraViewer.
- Restrict access using the whitelist feature—only add trusted IDs to ensure only authorized users can connect.
Protecting Data During Remote Sessions
- Avoid accessing sensitive data (e.g., bank accounts, confidential documents) during public Wi-Fi sessions—use a secure VPN if necessary.
- Enable the lock screen feature during sessions to prevent physical access to the remote computer.
- Use the file transfer feature instead of email or cloud storage to share sensitive files—UltraViewer’s transfer is encrypted end-to-end.
- Delete any sensitive files from the remote computer after the session if they’re no longer needed.
Maintaining Software Security
- Regularly update UltraViewer via https://ultraviewer-cn.com to get the latest security patches.
- Avoid modifying UltraViewer’s installation files or using cracked versions—these may contain malware or backdoors.
- Scan your computer regularly with antivirus software to detect any potential threats.
Monitoring Remote Activity
- Use session logging to track all connection attempts and review logs periodically for suspicious activity.
- Record sensitive sessions (e.g., client support) for compliance and training purposes.
- Set up alerts for failed connection attempts—some third-party security tools can notify you if someone tries to access your computer with the wrong password.
Conclusion: Become an UltraViewer Expert Today
From a secure UltraViewer download to mastering advanced features like unattended access and multi-client copy-pasting, this guide has equipped you with the knowledge and skills to use UltraViewer like a pro. Whether you’re managing multiple devices, collaborating with clients, or accessing your computer remotely, UltraViewer’s powerful features and user-friendly interface make it the ideal remote access solution for 2025.
The key to success with UltraViewer is starting with a proper UltraViewer download from the official website https://ultraviewer-cn.com. This ensures you have the latest version with all security updates, bug fixes, and advanced features. By following the installation optimizations, advanced feature tutorials, and troubleshooting tips in this guide, you’ll be able to resolve issues quickly, enhance productivity, and maintain a secure remote access environment.
As remote work continues to evolve, UltraViewer remains at the forefront of remote desktop software, with regular updates that address user needs and emerging technologies. Whether you’re a casual user or a professional, UltraViewer’s versatility and reliability make it a tool you can rely on for years to come.
Ready to take your remote access skills to the next level? Head to https://ultraviewer-cn.com to complete your UltraViewer download and start exploring the advanced features today. With the knowledge from this guide, you’ll be able to unlock seamless, secure, and efficient remote control—no matter where you are in the world.