Remote control tools have become essential for modern life—whether you’re working from home, helping a friend with tech issues, or managing business devices. For beginners, UltraViewer is the ideal choice: it’s free, easy to use, and packed with features that don’t require technical expertise. However, the journey starts with a safe "UltraViewer download"—a step where many new users stumble, falling prey to fake apps or outdated versions. This beginner-friendly guide demystifies "UltraViewer download" and walks you through every aspect of using the tool, from installation to advanced remote control. Updated for 2025, it includes simple instructions, real-world examples, and tips to help you master UltraViewer in just 7 days—all with links to the official UltraViewer download site to ensure safety.
I. Why Beginners Need UltraViewer: The Ultimate Remote Control Tool
Before you begin your "UltraViewer download", let’s explore why this tool is perfect for new users. UltraViewer is designed with simplicity in mind, but it doesn’t sacrifice functionality—making it the best balance of ease and power for beginners.
1. UltraViewer’s Beginner-Friendly Advantages
- No Technical Expertise Required: The interface is intuitive, with large buttons and clear labels. You don’t need to know coding, port forwarding, or network settings to use it.
- 100% Free for Personal Use: Core features (remote control, file transfer, chat) are free forever—no credit card required. Paid plans are optional for businesses.
- Lightweight & Fast: Unlike bulky tools that slow down your device, UltraViewer’s 3.2MB installation package launches in seconds and uses minimal system resources.
- Cross-Platform Compatibility: Use it to control a Windows PC from your Android phone, a macOS laptop from your iPhone, or vice versa—perfect for beginners who use multiple devices.
2. Critical 2025 Updates for Beginners
UltraViewer’s 2025 version (v6.6.0) includes updates specifically designed to help new users:
- Step-by-Step Setup Wizard: After "UltraViewer download", a guided wizard walks you through registration, ID/password setup, and basic connection—no more guessing what to do next.
- Beginner Mode: A simplified interface that hides advanced features (e.g., session management, AI support) until you’re ready to use them. Focus only on what you need: remote control, file transfer, and chat.
- In-App Tutorials: Click the "Help" icon to access short video tutorials and FAQs tailored to beginners (e.g., "How to connect to a friend’s PC" or "How to transfer photos").
These features are only available in the latest version—so a proper "UltraViewer download" from https://ultraviewer-cn.com is essential.
3. Common Beginner Use Cases for UltraViewer
You might be wondering: "How will I use UltraViewer?" Here are the most popular scenarios for new users:
- Help Friends/Family: Guide your parents through setting up a new app, troubleshooting a printer, or fixing a frozen screen—without leaving your home.
- Remote Work: Access your office computer from home to retrieve files, use work software, or continue a project.
- Study & Collaboration: Share your screen with classmates to work on group projects, or let a tutor walk you through a difficult assignment.
- Travel Convenience: Control your home PC from your phone to check emails, download files, or stream media while away.
All these scenarios start with a safe "UltraViewer download"—the first step to unlocking hassle-free remote control.
II. UltraViewer Download for Beginners: Safe, Simple, & Step-by-Step
For beginners, the biggest fear is downloading malware or using a fake app. That’s why the only safe way to get UltraViewer is via the official website: https://ultraviewer-cn.com. This section breaks down the "UltraViewer download" process for all devices, with screenshots and simple instructions.
1. Why Beginners Must Avoid Third-Party UltraViewer Download
Third-party sites (e.g., freeware download portals, social media links, or torrent sites) are dangerous for beginners. Here’s why:
- Malware Risk: Many fake UltraViewer downloads contain viruses, spyware, or ransomware that steal your data or lock your device.
- Outdated Versions: Third-party sites often host old versions (v6.0 or older) that lack beginner-friendly features like the setup wizard and in-app tutorials.
- Hidden Costs: Some sites trick you into paying for "premium" versions of UltraViewer, even though the core features are free on the official site.
- No Support: If you run into issues, third-party sites won’t help—you’re on your own.
The official UltraViewer download eliminates these risks: it’s free, safe, and includes all the latest beginner-friendly features.
2. UltraViewer Download for Windows (Beginners’ Most Common Device)
Windows is the most popular platform for beginners, so we’ll start with a detailed, screenshot-friendly guide:
- Open your browser (we recommend Chrome for simplicity) and type https://ultraviewer-cn.com into the address bar. Press Enter to go to the official site.
- On the homepage, you’ll see a big green button that says "Download for Windows". Click it—this starts the "UltraViewer download" for the latest v6.6.0 version.
- Look for the download progress in the bottom-left corner of Chrome (it will show "UltraViewer_Setup_v6.6.0.exe" and a percentage). Wait for it to finish (takes 10-15 seconds on a normal internet connection).
- Once downloaded, click the file name in the download bar to open the installer.
- A pop-up window will appear asking "Do you want to allow this app to make changes to your device?" Click "Yes" (this is a normal Windows security check—don’t worry!).
- The UltraViewer setup wizard will open. First, select your language (English is default, but you can choose other languages like Spanish or French). Click "Next".
- Read the simple license agreement (you don’t need to read every word—just check "I accept the agreement" and click "Next").
- Choose where to install UltraViewer. The default location (C:\Program Files\UltraViewer) is fine for most beginners. Click "Next".
- Check the box that says "Create a desktop shortcut"—this makes it easy to find UltraViewer later. Click "Next".
- Click "Install" and wait for the progress bar to finish (takes 5 seconds). Then click "Finish"—UltraViewer will launch automatically.11. 恭喜!You’ve completed your first "UltraViewer download" and installation. The main UltraViewer window will open, showing your ID and password (we’ll explain these later).
3. UltraViewer Download for macOS (Beginner-Friendly Steps)
If you have a MacBook or iMac, follow these simple steps for "UltraViewer download":
- Open Safari (Apple’s default browser) and go to https://ultraviewer-cn.com.
- Click the "Download for macOS" button (it’s blue and labeled "macOS 12.0+").
- The installer (UltraViewer_mac_v6.6.0.dmg) will download to your "Downloads" folder (you can see the progress in the top-right corner of Safari).
- Open your "Downloads" folder (click the Downloads icon in the Dock) and double-click the DMG file.
- A new window will open with the UltraViewer icon and a picture of the "Applications" folder. Drag the UltraViewer icon into the "Applications" folder—this installs the app.
- Close the window and open "Applications" (click the Applications icon in the Dock). Find UltraViewer and double-click it to launch.
- If a pop-up says "UltraViewer cannot be opened because the developer cannot be verified", don’t panic! This is Apple’s way of protecting you from unsafe apps. Click "OK", then go to "System Settings" > "Privacy & Security".
- Scroll down to the "Security" section and click "Open Anyway" (this only works for official downloads).
- Click "Open" again when prompted—UltraViewer will launch. You’ve successfully completed "UltraViewer download" for macOS!
4. UltraViewer Download for Android (Control PCs from Your Phone)
Controlling a PC from your Android phone is perfect for beginners on the go. Here’s how to download UltraViewer:
- Open Chrome (or your favorite Android browser) and go to https://ultraviewer-cn.com.
- Click "Download for Android"—the button is green and labeled "Android 8.0+".
- A pop-up will say "This type of file can harm your device. Do you want to keep it?" Click "Keep"—the official UltraViewer APK is safe.
- When the download finishes, tap the notification that says "UltraViewer_Android_v6.6.0.apk" (it will appear at the top of your screen).
- Another pop-up will say "Install blocked. For your security, your phone is not allowed to install unknown apps from this source." Tap "Settings".
- On the next screen, toggle "Allow from this source" to on (this lets you install apps from the official UltraViewer site). Tap the back button.
- Tap "Install" and wait for the app to install (takes 30 seconds). Then tap "Open" to launch UltraViewer.
- Grant permissions: UltraViewer will ask for access to your storage (to transfer files), camera (for video calls), and microphone (for voice calls). Tap "Allow" for all—these permissions are needed for full functionality.
- You’re done! The UltraViewer app will open, and you can start controlling PCs from your phone.
5. UltraViewer Download for iOS (iPhone & iPad)
iOS users have a simpler "UltraViewer download" process via the App Store:
- Open the App Store on your iPhone or iPad.
- Tap the search icon (magnifying glass) in the top-right corner and type "UltraViewer".
- Look for the official UltraViewer app (red icon with a white "U" logo—developer: UltraViewer Team). Avoid fake apps with similar names.
- Tap "Get" (or the cloud icon if you’ve downloaded it before) and authenticate with Face ID, Touch ID, or your Apple ID password.
- The app will install automatically. When it’s done, tap "Open" to launch UltraViewer.
- Grant permissions: Tap "Allow" for notifications (to receive connection alerts), camera, and microphone.
- That’s it! You’ve completed "UltraViewer download" for iOS. The app will open to the main screen, where you can enter a remote device’s ID and password.
6. Beginner’s UltraViewer Download Troubleshooting
If you run into issues during "UltraViewer download" or installation, here are simple fixes for common problems:
- Download won’t start: Make sure you’re using a stable internet connection. Close other browser tabs and try again. If it still doesn’t work, use a different browser (e.g., Chrome instead of Edge).
- Installer won’t open: For Windows users, right-click the installer and select "Run as administrator". For macOS users, ensure you dragged the icon to the "Applications" folder.
- App crashes after launch: Restart your device. If it still crashes, uninstall UltraViewer and re-download from https://ultraviewer-cn.com.
- I can’t find the app: For Windows, check your desktop for the shortcut or search for "UltraViewer" in the Start menu. For macOS, look in the "Applications" folder. For mobile, check your home screen or app drawer.
III. Day 1-2: Get Started with UltraViewer – Basic Setup for Beginners
Now that you’ve completed "UltraViewer download" and installation, it’s time to set up UltraViewer for your first remote control session. We’ll cover the basics over two days to avoid overwhelming you.
Day 1: Understand Your UltraViewer ID & Password
The first thing you’ll see when launching UltraViewer is your "Your ID" and "Password"—these are the keys to remote control. Here’s what beginners need to know:
- Your ID: A unique 9-digit number that identifies your device (e.g., 123456789). Share this with anyone who wants to control your device.
- Your Password: A temporary 6-digit password (e.g., 789012) that changes every time you launch UltraViewer (or when you click "Refresh Password"). This adds security—never share your password with people you don’t trust.
- Partner ID & Password: These fields are for you to enter the remote device’s ID and password (e.g., your friend’s PC or your office computer).
Exercise for Day 1: Write down your UltraViewer ID and password. Share them with a friend or family member (someone you trust) and ask them to download UltraViewer too—you’ll use these credentials for your first connection tomorrow.
Day 2: Make Your First Remote Connection
Today, you’ll connect to another device for the first time. We’ll use the example of helping a friend troubleshoot their PC:
Step 1: Get Your Friend’s Credentials
Ask your friend to launch their UltraViewer (they should have completed "UltraViewer download" from https://ultraviewer-cn.com) and share their "Your ID" and "Password" with you (via text, call, or chat).
Step 2: Enter Credentials in Your UltraViewer
- Open your UltraViewer app (desktop or mobile).
- In the "Partner ID" field, type your friend’s ID (e.g., 987654321).
- In the "Password" field, type their password (e.g., 210987).
- Click "Connect" (desktop) or "Remote Control" (mobile).
Step 3: Wait for Permission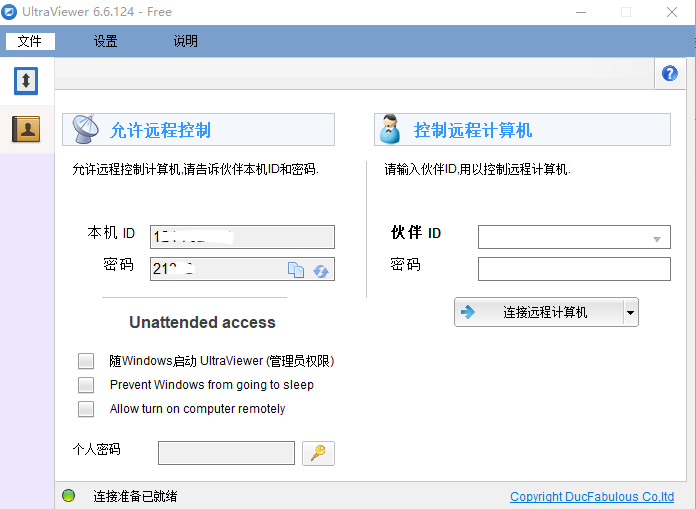
Your friend will see a pop-up on their screen asking: "Do you allow [Your Name] to control your device?" They need to click "Allow" to start the session.
Step 4: Start Controlling the Remote Device
Once approved, your screen will display your friend’s desktop. Here’s what you can do as a beginner:
- Move the Mouse: Use your mouse (desktop) or finger (mobile) to move the cursor on their screen.
- Click & Type: Left-click to open apps, right-click to access menus, and type using your keyboard.
- Chat: Click the "Chat" icon to send messages to your friend (e.g., "I’m opening Settings to fix the issue").
Exercise for Day 2: Practice opening a few apps on your friend’s device (e.g., Notepad, Settings) and sending a chat message. End the session by clicking "Disconnect" (desktop) or the back button (mobile).
Pro Tip for Beginners: Start with short sessions (5-10 minutes) to get comfortable. Don’t make changes to the remote device without your friend’s permission!
IV. Day 3-4: Master Core Features – File Transfer & Chat
Now that you’re comfortable with basic remote control, it’s time to learn two essential features: file transfer and chat. These will make your remote sessions more productive.
Day 3: Transfer Files Between Devices
File transfer is one of UltraViewer’s most useful features for beginners. For example, you can send photos from your phone to your PC, or share a document with a classmate. Here’s how to do it:
Step 1: Start a Remote Session
Connect to the remote device (using the same steps as Day 2: enter their ID and password, wait for permission).
Step 2: Open File Transfer
- Desktop: Click the "File Transfer" icon in the toolbar (it looks like two overlapping files).
- Mobile: Tap the "Files" tab at the bottom of the screen.
Step 3: Transfer Files
A dual-pane window will open:
- Left Pane: Your device’s files (e.g., your PC’s Documents folder or your phone’s Photos).
- Right Pane: The remote device’s files.
To transfer a file:
- Find the file you want to send in the left pane (e.g., a photo in your "Pictures" folder).
- Drag the file to the right pane (the remote device’s folder).
- A progress bar will show how long the transfer will take. Wait for it to finish (large files may take a few minutes).
To receive a file from the remote device:
- Find the file in the right pane.
- Drag it to the left pane (your device’s folder).
Exercise for Day 3: Transfer a photo from your phone to a friend’s PC, then receive a document from their PC to your device. Practice with small files first (e.g., photos or text documents) to get comfortable.
Beginner Tip: Avoid transferring large files (e.g., videos) over Wi-Fi—use a wired connection if possible to speed up the process.
Day 4: Use Chat & Voice Calls to Communicate
During a remote session, it’s important to communicate with the other user. UltraViewer’s chat and voice call features let you do this without switching apps:
Step 1: Use Chat
- During a remote session, click the "Chat" icon (desktop) or tap the "Chat" tab (mobile).
- Type your message in the text box (e.g., "Where is the file you want me to see?") and press Enter.
- The other user will see your message in their UltraViewer chat window and can reply.
Step 2: Make a Voice Call
- Click the "Voice Call" icon (desktop) or tap the "Call" tab (mobile).
- UltraViewer will start a voice chat—ensure your microphone is enabled (you’ll see a green microphone icon if it’s working).
- Talk to the other user as you control their device (e.g., "I’m going to click this button—let me know if anything happens").
Exercise for Day 4: Have a voice call with your friend while transferring a file. Use chat to confirm the file was received successfully.
Beginner Tip: If you’re in a noisy environment, use chat instead of voice calls to avoid confusion. You can also send screenshots via chat to show the other user what you’re seeing.
V. Day 5-6: Explore Advanced Features for Beginners
By now, you’re comfortable with UltraViewer’s core features. Over the next two days, we’ll explore simple advanced features that will make your remote sessions even better.
Day 5: Use Beginner-Friendly Advanced Features
UltraViewer’s 2025 version has advanced features that are still easy for beginners to use:
1. Screenshot Sharing
Capture a screenshot of the remote device to save or share:
- Desktop: Click the "Screenshot" icon in the toolbar. The screenshot will be saved to your "Pictures" folder.
- Mobile: Tap the "Screenshot" button (mobile) to save the image to your phone’s photo gallery.
Use Case: If you’re helping someone troubleshoot an error, take a screenshot of the error message to reference later.
2. Full-Screen Mode
Expand the remote desktop to fill your screen for better visibility:
- Desktop: Click the "Full-Screen" icon (or press F11). Press F11 again to exit.
- Mobile: Pinch to zoom or tap the "Full-Screen" button.
Use Case: Full-screen mode is perfect for editing documents or viewing photos on the remote device.
3. Display Quality Adjustment
If your remote session is laggy, reduce the display quality:
- Desktop: Click "Display" in the toolbar and select "Low Quality".
- Mobile: Tap the "Settings" icon and toggle "Low Quality" to on.
Use Case: Low quality is ideal for slow internet connections (e.g., public Wi-Fi) to reduce lag.
Exercise for Day 5: Practice taking a screenshot of the remote device, switching to full-screen mode, and adjusting the display quality.
Day 6: Set Up UltraViewer for Your Own Devices
One of the best uses of UltraViewer is accessing your own devices remotely (e.g., your home PC from your phone). Here’s how to set this up as a beginner:
Step 1: Install UltraViewer on All Your Devices
Ensure you’ve completed "UltraViewer download" and installation on all devices you want to access (e.g., your home PC, phone, and work laptop). Use the official site https://ultraviewer-cn.com for each device.
Step 2: Enable Auto-Accept on Your Home PC
To avoid having to manually approve connections every time, enable auto-accept on your home PC:
- On your home PC’s UltraViewer, click "Settings" (gear icon).
- Go to "Security" and check "Auto-accept connections from my account".
- Log in to your UltraViewer account (you created this on Day 1) to sync the setting.
Step 3: Connect to Your Home PC from Your Phone
- On your phone’s UltraViewer, log in to the same account.
- Your home PC will appear in the "My Devices" list (if it’s turned on and connected to the internet).
- Tap your home PC’s name to connect—no need to enter the ID and password every time!
Exercise for Day 6: Use your phone to connect to your home PC remotely. Open a document, transfer a photo, and practice navigating the desktop.
Beginner Tip: Ensure your home PC is turned on and connected to the internet before you leave. You can also set up your PC to wake from sleep mode (in Windows: "Control Panel" > "Power Options" > "Choose what the power buttons do") so you can access it even if it’s asleep.
VI. Day 7: Troubleshoot Common Issues & Master Tips for Beginners
On your final day of learning UltraViewer, we’ll cover common issues beginners face and share tips to make your remote sessions smoother.
1. Troubleshoot Common Beginner Problems
Even with a successful "UltraViewer download", you may run into issues. Here are simple fixes for the most common ones:
- Problem: I can’t connect to the remote device.Fixes:
- Double-check the ID and password (typos are common!).
- Ensure both devices have internet access (open a browser and visit a website).
- Ask the remote user to close and re-launch UltraViewer—this resets their ID and password.
- Problem: The remote screen is laggy or frozen.Fixes:
- Reduce display quality (Day 5).
- Close unnecessary apps on both devices (e.g., video streaming apps, games).
- Use a wired internet connection instead of Wi-Fi.
- Problem: File transfer fails.Fixes:
- Make sure the remote device has enough free space to receive the file.
- Rename the file to remove special characters (e.g., emojis, accents).
- Try transferring one file at a time instead of multiple files.
- Problem: I forgot my UltraViewer password.Fixes:
- On the main UltraViewer window, click "Refresh Password" to generate a new one.
- If you’re logged in to your account, you can reset your password via the official site: https://ultraviewer-cn.com > "Forgot Password".
2. Beginner-Friendly Tips to Master UltraViewer
Here are 5 tips to help you get the most out of UltraViewer:
- Tip 1: Use Shortcuts for SpeedLearn these simple shortcuts to save time:
- Desktop: F11 = Full-screen mode; Ctrl+S = Screenshot; Ctrl+D = Disconnect.
- Mobile: Swipe left = Chat; Swipe right = File transfer.
- Tip 2: Keep UltraViewer UpdatedNew versions include bug fixes and new features for beginners. To update:
- Desktop: Click "Help" > "Check for Updates".
- Mobile: Update via the App Store or Google Play.
- Tip 3: Secure Your SessionsNever share your ID and password with strangers. Refresh your password after every session, and enable 2FA in your account settings for extra security.
- Tip 4: Practice with a FriendThe more you use UltraViewer, the more comfortable you’ll be. Schedule regular practice sessions with a friend to try new features.
- Tip 5: Use In-App HelpIf you get stuck, click the "Help" icon in UltraViewer to access tutorials and FAQs. The 2025 version has a dedicated "Beginner Help" section with step-by-step guides.
3. Final Exercise: Plan Your First Real-World Use
Now that you’ve mastered UltraViewer, plan how you’ll use it in real life. Here are examples for beginners:
- Example 1: Help your parents set up a new video call app on their PC.
- Example 2: Access your home PC from your phone to retrieve a work document while traveling.
- Example 3: Collaborate with a classmate on a group project by sharing your screen.
Write down your plan and execute it—you’ll be amazed at how easy remote control can be with UltraViewer!
VII. Conclusion: Your Journey to Remote Control Mastery Starts with UltraViewer Download
Congratulations! You’ve completed this 7-day beginner’s guide to UltraViewer. By now, you know how to:
- Safely complete "UltraViewer download" from the official site https://ultraviewer-cn.com on Windows, macOS, Android, and iOS.
- Set up UltraViewer and make your first remote connection.
- Use core features like file transfer, chat, and voice calls.
- Explore beginner-friendly advanced features and troubleshoot common issues.
UltraViewer is the perfect tool for beginners who want to experience the convenience of remote control without the complexity. Remember: The key to a smooth experience is always using the official "UltraViewer download"—this ensures you have the latest features, security patches, and beginner-friendly tools.
As you continue using UltraViewer, you’ll discover even more ways to simplify your life—whether it’s helping loved ones, working remotely, or collaborating with others. Don’t be afraid to try new features, and refer back to this guide if you need a refresher.
Ready to start using UltraViewer? Visit https://ultraviewer-cn.com today to complete your "UltraViewer download" and begin your remote control journey. With UltraViewer, the world of seamless remote access is just a few clicks away!