Introduction: The Rise of UltraViewer in 2025’s Remote Work Landscape
Remote work and distributed teams are no longer trends—they’re permanent fixtures of the modern workplace. As a result, the demand for reliable, easy-to-use remote control tools has skyrocketed. UltraViewer has emerged as a standout solution, trusted by IT professionals, small business owners, educators, and families worldwide. What makes UltraViewer unique in 2025? It combines the core functionality of premium tools (screen sharing, file transfer, remote control) with a lightweight design, zero learning curve, and free access to essential features—making it accessible to users of all skill levels.
In a market saturated with remote control software, UltraViewer’s competitive advantages are clear:
- Lightweight & Fast: The installer is just 10MB, and the program uses minimal system resources, ensuring it doesn’t slow down your device—even on older hardware.
- Universal Compatibility: Works with all modern Windows versions, Windows Server, and virtual machines, making it a one-stop solution for mixed-device environments.
- Secure by Design: End-to-end encryption, session passwords, and confirmation prompts protect against unauthorized access, a critical feature for business and personal use.
- Cost-Effective: Free for basic use, with affordable premium plans that don’t break the bank—unlike competitors that charge hundreds of dollars for similar features.
To leverage these benefits, a successful UltraViewer download and proper setup are essential. Using outdated versions or untrusted sources can lead to security risks, compatibility issues, or missing features. This comprehensive tutorial will guide you through every step—from UltraViewer download and installation to advanced technical support workflows—ensuring you get the most out of this powerful tool in 2025.
Part 1: UltraViewer Download: Why Official Sources Matter & How to Get the Latest Version
The first rule of using UltraViewer safely and effectively is to download it exclusively from official channels. Third-party websites often distribute tampered versions of UltraViewer that include malware, adware, or expired licenses. Below, we’ll explain why official downloads are critical and provide a step-by-step guide to obtaining the 2025 latest version.
1.1 The Risks of Non-Official UltraViewer Download
Downloading UltraViewer from unregulated sources poses three major risks:
- Malware & Viruses: Third-party sites may bundle UltraViewer with spyware, ransomware, or adware that steals your data or damages your device.
- Outdated Features: Non-official versions are often outdated, missing critical updates, security patches, and new features (e.g., web-based temporary access, improved encryption).
- Compatibility Issues: Modified versions may not work with the latest Windows updates or virtual machines, leading to crashes or connection failures.
To avoid these risks, always use the official UltraViewer download channel: https://ultraviewer-cn.com.
1.2 Step-by-Step UltraViewer Download for Windows (2025 Latest Version)
Windows is UltraViewer’s primary supported operating system, and the download process is designed to be user-friendly—even for beginners. Follow these steps to get the latest version (v6.6.0):
- Check System Requirements:
- Ensure your device meets the minimum specs: Windows 7 SP1 or later (Windows 10/11 recommended), 1GB RAM, 50MB free disk space, and an internet connection (for download and remote sessions).
- For Windows Server users: UltraViewer supports Windows Server 2008 R2, 2012, 2016, 2019, and 2022.
- Access the Official UltraViewer Download Page:
- Open your browser (Chrome, Edge, Firefox, or Safari) and type https://ultraviewer-cn.com into the address bar.
- The homepage is designed to be intuitive—you’ll see a prominent “Download UltraViewer 6.6.0” button (or the latest version) in the center of the page.
- Initiate the Download:
- Click the download button. The website will automatically detect your Windows version (32-bit or 64-bit) and serve the correct installer.
- If the download doesn’t start automatically, click the “Alternative Download” link in the footer to access the backup download server.
- The installer file (UltraViewer_Setup.exe) will save to your default “Downloads” folder—you can track progress in your browser’s download manager.
- Verify the Installer’s Integrity (Optional but Recommended):
- For advanced users, verify the installer’s checksum (SHA-256) on the official website to ensure the file hasn’t been tampered with. This step confirms you have a genuine copy of UltraViewer.
1.3 UltraViewer Installation: Customization & Setup
Once the download is complete, follow these steps to install UltraViewer and configure initial settings:
- Run the Installer:
- Navigate to your “Downloads” folder and double-click UltraViewer_Setup.exe.
- If Windows Defender or another antivirus program flags the installer, click “More info > Run anyway”—this is a false positive, as UltraViewer is a trusted application.
- Select Installation Language:
- The installer will prompt you to choose a language from a dropdown menu (supports English, Chinese, Spanish, French, German, Portuguese, and more). Select your preferred language and click “OK.”
- Customize Installation Options:
- On the next screen, you’ll see the default installation path (C:\Program Files\UltraViewer). To change it, click “Browse” and select a different folder (e.g., D:\Programs).
- Check the boxes for:
- “Create a desktop shortcut” (easy access to UltraViewer).
- “Add UltraViewer to the Start menu” (for quick launching via Windows Start).
- “Associate UltraViewer with .uv files” (optional—for opening UltraViewer session files).
- Complete the Installation:
- Click “Install” to begin the process. The installer will extract files and configure UltraViewer on your device—this takes 60–90 seconds.
- When installation finishes, check “Launch UltraViewer now” and click “Finish.” The program will open automatically.
- First Launch Setup:
- On first launch, UltraViewer will ask for permission to access your network (firewall access). Click “Allow” to enable remote connections.
- You’ll see the main UltraViewer window with your unique ID and password—this is all you need to start or receive remote sessions.
1.4 Troubleshooting Common Installation Errors
If you encounter issues during installation, use these 2025-updated solutions:
- Error: “Installation Failed—Insufficient Disk Space”:
- Free up space on your system drive (C: drive) by deleting temporary files, unused apps, or large documents. UltraViewer requires only 50MB, so even a small amount of free space will resolve this.
- Error: “The System Cannot Find the File Specified”:
- The installer file may be corrupted. Delete the existing installer, clear your browser cache, and re-download UltraViewer from https://ultraviewer-cn.com.
- UltraViewer Won’t Launch After Installation:
- Restart your device to resolve any temporary system conflicts.
- If restarting doesn’t work, uninstall UltraViewer via Control Panel > Programs > Uninstall a Program, then reinstall the latest version.
Part 2: Navigating UltraViewer’s Interface & Basic Setup
UltraViewer’s interface is designed for simplicity, but understanding its layout and settings will help you use it more efficiently. This section covers the main components of the interface, account setup, and essential preferences.
2.1 Main Interface Overview
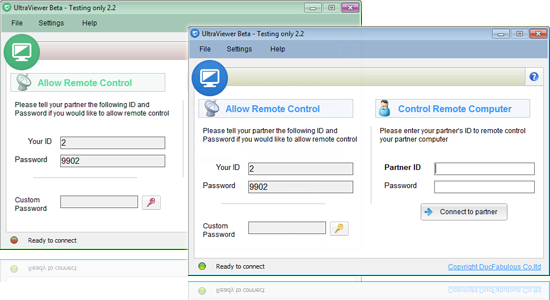
When you launch UltraViewer, you’ll see a clean, two-panel window divided into “Your ID/Password” and “Partner ID” sections:
- Left Panel: Your ID & Password:
- Your ID: A unique 9-digit number that identifies your device (e.g., 123456789). Share this with anyone who needs to control your device.
- Password: A randomly generated 6-digit password that secures remote access. Click “Refresh” to generate a new password (always do this after each session).
- Options: Click the dropdown arrow next to your ID to access additional features: “Set a fixed password” (for frequent connections), “Hide password” (for privacy), and “Copy ID/Pass” (to quickly share via clipboard).
- Right Panel: Partner ID & Connection Controls:
- Partner ID: Enter the 9-digit ID of the device you want to control.
- Connect to Partner: Click this button to initiate a remote session after entering the partner’s ID and password.
- Advanced Options: Click the gear icon to access settings like “Send Ctrl+Alt+Del,” “Disable remote user’s keyboard/mouse,” and “Auto-accept connection requests” (not recommended for security).
- Top Menu Bar:
- File: Access new sessions, open session logs, and exit the program.
- Edit: Copy/paste ID/password, access preferences, and customize the interface.
- View: Toggle full-screen mode, show/hide the toolbar, and adjust display settings.
- Help: Access tutorials, FAQs, and contact support.
2.2 Creating a UltraViewer Account (Free)
While UltraViewer works without an account, creating one unlocks useful features like saved devices, session logs, and sync settings. Here’s how to sign up:
- Click “Sign Up” in the top-right corner of the main window.
- Enter your email address, create a password (must be 8+ characters with letters and numbers), and confirm your password.
- Click “Register” and check your email for a verification link (valid for 24 hours).
- Click the verification link to activate your account, then log in to UltraViewer with your credentials.
Account Benefits:
- Save frequently used device IDs and passwords (no need to re-enter them).
- View session history (date, time, duration, and device ID).
- Sync settings across multiple devices (e.g., security preferences, toolbar layout).
2.3 Essential Settings to Configure After Installation
Customize UltraViewer’s settings to enhance security, performance, and usability. Access the settings menu by clicking the gear icon in the top-right corner:
- Security Settings (Critical):
- Auto-generate password on startup: Enabled by default—keeps your device secure by using a new password for each session.
- Require confirmation for remote control: Enabled by default—you’ll receive a prompt to approve or deny connection requests.
- Enable two-factor authentication (2FA): Adds an extra layer of security—you’ll need to enter a code sent to your email/phone to log in.
- Performance Settings:
- Screen quality: Set to “Auto” for balanced quality and speed, or “Low” for slow networks.
- Compression level: Higher compression improves speed but reduces image quality—adjust based on your internet connection.
- User Experience Settings:
- Toolbars: Customize which buttons appear in the session toolbar (e.g., hide “Record Session” if you don’t use it).
- Notifications: Enable sound alerts for connection requests, chat messages, and file transfers.
- Language: Change the interface language at any time (settings > General > Language).
Part 3: Step-by-Step Guide to Remote Control & Technical Support
UltraViewer’s core use case is remote control, and it excels at simplifying technical support, collaboration, and troubleshooting. Below is a detailed guide to using UltraViewer for common scenarios.
3.1 Scenario 1: Providing Technical Support to a Client
If you’re an IT professional or technical support specialist, UltraViewer makes it easy to assist clients remotely:
- Prepare the Client:
- Guide the client to complete UltraViewer download from https://ultraviewer-cn.com and install the latest version.
- Ask the client to share their UltraViewer ID and password (found in the left pane of their window).
- Initiate the Session:
- Open your UltraViewer, enter the client’s ID in the “Partner ID” field, and click “Connect to Partner.”
- Enter the client’s password when prompted and click “OK.”
- The client will receive a connection request—ask them to click “Allow” to grant access.
- Provide Support Efficiently:
- Once connected, you’ll have full control of the client’s screen. Use the following features to troubleshoot:
- Screen Sharing: Navigate the client’s system, open files, and run diagnostics.
- Chat: Explain your actions to the client (e.g., “I’m checking your device manager for driver issues”).
- File Transfer: Send troubleshooting tools, drivers, or software updates directly to the client’s device.
- Ctrl+Alt+Del: Unlock the client’s screen or access the task manager to close unresponsive apps.
- Once connected, you’ll have full control of the client’s screen. Use the following features to troubleshoot:
- End the Session Securely:
- After resolving the issue, click “End Session” in the toolbar.
- Advise the client to refresh their password (click “Refresh” in their UltraViewer window) to prevent unauthorized access.
3.2 Scenario 2: Collaborating with Remote Team Members
UltraViewer isn’t just for technical support—it’s also a powerful collaboration tool for remote teams:
- Set Up the Session:
- Share your UltraViewer ID and password with team members who need to access your screen.
- Ask team members to enter your ID in their UltraViewer and connect.
- Approve their connection requests (if enabled).
- Collaborate Effectively:
- Use screen sharing to present projects, walk through documents, or brainstorm ideas.
- Enable “Allow remote user to control” (in the session toolbar) to let team members take turns editing files or demonstrating tasks.
- Use the chat feature to share feedback in real time—no need to switch to a separate messaging app.
- Share Files During Collaboration:
- Drag-and-drop files from your computer to the remote screen, or use the file transfer tool to send documents, images, or presentations.
- Team members can also send files to you—perfect for sharing updates or feedback.
3.3 Scenario 3: Accessing Your Own Device Remotely
Need to access files or apps on your home or work computer while away? UltraViewer makes it easy:
- Prepare the Host Device (Computer You Want to Access):
- Ensure the host device is powered on, connected to the internet, and has UltraViewer running.
- Enable “Auto-accept connection requests” (settings > Security) if you won’t be able to approve the request manually.
- Set a fixed password (settings > Security > Set fixed password) for easier access.
- Access from the Client Device (Computer/Phone):
- On your remote device, complete UltraViewer download and installation (Windows) or use the web-based temporary access (mobile).
- Enter the host device’s ID and fixed password.
- Click “Connect to Partner” to access your files, apps, or desktop remotely.
- Tips for Remote Access:
- Use “Low bandwidth mode” if you’re on a mobile network to save data.
- Close unnecessary apps on the host device to improve performance.
- End the session when finished to free up resources.
Part 4: Advanced Features of UltraViewer 2025
UltraViewer’s advanced features are designed to cater to power users, IT professionals, and businesses. Below is a breakdown of the most useful advanced tools and how to use them.
4.1 Session Recording (Premium Feature)
Recording remote sessions is invaluable for training, documentation, or compliance. Here’s how to use it:
- Upgrade to UltraViewer Premium (via your account dashboard).
- Initiate a remote session as usual.
- Click the “Record Session” icon in the floating toolbar.
- Choose a save location for the recording (MP4 format) and click “Start Recording.”
- To stop recording, click the “Stop Recording” icon— the file will be saved automatically.
Use Cases:
- Train new team members by recording technical support sessions.
- Document troubleshooting steps for recurring issues.
- Provide proof of work for clients (e.g., showing that a problem was resolved).
4.2 Multi-Session Management (Premium Feature)
IT professionals and support teams often need to control multiple devices simultaneously—UltraViewer Premium makes this possible:
- Log in to your premium account.
- Connect to the first device as usual.
- To add a second session, click “File > New Session” and enter the next device’s ID and password.
- Switch between sessions using the tabs at the top of the UltraViewer window (each tab shows the device ID and session status).
- Use the “Session Grouping” feature to organize sessions by client, project, or priority.
Pro Tip: Use keyboard shortcuts to switch between sessions (Ctrl+Tab for next session, Ctrl+Shift+Tab for previous session) to save time.
4.3 File Transfer Advanced Options
UltraViewer’s file transfer feature supports more than just drag-and-drop—here are advanced tips:
- Batch File Transfer:
- Select multiple files/folders by holding Ctrl and clicking, then drag them to the remote device.
- Use the “Queue” feature to schedule transfers (premium) if you’re sending large files.
- Resume Interrupted Transfers:
- If a file transfer is interrupted (e.g., network failure), UltraViewer automatically resumes the transfer from where it left off—no need to restart.
- File Transfer Notifications:
- Enable “Notify me when transfer is complete” (settings > File Transfer) to receive alerts when files are sent/received.
4.4 Custom Branding (Enterprise Feature)
Enterprise users can customize UltraViewer’s interface with their company logo, colors, and name—ideal for maintaining brand consistency during client interactions:
- Contact UltraViewer’s enterprise sales team to request custom branding.
- Provide your company logo (PNG format, high resolution) and brand colors.
- The UltraViewer team will create a custom installer with your branding.
- Distribute the custom installer to your team or clients—they’ll see your brand throughout the UltraViewer interface.
Part 5: UltraViewer Security Best Practices for 2025
Remote control tools pose inherent security risks if not used properly. Follow these best practices to protect your device, data, and clients:
5.1 Secure Your UltraViewer Account
- Use a strong, unique password for your UltraViewer account (avoid reusing passwords from other platforms).
- Enable two-factor authentication (2FA) to prevent unauthorized account access.
- Never share your account credentials with anyone—share device IDs and passwords instead.
5.2 Protect Remote Sessions
- Always use a unique password for each session (enable “Auto-generate password on startup”).
- Never enable “Auto-accept connection requests” on public or shared devices.
- End sessions immediately after use—don’t leave sessions running unattended.
5.3 Secure Your Device
- Keep your Windows OS and UltraViewer updated to patch security vulnerabilities—enable “Auto-update” in UltraViewer’s settings.
- Use a reputable antivirus program and firewall to protect against malware.
- Avoid using UltraViewer on public Wi-Fi networks—use a VPN for secure remote access.
5.4 Comply with Data Protection Regulations
- For business use, ensure UltraViewer aligns with regulations like GDPR, HIPAA, or CCPA.
- Avoid accessing or transferring sensitive data (e.g., credit card numbers, medical records) during remote sessions unless necessary.
- Delete session recordings and logs after they’re no longer needed (or store them securely).
Part 6: UltraViewer vs. Competitors (2025 Comparison)
How does UltraViewer stack up against other popular remote control tools? Here’s a side-by-side comparison:
| Feature | UltraViewer | TeamViewer | AnyDesk |
|---|---|---|---|
| Free Version | ✅ (core features) | ❌ (7-day trial only) | ✅ (limited features) |
| Paid Pricing | $9.99/user/month (Premium) | $54.90/user/month (Business) | $19.90/user/month (Professional) |
| Windows Compatibility | Windows 7–11, Server | Windows 7–11, Server | Windows 7–11, Server |
| Mac Compatibility | ❌ | ✅ | ✅ |
| Mobile Compatibility | ❌ (web-based only) | ✅ | ✅ |
| File Transfer | ✅ (up to 10GB free) | ✅ (unlimited) | ✅ (unlimited) |
| Multi-Session Management | ✅ (up to 5 sessions Premium) | ✅ (unlimited Business) | ✅ (unlimited Professional) |
| Session Recording | ✅ (Premium) | ✅ (Business) | ✅ (Professional) |
| Custom Branding | ✅ (Enterprise) | ✅ (Enterprise) | ✅ (Enterprise) |
Verdict: UltraViewer is the best choice for Windows users seeking a cost-effective, user-friendly remote control tool. It offers the core features most users need for free, with affordable premium plans that undercut competitors like TeamViewer and AnyDesk. While it lacks Mac and mobile apps, its web-based temporary access feature and Windows compatibility make it ideal for personal use, small businesses, and IT professionals.
Part 7: Frequently Asked Questions (FAQs)
7.1 UltraViewer Download & Installation
- Q: Is UltraViewer free to download and use?A: Yes—UltraViewer’s core features (remote control, file transfer, chat) are free forever. Premium plans unlock advanced features like session recording and multi-session management.
- Q: How often is UltraViewer updated?A: UltraViewer releases updates every 1–2 months, including security patches, new features, and compatibility improvements. Enable auto-update to ensure you’re always using the latest version.
- Q: Can I download UltraViewer on a Chromebook?A: No—Chromebooks run Chrome OS, which is not supported by UltraViewer. You can use UltraViewer on a Chromebook via a Windows virtual machine (e.g., Parallels Desktop for Chrome OS).
7.2 Usage & Troubleshooting
- Q: Why is my remote session lagging?A: Lag is usually caused by a slow internet connection. Try reducing screen resolution, enabling low bandwidth mode, or closing background apps on both devices.
- Q: Can I use UltraViewer to control a device behind a firewall?A: Yes—UltraViewer uses port 5938 for connections, which is usually open on most firewalls. If the session fails, ask the controlled device’s user to allow UltraViewer through their firewall.
- Q: How do I uninstall UltraViewer?A: Windows 10/11: Go to Settings > Apps > Apps & features > search for “UltraViewer” > click “Uninstall.” Windows 7: Go to Control Panel > Programs > Uninstall a Program > select “UltraViewer” > click “Uninstall.”
7.3 Billing & Support
- Q: Can I cancel my UltraViewer Premium subscription at any time?A: Yes—you can cancel your subscription via your account dashboard. No refunds are provided for partial months, but you’ll have access to premium features until the end of your billing cycle.
- Q: How long does it take to get support from UltraViewer?A: Free users receive a response within 2–3 business days. Premium users get priority support (1–2 business days), and Enterprise users have 24/7 dedicated support.
Conclusion: UltraViewer Download—Your Gateway to Seamless Remote Access
In 2025, UltraViewer remains a top-tier remote control tool that balances simplicity, functionality, and affordability. Whether you’re a technical support specialist, a remote team member, or someone who needs to access their device from afar, UltraViewer delivers a reliable, secure experience that rivals premium alternatives—without the high cost.
By following this tutorial, you’ve learned how to complete a safe UltraViewer download from the official website, install the software on Windows devices, navigate its interface, and use core and advanced features. You’ve also discovered security best practices to protect your data and clients, making UltraViewer a trustworthy tool for personal and business use.
The key to maximizing UltraViewer’s value is to use the latest version—always download updates from https://ultraviewer-cn.com to access new features and security patches. With its free core functionality, affordable premium plans, and user-friendly design, UltraViewer is the perfect solution for anyone needing seamless remote access in 2025.
If you’re ready to get started, visit https://ultraviewer-cn.com to complete your UltraViewer download and join millions of users who trust UltraViewer for their remote control needs.