Introduction: Why UltraViewer Stands Out as a Top Remote Control Tool in 2025
In an era where remote work, technical support, and cross-location collaboration have become indispensable, a reliable remote control tool is no longer a luxury but a necessity. UltraViewer has emerged as a leading choice among millions of users worldwide, thanks to its lightweight design, stable connection, intuitive interface, and cost-effective features. Whether you’re an IT professional providing technical support to clients, a team member collaborating on projects with colleagues across cities, or a parent helping a family member troubleshoot device issues from afar, UltraViewer delivers a seamless remote control experience that rivals premium alternatives—without the hefty price tag.
What sets UltraViewer apart in 2025? First, its exceptional compatibility supports Windows 7 to Windows 11 (32-bit and 64-bit), Windows Server editions, and even works seamlessly with virtual machines, making it accessible to both personal and enterprise users. Second, its robust security features include end-to-end encryption for data transmission, password protection for remote access, and session logging, ensuring that sensitive information remains confidential. Third, its user-friendly design requires no advanced technical skills—even beginners can set up and use it within minutes. Finally, UltraViewer offers core remote control functions (screen sharing, file transfer, keyboard/mouse control) for free, with premium plans unlocking additional features like multi-session management and priority support.
To unlock these powerful capabilities, the first step is a secure and successful UltraViewer download and installation. It’s critical to obtain the latest version (v6.6.0 as of 2025) from the official website to avoid malware, outdated features, or compatibility issues. This guide will walk you through the entire process—from UltraViewer download across devices to advanced remote control techniques—helping you master every aspect of this versatile tool.
Part 1: UltraViewer Download Guide: Official Channels & Step-by-Step Installation
The safety and functionality of UltraViewer depend entirely on downloading from official sources. Third-party websites often distribute modified versions with hidden ads, viruses, or missing features, putting your device and data at risk. Below is a detailed guide for UltraViewer download and installation on Windows (the primary supported OS) and tips for mobile device compatibility.
1.1 Official UltraViewer Download Channels
UltraViewer’s official download channel is the most reliable source for the latest, safest version. Here’s how to access it:
- Primary Channel: Visit the official website via https://ultraviewer-cn.com. The homepage prominently features the “Download” button, which automatically detects your Windows version (32-bit/64-bit) to provide the correct installer.
- Alternative Official Link: If the main page is temporarily unavailable, use the official backup download page linked in the website’s footer—always verify the URL to ensure it starts with “https://ultraviewer-cn.com” to avoid phishing sites.
Avoid third-party platforms like unregulated download portals, torrent sites, or social media links. These often bundle UltraViewer with bloatware or malware that can compromise your device’s security.
1.2 UltraViewer Download & Installation on Windows (2025 Latest Version)
Windows is UltraViewer’s primary supported operating system, and the installation process is straightforward—follow these steps for a smooth setup:
- Prepare for Download:
- Ensure your Windows device meets the minimum requirements: Windows 7 SP1 or later (Windows 10/11 recommended), 1GB RAM, 50MB of free disk space, and a stable internet connection (for download and remote sessions).
- Temporarily disable any non-essential antivirus software (some tools may falsely flag UltraViewer’s installer as suspicious—this is a false positive, and you can re-enable antivirus after installation).
- Initiate UltraViewer Download:
- Open your preferred browser (Chrome, Edge, Firefox) and navigate to https://ultraviewer-cn.com.
- Locate the “Download UltraViewer Latest Version” button (usually in the center of the homepage or under the “Download” tab). Click it to start the download.
- The installer (UltraViewer_Setup.exe) is approximately 10MB, so the download should complete in seconds to minutes, depending on your internet speed.
- Run the Installer:
- Once the download finishes, locate the installer file in your “Downloads” folder (or the folder you specified). Double-click it to launch the installation wizard.
- A User Account Control (UAC) prompt may appear, asking for permission to make changes to your device. Click “Yes” to proceed.
- Customize Installation Settings:
- The installation wizard will guide you through setup. First, select your preferred language (supports 20+ languages, including English, Chinese, Spanish, French, and German).
- Choose the installation directory. The default path is “C:\Program Files\UltraViewer,” but you can click “Browse” to select a different folder (e.g., D:\Programs) to save space on your system drive.
- Optional: Check the boxes for “Create a desktop shortcut” (recommended for quick access) and “Add UltraViewer to startup” (useful if you use it frequently).
- Click “Install” to begin the process. The installation takes 1–2 minutes, with a progress bar showing completion status.
- Complete Setup & Launch UltraViewer:
- Once installation finishes, check the box for “Launch UltraViewer” and click “Finish.” The program will open automatically.
- On first launch, UltraViewer may prompt you to allow firewall access. Click “Allow” to ensure the program can establish remote connections.
1.3 Troubleshooting UltraViewer Download & Installation Issues
While most users experience smooth downloads and installations, common issues may arise—here are 2025’s latest solutions:
- Download Speed Is Slow or Stalled:
- Switch to a wired internet connection or a faster Wi-Fi network.
- Clear your browser cache and cookies, then restart the download from https://ultraviewer-cn.com.
- Disable bandwidth-heavy apps (e.g., video streaming services, cloud sync tools) during the download.
- Installer Fails to Launch:
- Right-click the installer file and select “Run as administrator” to bypass permission restrictions.
- Ensure your Windows OS is up to date (go to Settings > Windows Update > Check for updates) to fix compatibility bugs.
- Antivirus Blocks the Installer:
- Add UltraViewer’s installer to your antivirus exceptions list.
- Download the installer again from the official website to confirm it’s not corrupted.
- UltraViewer Crashes After Launch:
- Uninstall UltraViewer, restart your device, and reinstall the latest version from https://ultraviewer-cn.com.
- Check if your device meets the minimum system requirements—outdated hardware or OS versions may cause instability.
1.4 Mobile Device Compatibility (2025 Update)
UltraViewer does not currently offer a dedicated mobile app (iOS/Android), but mobile users can still participate in remote sessions as the “controlled device” (i.e., the device being accessed) using the following workaround:
- Install a Windows emulator on your mobile device (e.g., BlueStacks, NoxPlayer) that supports running Windows applications.
- Follow the same UltraViewer download and installation steps within the emulator.
- Note: Mobile remote control (controlling a PC from a phone) is not fully supported due to touchscreen limitations. For on-the-go remote access, use UltraViewer’s web-based temporary access feature (covered in Part 3).
Part 2: Getting Started with UltraViewer: Basic Setup & Interface Overview
After a successful UltraViewer download and installation, you’ll need to familiarize yourself with its interface and basic settings to start remote sessions. This section covers account setup, interface navigation, and essential preferences.
2.1 Account Setup (Optional but Recommended)
UltraViewer allows free use without creating an account—you can start remote sessions using a unique ID and password. However, creating an account (free) offers additional benefits:
- Save frequently accessed devices (ID and password) for quick connections.
- Access session logs to review past remote sessions.
- Sync settings across multiple devices (e.g., if you use UltraViewer on both your work and personal PC).
To create an account:
- Launch UltraViewer and click “Sign Up” in the top-right corner of the main window.
- Enter your email address, create a password (8+ characters, including letters and numbers), and confirm your password.
- Verify your email by clicking the link sent to your inbox (check spam folder if not received).
- Log in with your credentials to access your account dashboard.
2.2 Interface Overview
UltraViewer’s interface is designed for simplicity, with three main sections:
- Your ID & Password (Controlled Device):
- Located in the left pane, this section displays your unique UltraViewer ID (a 9-digit number) and a randomly generated password.
- Share this ID and password with the person who will control your device (the “controller”).
- Click “Refresh” to generate a new password (recommended after each session for security).
- Partner ID & Control Section (Controller Device):
- In the right pane, enter the partner’s UltraViewer ID (the ID of the device you want to control).
- Click “Connect to Partner” to initiate a remote session.
- Optional: Check “Send Ctrl+Alt+Del” to send the Ctrl+Alt+Del command to the controlled device (useful for unlocking screens or accessing task manager).
- Toolbar (During Remote Sessions):
- Once a session is active, a floating toolbar appears at the top of the controlled device’s screen (customizable position). Key features include:
- Screen Sharing: Toggle full-screen or partial-screen sharing.
- File Transfer: Send files/folders between devices (supports drag-and-drop).
- Chat: Send text messages to the controlled device’s user.
- Record Session: Capture the remote session for training or documentation (premium feature).
- End Session: Terminate the remote connection.
- Once a session is active, a floating toolbar appears at the top of the controlled device’s screen (customizable position). Key features include:
2.3 Essential Settings for Optimal Performance
Customize UltraViewer’s settings to match your needs—access the settings menu by clicking the gear icon in the top-right corner:
- Security Settings:
- Enable “Auto-generate password on startup” to ensure a unique password for each session.
- Check “Require partner’s confirmation before controlling” to prevent unauthorized access—you’ll receive a prompt to approve or deny connection requests.
- Set a “Session timeout” (e.g., 5 minutes of inactivity) to automatically end sessions and protect your device.
- Display Settings:
- Adjust “Screen resolution” to match the controlled device’s display (reducing resolution can improve connection speed on slow networks).
- Enable “Show remote cursor” to see the controller’s cursor position—helpful for guiding users during technical support.
- Network Settings:
- Select “Auto-detect network” for optimal connection quality, or manually choose “Low bandwidth mode” if you’re on a slow internet connection (reduces video quality to prioritize stability).
Part 3: Core Features of UltraViewer: Step-by-Step Usage Guides
UltraViewer’s core features are designed to simplify remote control, file transfer, and collaboration. Below is a detailed breakdown of how to use each feature effectively.
3.1 Initiating a Remote Control Session
Remote control is UltraViewer’s primary function—follow these steps to connect to another device:
For the Controller (Person Controlling the Device):
- Ensure both you and the controlled device have completed UltraViewer download and installation of the latest version.
- Ask the controlled device’s user to share their UltraViewer ID and password (found in the left pane of their UltraViewer window).
- Open your UltraViewer, enter the partner’s ID in the “Partner ID” field (right pane), and click “Connect to Partner.”
- Enter the partner’s password when prompted, then click “OK.”
- The controlled device’s user will receive a connection request (if they enabled the confirmation setting). Once approved, you’ll gain full control of their screen—you can move the mouse, type on the keyboard, and access files just as if you were sitting in front of the device.
For the Controlled Device (Person Allowing Access):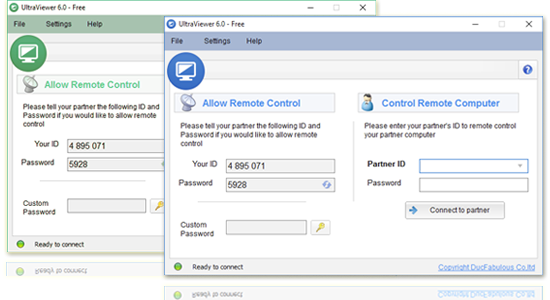
- Launch UltraViewer and locate your ID and password (left pane).
- Share your ID and password with the controller (via phone call, text, or email—avoid public channels for security).
- Approve the connection request when prompted (if enabled).
- During the session, you can monitor the controller’s actions and communicate via the chat feature if needed.
3.2 File Transfer: Securely Share Files Between Devices
UltraViewer’s file transfer feature eliminates the need for email or cloud storage when sharing files during remote sessions. It supports files of any size (up to 10GB per file in the free version) and encrypts all transfers:
- Initiate File Transfer:
- During an active remote session, click the “File Transfer” icon in the floating toolbar.
- A file transfer window will open, showing two panels: your local files (left) and the controlled device’s files (right).
- Send Files:
- Navigate to the file/folder you want to send in the local files panel.
- Drag-and-drop the file/folder to the desired location in the controlled device’s files panel, or select the file and click “Send.”
- Receive Files:
- If the controller sends you a file, a notification will appear. Click “Accept” to save the file to your default download folder, or “Browse” to select a custom location.
- Tips for Smooth File Transfers:
- Compress large files into ZIP/RAR archives to reduce transfer time.
- Avoid transferring multiple large files simultaneously on slow networks—prioritize critical files.
3.3 Text Chat: Communicate During Remote Sessions
Text chat is a useful complement to remote control, allowing you to explain actions, share instructions, or answer questions without interrupting the session:
- Click the “Chat” icon in the floating toolbar during a remote session.
- Type your message in the input field and press Enter to send.
- The controlled device’s user will see the chat window pop up and can reply in real time.
- Use chat to share URLs, error messages, or step-by-step instructions—this is especially helpful for technical support scenarios.
3.4 Temporary Remote Access (Web-Based)
For users who need to access a device without installing UltraViewer (e.g., clients who are uncomfortable downloading software), UltraViewer offers a web-based temporary access feature (available in the latest version):
- The controlled device’s user visits https://ultraviewer-cn.com and clicks “Temporary Access” in the top menu.
- A unique temporary ID and password are generated—share these with the controller.
- The controller opens their UltraViewer, enters the temporary ID and password, and clicks “Connect to Partner.”
- The controlled device’s user approves the request, and the remote session begins—no installation required for the controlled device.
Part 4: Advanced UltraViewer Tips & Tricks for 2025
To maximize UltraViewer’s potential, master these advanced tips—ideal for IT professionals, frequent users, and enterprise teams.
4.1 Multi-Session Management (Premium Feature)
UltraViewer’s premium plan allows you to control multiple devices simultaneously—perfect for IT teams supporting multiple clients:
- Upgrade to UltraViewer Premium via your account dashboard (pricing starts at $9.99/month).
- Launch UltraViewer and connect to the first device as usual.
- To add a second session, click “File > New Session” and enter the second device’s ID and password.
- Switch between sessions using the tabs at the top of the UltraViewer window.
- Use the “Session Grouping” feature to organize sessions by client or project for easier management.
4.2 Optimizing Connection Speed for Slow Networks
If you’re working with a slow or unstable internet connection, use these tricks to improve remote session performance:
- Reduce Screen Resolution: In the session toolbar, click “Display > Reduce Resolution” to lower the controlled device’s screen resolution—this reduces data transfer and speeds up responsiveness.
- Disable Background Apps: Ask the controlled device’s user to close bandwidth-heavy apps (e.g., video streaming, cloud backups) during the session.
- Use Low Bandwidth Mode: Access UltraViewer’s settings > Network > select “Low bandwidth mode” to prioritize stability over video quality.
- Avoid Full-Screen Sharing: Share only the specific window you need (click “Display > Share Window” and select the target window) instead of the entire screen.
4.3 Automating Remote Sessions with Scripts
Advanced users can automate repetitive tasks (e.g., software installations, system updates) during remote sessions using UltraViewer’s script feature:
- Create a batch script (.bat) or PowerShell script (.ps1) with the tasks you want to automate.
- During a remote session, use the file transfer feature to send the script to the controlled device.
- Open the command prompt or PowerShell on the controlled device (via UltraViewer) and run the script.
- Monitor the script’s progress via the remote session—this saves time for tasks that require repeated execution across multiple devices.
4.4 Securing Remote Access: Best Practices
Security is critical for remote control tools—follow these best practices to protect your device and data:
- Never share your UltraViewer ID and password with untrusted individuals.
- Generate a new password after each session (click “Refresh” in the left pane).
- Enable two-factor authentication (2FA) for your UltraViewer account (available in settings > Security).
- Review session logs regularly (account dashboard > Session History) to track who accessed your device and when.
- Uninstall outdated versions of UltraViewer and always complete UltraViewer download of the latest version to patch security vulnerabilities.
Part 5: UltraViewer Pricing & Version Comparison (2025)
UltraViewer offers three pricing tiers to suit different user needs—all plans include core remote control features, with premium plans unlocking advanced tools:
| Feature | Free Version | Premium (Monthly) | Enterprise (Custom) |
|---|---|---|---|
| Remote Control | ✅ | ✅ | ✅ |
| File Transfer (Up to 10GB) | ✅ | ✅ | ✅ |
| Text Chat | ✅ | ✅ | ✅ |
| Session Logs | ❌ | ✅ | ✅ |
| Multi-Session Management | ❌ | Up to 5 sessions | Unlimited sessions |
| Session Recording | ❌ | ✅ | ✅ |
| Priority Support | ❌ | ✅ | 24/7 Dedicated Support |
| Custom Branding | ❌ | ❌ | ✅ |
| Advanced Security Features | ❌ | ❌ | ✅ (SAML SSO, Audit Trails) |
| Price | $0 | $9.99/user | Custom Quote |
- Free Version: Ideal for personal use, occasional technical support, or small teams with basic needs.
- Premium Version: Best for IT professionals, freelancers, and small businesses that require multi-session management and session recording.
- Enterprise Version: Designed for large organizations with complex security requirements, custom branding, and dedicated support.
To upgrade, log in to your UltraViewer account, navigate to the “Subscription” tab, and select your preferred plan. Payment options include credit card, PayPal, and bank transfer.
Part 6: Frequently Asked Questions (FAQs) About UltraViewer Download & Usage
6.1 UltraViewer Download & Installation FAQs
- Q: Is UltraViewer compatible with Windows 11?A: Yes—UltraViewer v6.0+ fully supports Windows 11 (32-bit and 64-bit). Ensure you complete UltraViewer download of the latest version from https://ultraviewer-cn.com for optimal compatibility.
- Q: Can I download UltraViewer on a Mac?A: Currently, UltraViewer does not support macOS. Mac users can use alternative remote control tools (e.g., TeamViewer) or run Windows via Boot Camp to use UltraViewer.
- Q: Why is my UltraViewer download stuck at 99%?A: This is often caused by a slow or unstable internet connection. Pause the download, restart your browser, and try again from https://ultraviewer-cn.com. If the issue persists, clear your browser cache or use a different browser.
6.2 Usage FAQs
- Q: How do I fix a frozen remote session?A: First, check your internet connection—restart your router if needed. If the session remains frozen, click “End Session” and reconnect. For persistent issues, update UltraViewer to the latest version or reinstall the software.
- Q: Can I transfer files without initiating a remote control session?A: No—file transfer requires an active remote session. For standalone file sharing, use a cloud service like Google Drive or Dropbox.
- Q: Is UltraViewer safe to use for business purposes?A: Yes—UltraViewer uses 256-bit AES encryption for data transmission and complies with data protection regulations like GDPR. Enterprise users can add additional security features (e.g., SAML SSO) for enhanced protection.
6.3 Technical Support FAQs
- Q: How do I contact UltraViewer support?A: Free users can submit a support ticket via the official website (https://ultraviewer-cn.com/support). Premium users have access to priority email support, while Enterprise users receive 24/7 dedicated support.
- Q: Where can I find video tutorials for UltraViewer?A: The UltraViewer official website has a “Tutorials” section with step-by-step videos, and the YouTube channel (UltraViewer Official) features detailed guides for beginners and advanced users.
Conclusion: Master UltraViewer with a Secure Download & Smart Usage
UltraViewer remains a top choice for remote control in 2025, offering a perfect balance of simplicity, functionality, and security. By following this guide, you’ve learned how to complete a safe UltraViewer download from the official website, install the software on Windows devices, navigate its interface, and use core features like remote control, file transfer, and text chat. Advanced tips like multi-session management and network optimization will help you maximize efficiency, whether you’re using UltraViewer for personal use or business.
Remember, the key to a smooth UltraViewer experience is always using the latest version—regularly check https://ultraviewer-cn.com for updates, security patches, and new features. With its free core functionality and affordable premium plans, UltraViewer is a versatile tool that adapts to your remote control needs, saving you time, money, and frustration.
If you haven’t already, visit https://ultraviewer-cn.com to complete your UltraViewer download and start enjoying seamless remote access today. Whether you’re troubleshooting a friend’s laptop, collaborating with a remote team, or providing technical support to clients, UltraViewer has everything you need to stay connected and productive.