In the era of widespread remote work and global collaboration, remote desktop software has become an indispensable tool for individuals, tech support teams, and enterprises. UltraViewer, as a lightweight and efficient remote control solution, stands out among numerous alternatives with its user-friendly interface, stable connection performance, and free core functions. However, many users encounter difficulties in the process of UltraViewer download, installation, and usage, which affects the efficiency of remote collaboration. This comprehensive tutorial will guide you through every step from UltraViewer download to advanced application, helping you master all the practical skills of this software. For a safe and official UltraViewer download, please visit the official website:https://ultraviewer-cn.com. This article is updated in 2025 to adapt to the latest software version and user scenarios, providing you with the most practical and up-to-date guidance.
I. Why Choose UltraViewer? Advantages That Make It Worth UltraViewer Download
Before starting the UltraViewer download and usage guide, it is essential to understand why UltraViewer has become the preferred remote control tool for millions of users. In the 2025 remote software market, where products like TeamViewer and AnyDesk dominate, UltraViewer has gained a firm foothold with its unique advantages. First of all, UltraViewer is completely free for personal and non-commercial use, which is a huge advantage compared to TeamViewer's high subscription fees . Secondly, UltraViewer has a lightweight installation package, which takes up little system resources and can run smoothly even on old computers with low configurations . In addition, UltraViewer supports real-time remote control, built-in chat function, drag-and-drop file transfer, and multi-monitor switching, which can fully meet the needs of daily remote support and collaborative work . Unlike AnyDesk, which has unstable connection performance in cross-operator networks , UltraViewer has optimized its server nodes in 2025, greatly improving the stability of cross-region and cross-network connections. These advantages make UltraViewer a cost-effective choice for personal users and small and medium-sized enterprises, and also lay the foundation for its widespread use.
II. Step-by-Step Guide for UltraViewer Download and Installation (2025 Latest Version)
The first step to using UltraViewer smoothly is to complete the UltraViewer download and installation correctly. Choosing the official and safe download channel is crucial to avoid malware infection and software function abnormalities. The following is a detailed step-by-step guide for UltraViewer download and installation, applicable to all Windows systems (Windows 10, Windows 11, etc.), as UltraViewer currently focuses on Windows platform support .
1. Preparation Before UltraViewer Download
Before starting the UltraViewer download, you need to make simple preparations to ensure the smooth progress of the download and installation. First, check the network connection status of your computer to ensure a stable internet connection, which can avoid download interruptions caused by network fluctuations. Secondly, check the available space of the system disk (usually the C drive). The UltraViewer installation package is only a few megabytes, and the installed software takes up about 50MB of space, so you only need to ensure that there is more than 100MB of free space on the system disk. In addition, it is recommended to close other unnecessary software and antivirus programs temporarily during the download and installation process, because some antivirus software may mistakenly intercept the UltraViewer installation package, resulting in installation failure. After completing these preparations, you can start the UltraViewer download process.
2. Official UltraViewer Download Steps
Step 1: Open your browser (Chrome, Edge, Firefox, etc.), and enter the official UltraViewer download link in the address bar: https://ultraviewer-cn.com. It should be emphasized that to ensure the safety and integrity of the software, you must download it through the official website. Third-party download platforms may bundle adware or malware, which will bring potential risks to your computer security.
Step 2: After entering the official website, find the "Download" button on the homepage. The official website of UltraViewer has a simple and clear interface, and the download button is usually prominently displayed in the center or top of the page. Click the "Download" button, and the browser will automatically start downloading the latest version of the UltraViewer installation package (the latest version in 2025 is 6.6.124 ). During the download process, you can view the download progress in the browser's download manager. The download speed depends on your network environment, and it usually takes only 1-3 minutes to complete the download.
Step 3: After the download is complete, find the downloaded installation package in the browser's download folder. The default name of the UltraViewer installation package is usually "UltraViewer_Setup.exe". Before installation, you can right-click the installation package and select "Properties" to check the file information to ensure that it is not modified by third parties.
3. UltraViewer Installation Process and Attention Points
Step 1: Double-click the "UltraViewer_Setup.exe" installation package to start the installation. If a User Account Control (UAC) prompt pops up on the Windows system, click "Yes" to allow the program to make changes to the computer.
Step 2: Enter the UltraViewer installation wizard interface, first select the installation language. The official version of UltraViewer supports multiple languages, including English, Chinese, Spanish, French, etc. You can select the appropriate language according to your needs and click "Next".
Step 3: Read the user license agreement, check "I accept the agreement" and click "Next". It is recommended that you take a few minutes to browse the content of the agreement to understand the rights and obligations of both parties.
Step 4: Select the installation directory. By default, UltraViewer will be installed in the "Program Files" folder of the system disk. If you want to change the installation directory, click "Browse", select the target folder, and then click "Next". It should be noted that the installation path should not contain Chinese characters, otherwise it may cause software runtime errors.
Step 5: Choose additional tasks, such as creating a desktop shortcut, adding UltraViewer to the quick launch bar, etc. It is recommended to check "Create a desktop shortcut" to facilitate quick startup of the software later. After making your selection, click "Next".
Step 6: Click "Install" to start the formal installation. The installation process is very fast, usually completing within 1-2 minutes. During the installation, you can view the installation progress bar.
Step 7: After the installation is complete, check "Launch UltraViewer" and click "Finish" to exit the installation wizard and start UltraViewer automatically. At this point, the entire process of UltraViewer download and installation is completed. If the software does not start automatically, you can double-click the UltraViewer shortcut on the desktop to launch it.
Attention Points: 1. Do not install UltraViewer in the same folder as other remote control software to avoid file conflicts. 2. If the installation fails, check whether the system disk has enough free space and whether the antivirus software is closed. 3. After the installation is complete, it is recommended to update the software to the latest version in time. You can check for updates through the "Help" menu in UltraViewer.
III. Basic Usage of UltraViewer: Master Remote Control in 5 Minutes
After completing the UltraViewer download and installation, we will start to learn the basic usage of UltraViewer. UltraViewer's interface is simple and intuitive, and the basic remote control function can be mastered without professional technical knowledge. The core of UltraViewer's remote control is the connection through ID and password. The following will detailedly explain the basic operations such as establishing a remote connection, using the chat function, and transferring files.
1. Understanding UltraViewer's Main Interface
After launching UltraViewer, you will see its main interface, which is divided into two main parts: "Control Remote Computer" and "Allow Remote Control". In the "Allow Remote Control" area, you can see your computer's unique UltraViewer ID and password. This ID and password are the key to allowing others to remotely control your computer. You need to provide this information to the person who will control your computer. In the "Control Remote Computer" area, there are input boxes for "Partner ID" and "Partner Password". You need to enter the ID and password of the remote computer you want to control here to establish a connection.
In addition to the core connection area, the main interface also includes some functional buttons, such as "Chat", "File Transfer", "View Only", "Full Screen", etc. These buttons will be grayed out before the connection is established and will become available after the connection is successful. The menu bar at the top of the interface includes "File", "Edit", "View", "Tools", "Help" and other options, which provide more detailed function settings and help information.
2. Establishing a Remote Connection
UltraViewer supports two-way remote control: controlling a remote computer and being controlled by a remote computer. The following are the operation steps for both scenarios:
Scenario 1: You need to control a remote computer (e.g., provide technical support to others)
Step 1: Ask the other party to start UltraViewer on their computer and provide you with their UltraViewer ID and password.
Step 2: On your UltraViewer main interface, enter the other party's ID in the "Partner ID" input box and the other party's password in the "Partner Password" input box.
Step 3: Click the "Connect to partner" button. At this time, UltraViewer will try to establish a connection with the remote computer. If the ID and password are correct and the remote computer is connected to the internet, the connection will be established successfully within a few seconds. After the connection is successful, you will see the desktop screen of the remote computer on your interface, and you can use your mouse and keyboard to control the remote computer as if you were operating it locally.
Scenario 2: Allowing others to control your computer (e.g., asking for technical support)
Step 1: Start UltraViewer on your computer and find your ID and password in the "Allow Remote Control" area.
Step 2: Provide your ID and password to the person who will control your computer. It should be noted that the password will be automatically updated every time you restart UltraViewer for security reasons. If you need to set a fixed password, you can do so through the "Tools" menu.
Step 3: After the other party enters your ID and password and clicks "Connect to partner", you will receive a connection request prompt on your computer. Click "Allow" to agree to the connection, and the other party can then control your computer remotely. During the control process, you can see all the operations of the other party in real time.
3. Using the Built-in Chat Function
UltraViewer has a built-in real-time chat function, which allows you to communicate with the remote computer user during the remote control process without using additional communication tools. This is very convenient for technical support scenarios where you need to explain operations and ask questions.
Usage Steps: After establishing a remote connection, click the "Chat" button on the main interface (or use the shortcut key Ctrl+Alt+C) to open the chat window. In the chat window, you can type text and send messages. The other party will receive the message in real time and can reply to you. The chat history will be saved during the session. After the connection is disconnected, the chat history will be cleared automatically. If you need to hide the chat window temporarily, you can click the "Minimize" button in the upper right corner of the chat window, and it will be minimized to the system tray.
4. Drag-and-Drop File Transfer
File transfer is one of the most commonly used functions in remote collaboration. UltraViewer supports convenient drag-and-drop file transfer, which allows you to transfer files between local and remote computers quickly.
Usage Steps: 1. After establishing a remote connection, find the file or folder you want to transfer on your local computer.
2. Hold down the left mouse button, drag the file or folder to the UltraViewer remote control window, and release the mouse button. At this time, a file transfer prompt will pop up, showing the file name, size, and transfer progress.
3. The remote computer user can choose to "Accept" or "Reject" the file transfer. If the other party accepts, the file will start to be transferred. The transfer speed depends on the network bandwidth of both parties. For large files (more than 1GB), it is recommended to compress the file into a zip package first to improve the transfer speed and stability .
4. If you want to transfer files from the remote computer to the local computer, the operation is similar. The remote user only needs to drag the file from their computer to the remote control window, and you can accept the file transfer on your local computer.
Attention Points: 1. UltraViewer does not limit the size of transferred files, but the transfer speed is affected by the network. It is recommended to perform large file transfers when the network is stable. 2. During the file transfer process, do not close the UltraViewer window, otherwise the transfer will be interrupted. 3. You can check the file transfer history through the "Tools" > "File Transfer History" menu.
IV. Advanced UltraViewer Usage Skills: Improve Remote Collaboration Efficiency
Mastering the basic usage of UltraViewer can meet daily remote control needs, but learning some advanced skills can further improve your remote collaboration efficiency. The following will introduce advanced functions such as multi-monitor switching, screen resolution adjustment, unattended access, and shortcut key usage, helping you use UltraViewer more proficiently.
1. Multi-Monitor Switching
If the remote computer has multiple monitors (dual-screen or triple-screen), UltraViewer supports free switching between different monitors, which is very useful for technical support and office scenarios that need to operate multiple screens.
Usage Steps: After establishing a remote connection, click the "View" menu on the UltraViewer main interface, and select "Switch Monitor" from the drop-down menu. You can see the list of monitors of the remote computer (marked as Monitor 1, Monitor 2, etc.). Select the monitor you want to view, and the UltraViewer window will display the screen content of the selected monitor. You can also use the shortcut key Ctrl+Alt+M to switch between monitors quickly. In addition, you can select "Show All Monitors" to display the screens of all monitors of the remote computer in the same window, which is convenient for viewing the overall situation.
2. Adjusting Remote Screen Resolution and Quality
In different network environments, adjusting the remote screen resolut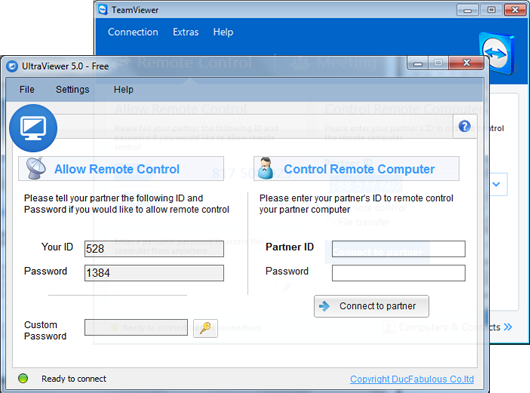 ion and quality can balance the smoothness and clarity of the remote control. UltraViewer provides flexible resolution and quality adjustment options to adapt to different network conditions.
ion and quality can balance the smoothness and clarity of the remote control. UltraViewer provides flexible resolution and quality adjustment options to adapt to different network conditions.Usage Steps: 1. After establishing a remote connection, click the "View" menu and select "Screen Resolution" from the drop-down menu. You can choose different resolution options according to your needs. Lowering the resolution can reduce network bandwidth occupation and make the remote control more smooth in a low-bandwidth network environment.
2. To adjust the screen quality, click the "View" menu and select "Image Quality". There are three options: High, Medium, and Low. High quality provides clearer screen display, suitable for high-bandwidth networks; Low quality prioritizes smoothness, suitable for low-bandwidth or unstable networks. UltraViewer also supports automatic image quality adjustment, which can adjust the quality according to the network conditions in real time. You can enable this function through the "Tools" > "Options" > "Display" menu.
3. Unattended Access Setting
In some scenarios, you may need to control a remote computer when no one is on the other side (e.g., remotely accessing your home computer from the company). At this time, you need to set up unattended access in UltraViewer.
Setting Steps: 1. On the remote computer that needs unattended access, start UltraViewer and click the "Tools" menu, then select "Options".
2. In the pop-up options window, select the "Security" tab. Find the "Unattended Access" option and check "Enable Unattended Access".
3. Set a fixed password for unattended access. This password is different from the default dynamic password. It will not change when UltraViewer is restarted, so you can use this password to access the remote computer at any time.
4. Click "OK" to save the settings. After setting up, you only need to remember the ID and fixed password of the remote computer. When you need to access it remotely, enter the ID and fixed password in your local UltraViewer, and you can establish a connection without the other party's manual approval.
Security Tips: The fixed password for unattended access should be set to a complex combination of letters, numbers, and symbols to avoid being guessed by others. It is recommended to change the password regularly to ensure the security of the remote computer. In addition, you can enable the "Access Log" function through the "Tools" > "Options" > "Security" menu to record all remote access records, which is convenient for checking abnormal access.
4. Commonly Used UltraViewer Shortcut Keys
Using shortcut keys can help you complete operations quickly without clicking the mouse, greatly improving the efficiency of remote control. The following are commonly used UltraViewer shortcut keys:
1. Ctrl+Alt+C: Open/close the chat window
2. Ctrl+Alt+F: Switch to full-screen mode
3. Ctrl+Alt+M: Switch between multi-monitors
4. Ctrl+Alt+Q: Disconnect the remote connection
5. Ctrl+Alt+S: Take a screenshot of the remote screen
6. Ctrl+Alt+T: Open the task manager of the remote computer
7. Ctrl+Alt+V: Paste the copied content to the remote computer
You can view all shortcut keys and customize them through the "Tools" > "Options" > "Shortcuts" menu. According to your usage habits, setting personalized shortcut keys can make your operation more smooth.
V. UltraViewer Common Problems and Solutions
In the process of UltraViewer download, installation, and usage, you may encounter some common problems. The following will sort out the most common problems and provide detailed solutions, helping you solve problems quickly and ensure the smooth use of UltraViewer.
1. Problem 1: UltraViewer Download Fails or the Installation Package Is Corrupted
Solutions: 1. Check the network connection: Ensure that your network is stable. If the network is interrupted during the download process, the installation package will be corrupted. You can try to re-download UltraViewer through the official website: https://ultraviewer-cn.com.
2. Close the antivirus software: Some antivirus software may mistakenly identify the UltraViewer installation package as a virus and block the download. You can temporarily close the antivirus software and re-download it. After the download is complete, add UltraViewer to the trust list of the antivirus software.
3. Clear browser cache: If the browser cache is corrupted, it may also cause download failures. You can clear the browser cache and cookies, then restart the browser and try to download again.
4. Use a different browser: If the download fails with the current browser, you can try using another browser (such as Chrome, Edge) to download, which may solve the problem.
2. Problem 2: Failed to Establish a Remote Connection
Solutions: 1. Check the ID and password: Ensure that the partner ID and password you entered are correct. The UltraViewer password is case-sensitive, so pay attention to distinguishing uppercase and lowercase letters. If the remote computer restarts UltraViewer, the password will change automatically, so you need to ask the other party for the latest password.
2. Check the network status of both parties: Ensure that both the local and remote computers are connected to the internet. You can test the network by opening a web page. If the network is unstable, you can try to restart the router or switch to a more stable network (such as using a wired network instead of a wireless network).
3. Check the firewall settings: The firewall of both parties may block the UltraViewer connection port (default port 5900). You can temporarily close the firewall and try to establish a connection again. If the connection is successful, you need to add UltraViewer to the firewall's allowed list to ensure that the firewall does not block the software's network access.
4. Update UltraViewer to the latest version: Older versions of UltraViewer may have compatibility problems, leading to connection failures. You can update both local and remote UltraViewer to the latest version through the "Help" > "Check for Updates" menu.
3. Problem 3: Remote Control Is Laggy or Disconnected Frequently
Solutions: 1. Adjust the screen quality: In a low-bandwidth network environment, high-quality screen display will occupy a lot of network resources, leading to lag. You can reduce the screen quality to Medium or Low through the "View" > "Image Quality" menu to improve the smoothness of remote control.
2. Lower the screen resolution: Lowering the remote screen resolution can reduce the amount of data transmitted, thereby reducing lag. You can adjust the resolution through the "View" > "Screen Resolution" menu.
3. Close unnecessary background programs: If there are many background programs running on the local or remote computer, they will occupy system resources and network bandwidth, leading to lag in remote control. You can close unnecessary background programs through the task manager to free up resources.
4. Check the network bandwidth: Use a network speed test tool to check the upload and download speeds of both parties. If the network bandwidth is too low, it is recommended to upgrade the network or perform remote control when the network is less congested (such as avoiding peak hours).
4. Problem 4: File Transfer Fails or Is Too Slow
Solutions: 1. Compress large files: For large files, compressing them into zip packages can reduce the file size and improve the transfer speed and stability. You can use compression software such as WinRAR or 7-Zip to compress files before transferring .
2. Check the network connection: File transfer speed is greatly affected by the network. Ensure that both parties have a stable network connection. Avoid transferring files when the network is unstable or congested.
3. Close other network-intensive programs: Programs such as video streaming, online games, and cloud synchronization will occupy a lot of network bandwidth, leading to slow file transfer. Close these programs before transferring files to ensure that the network bandwidth is focused on file transfer.
4. Use the "File Transfer Manager": If the drag-and-drop file transfer fails, you can use the professional file transfer manager of UltraViewer. Click the "Tools" > "File Transfer" menu to open the file transfer manager, which provides more stable file transfer functions and supports batch file transfer.
V. Summary: Start Efficient Remote Collaboration with UltraViewer Download
As a lightweight and efficient remote control software, UltraViewer has won the favor of numerous users with its free core functions, simple operation, and stable performance. Through this comprehensive tutorial, you have mastered the entire process from UltraViewer download and installation to basic and advanced usage, as well as solutions to common problems. Whether you are an individual user who needs to remotely access your home computer, a tech support staff who provides remote assistance to customers, or an enterprise team that carries out remote collaboration, UltraViewer can meet your needs.
It should be emphasized again that to ensure the safety and stability of the software, you must complete the UltraViewer download through the official website: https://ultraviewer-cn.com. Avoid using third-party download channels to prevent malware infection. With the continuous update and optimization of UltraViewer, its functions are becoming more and more complete. It is recommended that you pay attention to the official website dynamics and update the software to the latest version in time to enjoy better functions and services.
In the era of remote work, a good remote control tool is the key to improving work efficiency. UltraViewer, with its simple operation and powerful functions, provides a reliable solution for your remote collaboration. Now, go to the official website to complete the UltraViewer download, and start your efficient remote work journey!