After completing the UltraViewer download and installation, you can start using it for remote control. UltraViewer’s interface is simple and intuitive, and its basic functions are easy to master. This chapter will detail the basic operations of UltraViewer, including remote connection setup, basic remote control operations, file transfer, and real-time chat, helping you quickly get started with remote access.
4.1 Understanding the UltraViewer Main Interface
When you launch UltraViewer for the first time, you will see the main interface, which is divided into two main sections: "Control Remote Computer" and "Your Computer ID/Password" .
- Your Computer ID and Password: This section displays your computer’s unique UltraViewer ID and a randomly generated password. If you want others to remotely control your computer, you need to provide this ID and password to the other party. Note that the password is randomly generated each time UltraViewer is launched by default for security. You can also set a fixed password in the settings.
- Control Remote Computer Section: This section is used for you to control another computer. You need to enter the remote computer’s UltraViewer ID and password (provided by the remote party) here, then click the "Connect" button to establish a remote connection .
- Menu Bar: Located at the top of the interface, including "File", "Edit", "View", "Tools", "Settings", and "Help" menus. You can configure software settings, manage remote sessions, and access help documentation from here.
- Chat Box: Located at the bottom of the interface, it allows real-time text communication between the local and remote computers during a remote session, facilitating coordination and communication .
4.2 Step-by-Step Remote Connection Setup
Establishing a remote connection with UltraViewer requires both the local and remote computers to have UltraViewer installed and running, and both parties need to be connected to the internet. Here are the detailed steps to establish a remote connection:
4.2.1 Case 1: You Control Another Person’s Computer (e.g., Provide Technical Support)
- Ask the remote party (the person whose computer you want to control) to install and launch UltraViewer. Ensure they have completed the UltraViewer download and installation from the official channel.
- Ask the remote party to provide their UltraViewer ID and password (displayed in the "Your Computer ID/Password" section of their UltraViewer interface).
- On your UltraViewer interface, enter the remote party’s ID in the "Partner ID" input box under the "Control Remote Computer" section.
- Enter the remote party’s password in the "Password" input box.
- Click the "Connect" button. A prompt will appear asking you to confirm the connection; click "Yes".
- Wait for a few seconds. If the ID and password are correct and the network connection is stable, the remote connection will be established successfully. You will then see the remote computer’s screen on your local interface and can control it with your mouse and keyboard .
4.2.2 Case 2: Others Control Your Computer (e.g., Receive Technical Support)
- Launch UltraViewer on your computer (ensure you have completed the official UltraViewer download and installation).
- Find your UltraViewer ID and password in the "Your Computer ID/Password" section of the interface.
- Provide your ID and password to the person who will control your computer (the local party).
- Wait for the local party to initiate the connection. When a connection request is received, a pop-up window will appear on your screen asking for confirmation. Click "Allow" to grant remote control permissions.
- After confirmation, the local party can successfully control your computer. You can see all operations of the local party on your screen in real time.
4.2.3 Key Notes for Remote Connection
- Password Security: The UltraViewer password is used to protect your computer from unauthorized access. Do not share your password with untrusted people. After the remote session ends, it is recommended to restart UltraViewer to generate a new random password.
- Network Stability: A stable internet connection is crucial for a smooth remote session. If the network is unstable, the remote screen may freeze or lag. It is recommended to use a wired network for both parties if possible.
- Firewall Settings: If the remote connection fails, check if the firewall on both computers is blocking UltraViewer. Add UltraViewer to the firewall’s allowed list to ensure the software can communicate normally through the network.
4.3 Basic Remote Control Operations
After establishing a remote connection, you can control the remote computer as if you were sitting in front of it. Here are the basic remote control operations:
- Mouse Control: Move your local mouse to control the mouse cursor on the remote screen. Left-click to select or open files/programs, right-click to bring up the context menu, and scroll the mouse wheel to scroll the remote screen.
- Keyboard Control: Use your local keyboard to input text or execute shortcut commands on the remote computer. Common shortcuts (such as Ctrl+C, Ctrl+V, Ctrl+Alt+Del) are fully supported.
- Screen Zoom and Fit: If the remote screen resolution is different from your local screen, you can adjust the display mode. Click the "View" menu at the top of the UltraViewer interface, and select "Fit to Screen" (the remote screen automatically fits your local window) or "Original Size" (display the remote screen in its original resolution). You can also use the zoom slider to adjust the screen size manually.
- Full-Screen Mode: Click the "Full-Screen" button in the toolbar or press the F11 key to switch to full-screen mode, which provides a more immersive remote control experience. Press F11 again to exit full-screen mode.
- End Remote Connection: To end the remote session, click the "Disconnect" button in the upper right corner of the UltraViewer interface, or close the UltraViewer window directly. Both operations will safely terminate the remote connection without affecting the remote computer’s system.
4.4 File Transfer Between Local and Remote Computers
UltraViewer supports convenient file transfer between local and remote computers, which is very useful for sharing documents, software installation packages, or other files during remote collaboration. Here are the two methods of file transfer:
4.4.1 Method 1: Drag-and-Drop File Transfer
- Ensure the remote connection is established successfully.
- On your local computer, find the file or folder you want to transfer.
- Press and hold the left mouse button to drag the file/folder to the UltraViewer remote screen window, and release the mouse button. A pop-up window will appear asking for confirmation to transfer the file.
- Click "Yes" to start the file transfer. A progress bar will display the transfer progress, transfer speed, and remaining time.
- After the transfer is complete, the file/folder will be saved to the default receiving directory of the remote computer (usually the "Desktop" or "Downloads" folder). You can also specify the receiving directory in the UltraViewer settings.
4.4.2 Method 2: File Transfer via the "File Manager" Tool
- During the remote session, click the "Tools" menu at the top of the UltraViewer interface and select "File Manager".
- The file manager window will open, with the local computer’s file system on the left and the remote computer’s file system on the right.
- On the local side (left), find the file/folder you want to transfer, select it, and click the "Upload" button (arrow pointing to the right) in the middle of the window.
- Or, on the remote side (right), find the file/folder you want to download to the local computer, select it, and click the "Download" button (arrow pointing to the left).
- Select the target directory for the transfer and click "OK" to start the transfer. This method is more suitable for transferring multiple files or folders, and you can clearly see the file structure of both parties.
4.4.3 File Transfer Precautions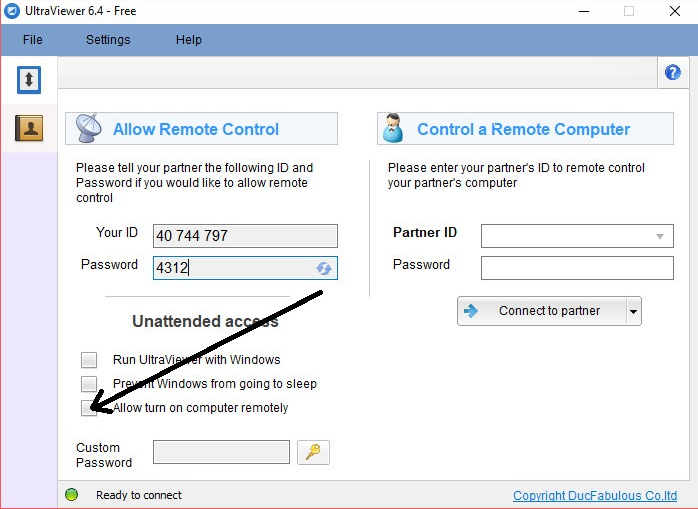
- File Size Limit: UltraViewer has no strict limit on the size of transferred files, but the transfer speed depends on the network bandwidth of both parties. It is recommended to compress large files into ZIP/RAR format before transfer to improve transfer speed.
- File Overwrite Prompt: If the target directory already has a file with the same name, UltraViewer will pop up a prompt asking whether to overwrite it. Choose "Yes" (overwrite), "No" (skip), or "Yes to All" (overwrite all) according to your needs.
- Transfer Interruption Handling: If the file transfer is interrupted due to network issues, you can restart the transfer. UltraViewer supports resuming interrupted transfers for large files, so you don’t need to retransfer the entire file.
4.5 Real-Time Chat During Remote Sessions
UltraViewer’s built-in chat function allows real-time text communication between local and remote users, which is very convenient for coordinating operations during remote technical support or collaboration . Here’s how to use it:
- During the remote connection, find the chat box at the bottom of the UltraViewer interface.
- Type your message in the input box.
- Click the "Send" button or press the Enter key to send the message. The remote user will receive the message in their UltraViewer chat box in real time.
- To view the chat history, scroll up in the chat box. UltraViewer will save the chat history during the current session; the history will be cleared when the session ends.
- If you need to send special characters or emojis, you can use the system’s built-in emoji input tool to insert them into the chat box.
Note: The chat function only works during an active remote connection. If the connection is terminated, the chat function will no longer be available.
Chapter 5: UltraViewer Advanced Usage Tips: Boost Remote Work Efficiency
Mastering UltraViewer’s basic functions can meet most daily remote control needs. However, UltraViewer also has many advanced functions that can further improve remote work efficiency, such as adjusting remote screen quality, setting remote control permissions, batch managing remote devices, and using shortcut commands. This chapter will detail these advanced usage tips to help you become an UltraViewer expert.
5.1 Adjusting Remote Screen Quality to Adapt to Network Conditions
The remote screen quality directly affects the smoothness of the remote control experience. UltraViewer allows you to adjust the screen quality according to your network conditions to balance visual effects and connection smoothness:
- During the remote session, click the "View" menu at the top of the UltraViewer interface.
- Hover over "Image Quality" to see three quality options:
- High Quality: Suitable for high-speed and stable networks (such as wired networks). It provides the clearest remote screen display, which is ideal for tasks that require high visual clarity, such as graphic design or video editing .
- Balanced Quality: The default quality setting, suitable for most general network conditions. It balances clarity and smoothness, meeting most remote control needs (such as document editing, web browsing).
- Low Quality: Suitable for low-speed or unstable networks (such as 4G mobile networks or weak Wi-Fi signals). It reduces the screen resolution and color depth to minimize network bandwidth usage, ensuring smooth remote control even with poor network conditions .
- Select the appropriate quality option according to your network status. You can switch between different quality settings at any time during the remote session.
Additional Tip: You can also enable the "Auto-Adjust Quality" function in the UltraViewer settings. When this function is enabled, UltraViewer will automatically adjust the screen quality according to real-time network speed changes, ensuring the most stable remote control experience.
5.2 Setting Remote Control Permissions for Enhanced Security
In some cases, you may want to restrict the remote user’s operation permissions (for example, allowing them to only view the screen without controlling it, or prohibiting them from accessing certain files). UltraViewer’s permission setting function can help you achieve this:
- Before establishing a remote connection, click the "Settings" menu at the top of the UltraViewer interface and select "Security Settings".
- In the security settings window, find the "Remote Control Permissions" section. You can set the following permissions:
- Full Control Permission: The default setting, allowing the remote user to control the mouse, keyboard, and access all files on your computer.
- View Only Permission: Prohibits the remote user from controlling the mouse and keyboard; they can only view your screen. This is suitable for scenarios such as remote training or presentation sharing.
- Custom Permission: Allows you to customize which operations the remote user can perform, such as allowing file transfer but prohibiting remote printing, or allowing keyboard input but prohibiting mouse control.
- Select the desired permission level and click "Apply" to save the settings.
- During a remote session, you can also dynamically adjust the permissions. Click the "Tools" menu > "Remote Permissions" and select the new permission level. The setting will take effect immediately.
5.3 Batch Managing Multiple Remote Devices
For enterprise users or IT technicians who need to manage multiple remote devices, UltraViewer’s batch management function can significantly improve work efficiency. Here’s how to use it:
- Launch UltraViewer and click the "Tools" menu > "Device Manager" to open the device management window.
- Click the "Add Device" button to add the UltraViewer ID and name of the remote device you want to manage. You can also add a note (such as the device’s location or user) for easy identification.
- After adding multiple devices, you can view all remote devices in the device manager window, including their online status (online/offline) and last connection time.
- To connect to a remote device in batches, select multiple devices in the device manager, right-click, and select "Connect to Selected Devices". UltraViewer will establish remote connections to these devices one by one.
- You can also create device groups (such as "Office Devices", "Home Devices") in the device manager to classify and manage remote devices, making it easier to find the device you need to control.
Note: The batch management function is mainly available in the commercial version of UltraViewer. Personal free users can add a limited number of devices (usually up to 5). If you need to manage more devices, you can upgrade to the commercial version.
5.4 Using Shortcut Commands to Improve Operation Efficiency
UltraViewer supports a variety of shortcut commands that allow you to quickly perform common operations without using the mouse, greatly improving remote control efficiency. Here are the most commonly used shortcut commands:
Shortcut Command | Function Description |
|---|---|
F11 | Switch to full-screen mode / Exit full-screen mode |
Ctrl+F | Open the search box to search for text on the remote screen |
Ctrl+Alt+Del | Send the Ctrl+Alt+Del command to the remote computer (for example, to open the task manager) |
Ctrl+Shift+S | Take a screenshot of the remote screen and save it to the local computer |
Ctrl+T | Open the file transfer window |
Ctrl+C / Ctrl+V | Copy / Paste text between local and remote computers |
Esc | Cancel the current operation or close the pop-up window |
You can view the full list of shortcut commands by clicking the "Help" menu > "Keyboard Shortcuts" in the UltraViewer interface. You can also customize some shortcut commands in the settings according to your usage habits.
5.5 Remote Printing and Clipboard Synchronization
UltraViewer also supports remote printing and clipboard synchronization functions, which are very practical for remote office scenarios:
5.5.1 Remote Printing
Remote printing allows you to print files from the remote computer to a printer connected to your local computer. Here’s how to use it:
- Ensure the remote connection is established successfully, and the local printer is properly connected and installed.
- On the remote computer, open the file you want to print (such as a Word document or PDF).
- Select "Print" from the file menu. In the printer selection window, select "UltraViewer Virtual Printer".
- Click "Print" to send the print job to your local computer.
- A pop-up window will appear on your local computer asking you to select the local printer and confirm the print settings. After confirmation, click "OK" to start printing.
5.5.2 Clipboard Synchronization
Clipboard synchronization allows you to share the clipboard content between local and remote computers. For example, you can copy text on the local computer and paste it directly on the remote computer, and vice versa. Here’s how to enable it:
- Click the "Settings" menu in the UltraViewer interface and select "Advanced Settings".
- Find the "Clipboard Synchronization" option and check "Enable clipboard synchronization between local and remote computers".
- Click "Apply" to save the settings. From then on, the clipboard content of both computers will be automatically synchronized during the remote session.
Chapter 6: Common UltraViewer Usage Issues and Troubleshooting
During the use of UltraViewer, you may encounter various issues such as failure to establish a remote connection, screen lag, file transfer errors, etc. This chapter will summarize the most common usage issues and provide detailed troubleshooting methods to help you quickly resolve problems and ensure the smooth progress of remote work.
6.1 Cannot Establish Remote Connection
Problem Description: After entering the remote party’s ID and password and clicking "Connect", the connection fails, and prompts such as "Connection timeout", "Invalid ID", or "Password error" appear.
Troubleshooting Methods: