1. UltraViewer Download & Complete User Guide 2025: Master Remote Control Like a Pro
Introduction
In an era where remote work and distance technical support have become indispensable, finding a reliable, user-friendly remote control tool is crucial. UltraViewer stands out as a lightweight yet powerful solution, trusted by millions of users worldwide for its seamless connectivity, robust security features, and cost-effective pricing. Whether you’re a small business owner providing technical support to clients, a professional managing multiple computers remotely, or a parent helping a family member troubleshoot their PC, UltraViewer offers the functionality and simplicity you need. However, to unlock its full potential, the first step is to perform a safe and correct UltraViewer download, followed by mastering its core and advanced features. This comprehensive guide will walk you through every detail—from system requirements and secure download steps to advanced op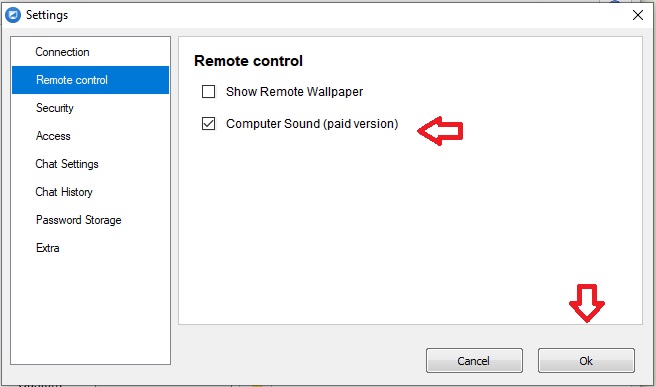 eration tips—ensuring you can leverage UltraViewer to streamline remote tasks in 2025.
eration tips—ensuring you can leverage UltraViewer to streamline remote tasks in 2025.System Requirements for UltraViewer Download 2025
Before initiating your UltraViewer download, it’s essential to verify that your device meets the minimum system requirements. This ensures smooth installation, stable performance, and compatibility with the latest features of UltraViewer 6.6.124—the most recent version as of 2025.
UltraViewer is exclusively designed for Windows operating systems, supporting a wide range from legacy versions to the latest releases. For Windows users, the software is compatible with Windows XP, Windows Server, Windows 7, Windows 8, Windows 10, and Windows 11 . Mac users, while currently unable to access a native version, can still use UltraViewer by installing a Windows emulator like Parallels Desktop or VMware Fusion .
The hardware requirements are minimal, making UltraViewer accessible even on older devices. Your computer should have a processor of at least 1 GHz, a minimum of 2 GB RAM, and 100 MB of free hard drive space . A stable internet connection is also critical—whether you’re using a wired or wireless network—to ensure low-latency remote sessions and smooth file transfers. Additionally, for advanced features like audio sharing (available in the Pro version), both connected devices must have .NET Framework 3.5 or later installed, which is pre-packaged with most modern Windows versions .
By confirming these requirements upfront, you can avoid common issues like installation failures, laggy connections, or feature malfunctions after your UltraViewer download.
Step-by-Step Guide to Safe UltraViewer Download
The safety of your device should be a top priority when downloading any software. With cyber threats like malware and fake software distributors on the rise, accessing UltraViewer from the official source is non-negotiable. Follow these steps for a secure and hassle-free UltraViewer download:
- Visit the Official UltraViewer Website: Open your preferred web browser and navigate to https://www.ultraviewer.net/en/download.html—the official download page . Avoid third-party websites or file-sharing platforms, as they may distribute modified versions containing viruses or spyware .
- Locate the Latest Version: The official page prominently displays the latest version, UltraViewer 6.6.124, released in July 2025 . This version includes critical updates like improved video jump speed, fixed timer errors, and enhanced security protocols . Ensure you’re downloading this latest build to benefit from bug fixes and new features.
- Initiate the Download: Click the “Download” button to start the process. The installer file (typically named UltraViewer_Setup.exe) will begin downloading automatically. The file size is small (around 5 MB), so the download should complete within seconds on a stable internet connection.
- Verify the File Integrity: After the download finishes, scan the installer file with your antivirus software to confirm it’s free of malware. UltraViewer’s security is verified by multiple virus detection engines, but this extra step adds a layer of protection .
- Save the Installer: Choose a location on your hard drive (e.g., Downloads folder) to save the installer. Avoid saving it to external drives or untrusted locations to prevent file corruption.
By following these steps, you ensure that your UltraViewer download is safe, authentic, and up-to-date, laying the foundation for a reliable remote control experience.
Installation Process for UltraViewer 6.6.124
Once your UltraViewer download is complete, the installation process is straightforward and user-friendly, even for those with limited technical expertise. Here’s a detailed walkthrough:
- Launch the Installer: Navigate to the folder where you saved the UltraViewer_Setup.exe file and double-click it to run the installer. If Windows Defender or your antivirus software prompts a security warning, select “Run anyway” (since you’ve verified the file’s integrity).
- Select the Installation Language: UltraViewer supports multiple languages, including English, Vietnamese, Croatian, Turkish, and Swedish . Choose your preferred language from the dropdown menu and click “OK” to proceed.
- Follow the Setup Wizard: The Inno Setup Compiler 6 (used for UltraViewer’s installation) will guide you through the process . Click “Next” to accept the license agreement, then choose the installation directory. The default path is usually suitable, but you can customize it if needed.
- Create Desktop Shortcut: Select the option to create a desktop shortcut for easy access. This step is recommended for frequent users.
- Complete the Installation: Click “Install” to start the process. The installer will extract files and configure UltraViewer on your device—this takes less than a minute. Once finished, click “Complete” to launch UltraViewer.
Upon launching, UltraViewer will generate a unique ID and a random password (minimum 5 characters for security) . This credentials pair is used to establish remote connections, so keep it handy. The software also automatically checks for updates, ensuring you always have the latest features and security patches .
Core Features of UltraViewer: How to Use Them
After your UltraViewer download and installation, it’s time to explore its core features. Designed for both personal and business use, UltraViewer offers intuitive tools for remote control, file transfer, and real-time communication.
1. Establishing a Remote Connection
- To Control Another PC: Ask the remote user to share their UltraViewer ID and password. Enter these credentials in the “Partner ID” and “Password” fields on your UltraViewer interface, then click “Connect to partner.”
- To Allow Remote Access: Share your own ID and password with the person who needs to control your PC. They will enter these details on their end, and you’ll receive a prompt to grant access—click “Allow” to proceed.
UltraViewer’s connection process is encrypted end-to-end, ensuring that all data transmitted during the session is secure . The latest version also includes captcha/security checks to prevent unauthorized access .
2. File Transfer
- Click the “File Transfer” button (located in the toolbar) during a remote session. A file manager window will open, showing both your local files and the remote PC’s files.
- Drag and drop files between the two windows to transfer them. UltraViewer supports large file transfers and maintains data integrity through checksum verification .
- You can also pause and resume transfers if the connection is interrupted, making it ideal for sending large documents or folders.
3. Real-Time Chat
- Use the built-in chat feature to communicate with the remote user during a session. Click the “Chat” button to open the chat window.
- You can send text messages, and drag-and-drop files directly into the chat for quick sharing . The chat window can be toggled on or off at any time, giving you full control over the conversation.
4. Screen Capture
- To capture a portion of the remote screen, click “Screen” in the menu bar and select “Capture part of the screen.”
- Drag your cursor to select the area you want to capture, then click “Copy” to save it to your clipboard or “Save” to store it as a file . This feature is useful for documenting issues or sharing instructions.
Advanced Features of UltraViewer 2025
UltraViewer 6.6.124 and recent updates have introduced advanced features that enhance productivity and flexibility. These tools are particularly valuable for business users and technical support professionals.
1. Remote Wake-Up
Available in UltraViewer Lite and Pro versions, the remote wake-up feature allows you to turn on a sleeping or hibernating PC without physical access . Unlike Wake-on-LAN, this feature doesn’t require special hardware or complex configurations—simply:
- Go to “Menu” > “Settings” > “Tools” and enable “Allow turn on computer remotely.”
- Set a wake-up timer on the remote PC. If no connection is initiated within the timer period, the PC will automatically shut down to save energy .
Note that some older devices may not support this feature. Test it by putting the remote PC in sleep mode and initiating a wake-up request after your UltraViewer download.
2. Multi-Monitor Switching
If the remote PC has multiple monitors, use the fast switch monitor button to toggle between them . Left-click the button to switch between individual monitors (1, 2, 3, etc.), or right-click to view all monitors simultaneously. This feature is essential for users who need to access applications or files spread across multiple screens.
3. Audio Sharing
Exclusive to the Pro version, audio sharing allows you to stream sound from the remote PC to your device . To use this feature:
- Ensure both devices are running UltraViewer 6.5 or higher (upgrade if necessary via the official UltraViewer download page).
- Go to “Menu” > “Audio” and select “Enable audio sharing.”
- This is ideal for troubleshooting audio issues, watching videos remotely, or participating in meetings where sound is required.
4. Video Record Playback with Jump Function
UltraViewer allows you to record remote sessions for later review. The latest version (6.6.124) improves the speed of jumping to specific positions in recorded videos and fixes a timer error . To use this:
- Click “Record” during a session to start capturing.
- After recording, open the file in UltraViewer and use the jump function to navigate to specific timestamps—perfect for revisiting important parts of a support session.
Troubleshooting Common UltraViewer Issues
Even with a successful UltraViewer download and installation, you may encounter occasional issues. Here are solutions to the most common problems:
1. Installation Failures
- Cause: Missing .NET Framework, insufficient disk space, or antivirus interference.
- Solution: Install .NET Framework 3.5 or later (pre-installed on Windows 7+), free up at least 100 MB of disk space, and temporarily disable your antivirus during installation.
2. Connection Issues
- Cause: Poor internet connection, incorrect ID/password, or firewall blocking the app.
- Solution: Check your internet speed (aim for at least 1 Mbps), verify the partner’s ID and password (ensure no extra spaces), and add UltraViewer to your firewall’s exception list.
3. Password Pasting Errors
- Issue: Unable to paste 5-character IDs or passwords.
- Solution: This bug was fixed in UltraViewer 6.6.25 . If you’re using an older version, update via the official UltraViewer download page to resolve the issue.
4. DPI Compatibility Problems
- Issue: UI elements (e.g., chat window, address book) not displaying correctly on high-DPI screens (above 150%).
- Solution: Update to UltraViewer 6.6.13 or later—these versions fix DPI-related bugs .
5. Session Disconnections
- Cause: Network instability or outdated software.
- Solution: Use a wired internet connection if possible, and ensure both devices are running the latest UltraViewer version (check for updates in “Menu” > “Help” > “Check for updates”).