Why Choose UltraViewer? Key Benefits of the 2025 Version
Before diving into UltraViewer download, it’s important to understand why this software has become a top choice for millions worldwide. The 2025 updates to UltraViewer have addressed user feedback and introduced game-changing features that set it apart from competitors.
First, UltraViewer offers exceptional performance without sacrificing system resources. The latest version boasts 8-20 times faster speed compared to older releases, along with 2-3 times lower CPU usage – a crucial advantage for users with low-RAM or slow computers . This means you can control remote devices smoothly even on less powerful hardware, without lag or freezing.
Second, security is a top priority. UltraViewer now includes captcha security checks, random password generation (minimum 5 digits), and automatic password resets every time the software launches . These features prevent unauthorized access and ensure that your remote sessions remain private. Additionally, all controller activities are visible to the device owner, who can take back control or end the session at any time .
Third, the 2025 update expands functionality with user-requested features. New additions include microphone support for voice communication during remote sessions, copy-pasting between multiple remote clients (requires both devices to run the latest version), and a lock screen feature to protect sensitive data . You can also capture screenshots, record video of remote sessions, and switch between multiple monitors with a single click .
Finally, UltraViewer is completely free for both personal and commercial use. Unlike many remote control tools that require paid subscriptions for advanced features, UltraViewer offers its full suite of capabilities at no cost. The only premium option is the UltraViewer Lite license, which unlocks remote wake-up functionality for computers in sleep mode .
For these reasons, UltraViewer download has become the go-to choice for anyone seeking a reliable, secure, and user-friendly remote control solution. Now, let’s walk through the step-by-step process of UltraViewer download and installation.
## Step-by-Step UltraViewer Download & Installation (2025 Latest Version)
The UltraViewer download and installation process is straightforward, but following best practices ensures a smooth experience. Below is a detailed guide for Windows, Mac, and Linux users, along with tips to avoid common pitfalls.
### 1. Check System Requirements
Before initiating UltraViewer download, verify that your device meets the minimum system requirements. This prevents compatibility issues and ensures optimal performance:
- Windows: Windows XP or later (32-bit and 64-bit supported; Windows 11 fully compatible)
- Mac: macOS X 10.7 or above
- Linux: Ubuntu 12.04 or later versions
- Minimum RAM: 512MB (1GB recommended for multiple remote sessions)
- Free storage: At least 10MB (UltraViewer is a lightweight application)
- Internet connection: Stable broadband (minimum 1Mbps for smooth remote control)
### 2. Safe UltraViewer Download from Official Sources
The most critical step in the process is to obtain the software from a trusted source. Third-party websites often distribute modified versions of UltraViewer with malware, adware, or hidden fees. To ensure a safe UltraViewer download:
- Visit the official UltraViewer website (ultraviewer.net) – this is the only verified source for the latest, virus-free version.
- On the homepage, locate the “Download” button (typically in the top navigation bar or hero section).
- Select the version compatible with your operating system. The website automatically detects your OS in most cases, but you can manually choose Windows, Mac, or Linux if needed.
- For Windows users, the download will start as an EXE file (e.g., UltraViewer_Setup.exe). Mac users will receive a DMG file, while Linux users get a DEB/RPM package or terminal installation instructions.
Pro tip: Enable your antivirus software during UltraViewer download to scan the file for potential threats, though the official version is always 100% clean.
### 3. Installation Guide for Different Operating Systems
Once the UltraViewer download is complete, follow these OS-specific installation steps:
#### Windows Installation
1. Locate the downloaded EXE file (usually in the “Downloads” folder) and double-click it to launch the setup wizard.
2. The wizard will prompt you to select a language. UltraViewer supports over 20 languages, including English, Spanish, French, Italian, Korean, Japanese, and Vietnamese . Choose your preferred language and click “OK.”
3. Read the End User License Agreement (EULA) and check the box to accept the terms.
4. Select the installation directory (the default location is usually C:\Program Files\UltraViewer, but you can customize it if needed).
5. Choose whether to create a desktop shortcut and add UltraViewer to your Start menu – these options make it easier to launch the software later.
6. Click “Install” and wait for the process to complete (typically 10-30 seconds).
7. Once installed, check the box next to “Run UltraViewer” and click “Finish” to launch the software.
#### Mac Installation
1. Open the downloaded DMG file from your “Downloads” folder.
2. A new window will appear with the UltraViewer icon and the Applications folder icon.
3. Drag and drop the UltraViewer icon into the Applications folder to install it.
4. Navigate to the Applications folder, find UltraViewer, and double-click it to launch.
5. MacOS may prompt you to allow the app to run (since it’s downloaded from the internet). Click “Open” in the security dialog to proceed.
#### Linux Installation
1. For Ubuntu/Debian-based systems: Open the terminal and navigate to the “Downloads” folder using `cd ~/Downloads`.
2. Run the command `sudo dpkg -i UltraViewer.deb` (replace “UltraViewer.deb” with the exact filename of your downloaded package).
3. If you encounter dependency errors, run `sudo apt-get install -f` to resolve them.
4. For RPM-based systems (Fedora, CentOS): Use `sudo rpm -i UltraViewer.rpm` in the terminal.
5. Launch UltraViewer from the Applications menu or by typing `ultraviewer` in the terminal.
### 4. Post-Installation Setup
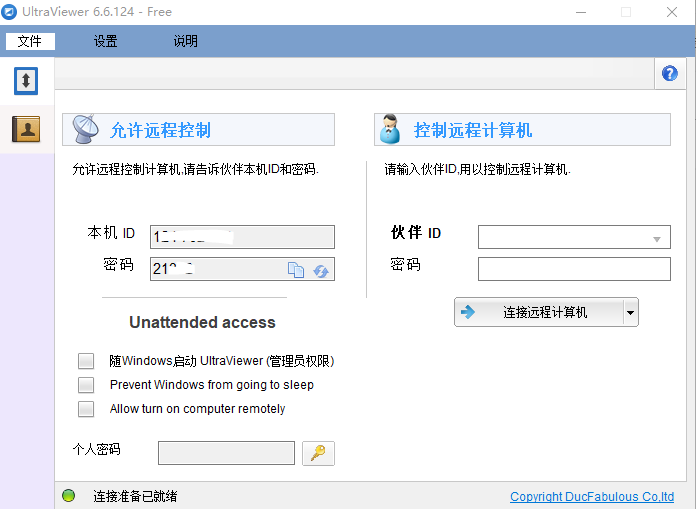
After installation, UltraViewer will launch automatically. The first time you open it, you’ll see a main window displaying your unique ID and a temporary password. This ID is permanent (tied to your device), while the password resets every time you restart UltraViewer for security .
To optimize your experience, complete these initial setup steps:
- Enable “Run UltraViewer with Windows” (Windows) or “Launch at startup” (Mac/Linux) to access the software quickly whenever you need it.
- Set a custom password by clicking the golden key icon in the “Custom Password” section . This password remains consistent (unlike the temporary one) and is ideal for accessing your own devices remotely.
- Adjust the display settings: Go to “Options” > “Screen Size” and choose your preferred mode (Full Screen, Best Scaled, or Stretchable) for remote sessions .
With UltraViewer download and installation complete, you’re ready to start using the software’s core features. Let’s explore how to perform common tasks like remote access, file transfer, and screen sharing.
## Core Features of UltraViewer: How to Use Them Effectively (2025 Update)
UltraViewer’s 2025 version comes packed with features designed to simplify remote control, but many users only scratch the surface of what’s possible. Below is a detailed breakdown of the most useful features, along with step-by-step instructions to use them.
### 1. Remote Access to Another Computer
The primary function of UltraViewer is to control a remote computer from your device. Here’s how to do it:
1. Ensure UltraViewer is installed on both your computer (the controller) and the remote computer (the target). If the target device doesn’t have it, guide the owner through the UltraViewer download and installation process we covered earlier.
2. On the target computer, launch UltraViewer and share the displayed ID and password with you (via phone, email, or chat).
3. On your controller computer, open UltraViewer, enter the target’s ID in the “Partner ID” field, and type the password in the “Password” field.
4. Click “Connect to Partner” and wait a few seconds for the connection to establish.
5. Once connected, you’ll see the target computer’s screen on your device. You can control the mouse and keyboard just as if you were sitting in front of it .
Pro tips for smooth remote access:
- Use the “Fast Switch Monitor” button to toggle between multiple monitors on the target device .
- Enable “Show Remote Cursor” in the Options menu to see the target user’s cursor (helpful for collaboration) .
- Press F1 to open the built-in chat box and communicate with the target user in real time . Press F1 again to close the chat.
### 2. Remote Wake-Up (UltraViewer Lite License Required)
One of the most requested features, remote wake-up allows you to turn on a target computer that’s in sleep mode or powered off. Here’s how to set it up:
1. Purchase an UltraViewer Lite license from the official website (this is the only premium feature; all others are free).
2. On the target computer, open UltraViewer and go to “Options” > “Wake Up Configure.”
3. Follow the on-screen instructions to set up the wake timer (e.g., “Wake up after 5 minutes of being off”).
4. Enable the “Allow Turn on Computer Remotely” option.
5. On your controller computer, enter the target’s ID and password as usual and click “Connect to Partner.” UltraViewer will send a wake-up signal to the target device, which will power on and establish the connection .
This feature is perfect for accessing your home computer while traveling or waking up a work device to retrieve important files.
### 3. File Transfer and Copy-Pasting
UltraViewer’s 2025 update makes sharing files and text between devices easier than ever:
- **File Transfer**: During a remote session, click the “File Transfer” icon in the UltraViewer toolbar (looks like a folder with an arrow). Select the files/folders you want to send from your computer, choose the destination folder on the target device, and click “Send.” The transfer speed depends on your internet connection, but UltraViewer’s optimized protocol ensures fast, reliable transfers.
- **Cross-Device Copy-Pasting**: The latest version allows copy-pasting text, images, and files between multiple remote clients – a game-changer for multitasking . Simply copy content on one device (Ctrl+C or Cmd+C) and paste it on another (Ctrl+V or Cmd+V). Note that both devices must run the 2025 update for this feature to work.
### 4. Screen Capture and Video Recording
Need to save a snapshot or record a remote session for training or documentation? UltraViewer has you covered:
- **Screen Capture**: During a remote session, click the “Capture Screen” icon in the toolbar. You can choose to capture the full screen or a specific region. The screenshot is automatically saved to your default “Pictures” folder (Windows) or “Photos” app (Mac).
- **Video Recording**: Click the “Record Video” icon to start recording the remote session. Click it again to stop. The video file is saved in MP4 format, with options to adjust quality and resolution in the Settings menu . You can also jump to specific positions in recorded videos using the new “Skip to Position” feature .
### 5. Audio and Visual Customization
UltraViewer’s 2025 update improves audio support and visual quality:
- **Microphone Support**: For the first time, UltraViewer allows voice communication during remote sessions . To enable it, go to “Options” > “Audio” and check “Enable Microphone.” Both you and the target user can speak and hear each other, making troubleshooting and collaboration more efficient.
- **Image Quality Adjustment**: If your internet connection is slow, reduce the image quality to improve speed. Go to “Options” > “Quality” and select “Low” or “Medium.” For fast connections, choose “High” to enjoy up to 65000 colors and crisp visuals .
- **DPI Compatibility**: The latest version fixes DPI-related issues, ensuring the software works perfectly on devices with DPI settings above 150% . This means no more distorted interfaces or unresponsive buttons on high-resolution screens.
## Troubleshooting Common UltraViewer Issues (2025 Solutions)
Even with a smooth UltraViewer download and setup, you may encounter occasional issues. Below are the most common problems and their latest solutions, based on 2025 updates and user feedback.
### 1. UltraViewer Download Failed
If your UltraViewer download doesn’t start or completes with an error:
- Check your internet connection: Ensure you have a stable broadband connection and try again.
- Disable ad blockers or firewalls: Some security tools may block the download. Temporarily disable them and retry (remember to re-enable them afterward).
- Clear your browser cache: Corrupted cache files can interfere with downloads. Clear your browser’s cache and cookies, then visit the official website again.
- Download the offline installer: If the web installer fails, look for the “Offline Installer” link on the UltraViewer website. This file is larger but doesn’t require an internet connection during installation.
### 2. Cannot Connect to a Remote Computer
Connection issues are often caused by one of these factors:
- Incorrect ID or password: Double-check the ID and password provided by the target user. Remember, the target’s password resets every time they restart UltraViewer .
- Firewall or antivirus blocking the connection: Ensure both devices allow UltraViewer through their firewalls. Add UltraViewer to the list of trusted apps in your security software.
- Outdated software version: If either device is running an older version of UltraViewer, the connection may fail. Guide the target user to complete a fresh UltraViewer download of the latest version from the official website.
- Network restrictions: Some workplaces or public networks block remote control ports. Try using a different network (e.g., mobile hotspot) to test the connection.
### 3. Remote Session Is Laggy or Freezing
Laggy sessions are usually related to performance or network issues:
- Reduce image quality: As mentioned earlier, lower the quality setting in the Options menu to reduce bandwidth usage.
- Close background apps: On both devices, close unnecessary apps and browser tabs to free up CPU and RAM.
- Disable remote wallpaper: UltraViewer automatically disables the target’s wallpaper to improve speed, but if you re-enabled it, turn it off in Options > Display .
- Use a wired internet connection: Wi-Fi can be unstable – a wired Ethernet connection will provide a more reliable remote experience.
### 4. Copy-Pasting or Chat Features Not Working
If these features fail, the issue is likely version-related:
- Ensure both devices are running the 2025 update (version 6.6.28 or later). Older versions don’t support cross-device copy-pasting or the updated chat interface .
- Restart UltraViewer on both devices after updating.
- For chat issues, check if the chat window is set to full width. The 2025 update fixed a bug where the chat dialog wouldn’t display properly , so updating should resolve the problem.
## Conclusion
UltraViewer has established itself as a leading remote control solution, and the 2025 updates only enhance its value. From a seamless UltraViewer download process to advanced features like microphone support, remote wake-up, and cross-device copy-pasting, the software offers everything you need for efficient remote work, support, and collaboration – all for free.
By following this guide, you’ve learned how to safely complete UltraViewer download, install the software on any operating system, and master its core and advanced features. You also know how to troubleshoot common issues, ensuring a smooth experience every time. Whether you’re a tech support professional, a remote worker, or someone who helps friends and family with their computers, UltraViewer is a tool that simplifies remote control and makes distance irrelevant.
Don’t miss out on the latest features – visit the official website today for a safe UltraViewer download and start enjoying the benefits of reliable, user-friendly remote control. With UltraViewer, you’re never more than a few clicks away from accessing any device, anywhere in the world.
---
# 2. Safe UltraViewer Download: Step-by-Step Tutorial for Remote Work, Support & Personal Use
## Introduction
Remote control software has become an indispensable tool in our increasingly connected world. Whether you’re a freelancer needing access to your home office computer, an IT professional providing technical support, or a parent helping your child troubleshoot their laptop, having a reliable solution can save time, money, and frustration. UltraViewer stands out as a top choice for users worldwide, thanks to its intuitive interface, robust security features, and constant updates. However, the journey to effective remote control starts with a safe and correct UltraViewer download. Many users struggle with finding the right version, avoiding malware, or setting up the software properly – which is why this tutorial exists.
In this comprehensive guide, we’ll focus on every aspect of UltraViewer download and usage, tailored to 2025’s latest version. We’ll cover how to safely download UltraViewer from official sources, install it on different operating systems, configure it for specific use cases, and leverage its newest features. Whether you’re a complete beginner or looking to upgrade your skills, this article will help you make the most of UltraViewer for remote work, technical support, or personal use.
## The Importance of Safe UltraViewer Download in 2025
With the rise in cyber threats, downloading software from untrusted sources has never been riskier. Fake UltraViewer downloads are prevalent on third-party websites, often laced with malware, spyware, or adware that can compromise your device and steal sensitive data. A safe UltraViewer download from the official website not only protects you from these risks but also ensures you get the latest version with all the newest features and security patches.
The 2025 version of UltraViewer includes critical security updates, such as enhanced captcha checks, random password generation, and bug fixes that address vulnerabilities . Using an outdated or modified version means missing out on these protections, putting your remote sessions and personal data at risk. Additionally, official UltraViewer download guarantees compatibility with the latest operating systems (including Windows 11, macOS Sonoma, and Ubuntu 24.04), ensuring a smooth experience without crashes or glitches.
Another key reason to prioritize safe UltraViewer download is to avoid hidden costs. Third-party websites often trick users into paying for “premium” versions of UltraViewer, even though the software is completely free for both personal and commercial use. The only paid option is the UltraViewer Lite license for remote wake-up functionality, which you can purchase directly from the official website if needed .
In summary, a safe UltraViewer download is the foundation of a secure, reliable remote control experience. By following the steps outlined later in this guide, you’ll protect your device, access the latest features, and avoid unnecessary expenses.
## UltraViewer 2025: Key Features for Different Use Cases
Before proceeding with UltraViewer download, it’s helpful to understand how the software’s features align with your specific needs. UltraViewer’s 2025 update has expanded its capabilities to cater to three main user groups: remote workers, technical support professionals, and personal users. Below is a breakdown of the most relevant features for each use case.
### For Remote Workers
- **Remote Wake-Up**: Turn on your office computer from anywhere in the world using the UltraViewer Lite license . This means you don’t have to ask a colleague to power on your device if you forget to leave it on.
- **Low CPU Usage**: The 2025 version uses 2-3 times less CPU than older releases , allowing you to run UltraViewer alongside other work apps (like Microsoft Office, Slack, or Zoom) without slowing down your computer.
- **Copy-Pasting Between Devices**: Seamlessly copy text, files, and images between your remote work computer and your local device . This eliminates the need for emailing files to yourself or using cloud storage for quick transfers.
- **Auto-Start with System**: Configure UltraViewer to launch automatically when your computer starts, so you’re always ready to connect to your remote work device.
### For Technical Support Professionals
- **Real-Time Chat**: Communicate with clients during remote sessions using the built-in chat feature (activate with F1) . You can explain steps, answer questions, and provide guidance without switching to a separate messaging app.
- **Screen Recording**: Record remote sessions to create tutorials or document troubleshooting steps . The 2025 update allows you to jump to specific positions in recorded videos, making it easier to review key moments .
- **Multiple Monitor Support**: Switch between a client’s multiple monitors with a single click , ensuring you can access all parts of their system without confusion.
- **Custom Passwords**: Let clients set a permanent custom password for their device , so you can access it quickly for follow-up support without requesting a new temporary password each time.
### For Personal Users
- **Easy-to-Use Interface**: UltraViewer’s simple design means you don’t need technical expertise to help friends or family. Even elderly users can follow the steps to share their ID and password.
- **Microphone Support**: Talk to your loved ones during remote sessions , making it easier to guide them through tasks like setting up software or troubleshooting errors.
- **Screen Capture**: Take screenshots of the remote device to show users where to click or what settings to adjust.
- **Free of Charge**: No need to pay for expensive software to help your family – UltraViewer’s core features are completely free.
Now that you know how UltraViewer’s features can benefit you, let’s move on to the step-by-step UltraViewer download and installation process.
## Safe UltraViewer Download & Installation: A Detailed Walkthrough
This section provides a comprehensive guide to UltraViewer download and installation, including tips to avoid common mistakes and ensure a smooth setup. We’ll cover Windows, Mac, and Linux systems, as well as post-installation configuration.
### Part 1: Pre-Download Preparation
Before starting your UltraViewer download, take a few minutes to prepare your device:
1. **Update Your Operating System**: Ensure your device is running the latest OS updates. This improves compatibility and security.
- Windows: Go to Settings > Windows Update > Check for updates.
- Mac: Go to System Settings > General > Software Update.
- Linux: For Ubuntu, run `sudo apt update && sudo apt upgrade` in the terminal.
2. **Scan for Malware**: Run a full antivirus scan to ensure your device is free of existing threats. This prevents malware from interfering with the installation.
3. **Free Up Storage Space**: UltraViewer only requires 10MB of free space, but it’s good practice to have at least 1GB available for smooth operation.
4. **Close Unnecessary Apps**: Shut down any apps or browser tabs you’re not using to free up CPU and RAM for the download and installation.
### Part 2: Official UltraViewer Download Process
To ensure a safe UltraViewer download, always use the official website. Follow these steps:
1. Open your preferred web browser (Chrome, Firefox, Edge, or Safari) and navigate to ultraviewer.net.
2. Once on the homepage, you’ll see a prominent “Download” button. Click it to start the download. The website will automatically detect your operating system and serve the correct version.
3. If the automatic detection fails (e.g., you’re downloading for a different device), scroll down to the “Download” section at the bottom of the page. Here, you’ll find links for Windows, Mac, and Linux. Click the appropriate link.
4. Wait for the download to complete. The time will vary depending on your internet speed – typically 1-5 minutes for a standard broadband connection.
5. Locate the downloaded file:
- Windows: Usually in the “Downloads” folder, named something like “UltraViewer_6.6.28.exe” (the version number may vary).
- Mac: In the “Downloads” folder as a DMG file (e.g., “UltraViewer.dmg”).
- Linux: In the “Downloads” folder as a DEB or RPM file (e.g., “UltraViewer_6.6.28.deb”).
Pro tip: Avoid clicking on pop-up ads or “Download Now” buttons that appear outside the official UltraViewer website. These are often links to fake downloads.
### Part 3: Step-by-Step Installation
Once your UltraViewer download is complete, follow these OS-specific installation steps:
#### Windows Installation (32-bit/64-bit)
1. Navigate to your “Downloads” folder and double-click the UltraViewer EXE file.
2. A User Account Control (UAC) prompt may appear, asking for permission to run the installer. Click “Yes.”
3. Select your preferred language from the dropdown menu. UltraViewer supports over 20 languages, including English, German, Spanish, Chinese, and Portuguese . Click “OK.”
4. Read the License Agreement carefully. Check the box next to “I accept the agreement” and click “Next.”
5. Choose the installation directory. The default is “C:\Program Files\UltraViewer,” but you can click “Browse” to select a different folder. Click “Next.”
6. Select additional tasks:
- Create a desktop shortcut: Recommended for quick access.
- Add UltraViewer to Start Menu: Also recommended.
- Associate UltraViewer with remote session files: Useful if you receive recorded sessions from others.
Check the boxes for the tasks you want and click “Next.”
7. Click “Install” to begin the installation. The process will take 10-30 seconds.
8. Once installed, check the box next to “Run UltraViewer” and click “Finish.” The software will launch automatically.
#### Mac Installation
1. Go to your “Downloads” folder and double-click the UltraViewer DMG file.
2. A new window will open with the UltraViewer icon and the Applications folder icon.
3. Click and drag the UltraViewer icon into the Applications folder. This copies the software to your Mac’s applications directory.
4. Eject the DMG file by right-clicking it on the desktop and selecting “Eject.”
5. Open the Applications folder, find UltraViewer, and double-click it to launch.
6. MacOS may display a security warning: “UltraViewer is an app downloaded from the internet. Are you sure you want to open it?” Click “Open” to proceed. This is a standard warning for apps not downloaded from the App Store.
#### Linux Installation (Ubuntu/Debian)
1. Open the terminal by pressing Ctrl+Alt+T.
2. Navigate to the “Downloads” folder using the command: `cd ~/Downloads`
3. List the files in the folder to find the UltraViewer DEB file: `ls`
4. Install the package using the command: `sudo dpkg -i UltraViewer_6.6.28.deb` (replace the filename with the exact name of your downloaded file).
5. If you encounter dependency errors (common on some Linux systems), run the following command to resolve them: `sudo apt-get install -f`
6. Once the installation is complete, launch UltraViewer from the Applications menu or by typing `ultraviewer` in the terminal.
### Part 4: Initial Configuration After Installation
After launching UltraViewer for the first time, you’ll see the main interface with two sections: “Your ID” and “Password” (for others to connect to you) and “Partner ID” and “Password” (for you to connect to others). Follow these steps to configure the software for your needs:
1. **Set a Custom Password**: If you plan to let others access your device regularly (e.g., a tech support professional), click the golden key icon in the “Custom Password” section . Enter a unique password and click “OK.” This password won’t change when you restart UltraViewer, unlike the temporary password displayed by default.
2. **Enable Auto-Start**: Go to “Options” > “General” and check “Run UltraViewer when Windows starts” (Windows) or “Launch at login” (Mac/Linux). This ensures the software is always available when you need it.
3. **Adjust Display Settings**: For better visibility during remote sessions, go to “Options” > “Screen Size” and choose your preferred mode. “Best Scaled” is recommended for most users, as it adjusts the remote screen to fit your device without distortion.
4. **Enable Microphone Support**: If you want to use voice communication during remote sessions, go to “Options” > “Audio” and check “Enable Microphone.” Ensure your microphone is connected and working before starting a session.
5. **Update to the Latest Version**: Even if you just completed UltraViewer download, it’s a good idea to check for updates. Go to “Help” > “Check for Updates” and follow the prompts if a new version is available.
## Advanced Usage: Maximizing UltraViewer for Your Needs (2025 Features)
Now that you’ve completed UltraViewer download and basic setup, let’s explore advanced features to enhance your remote control experience. These features are part of the 2025 update and are designed to make UltraViewer more versatile and efficient.
### 1. Remote File Transfer: Fast and Secure
Transferring files between devices is a common need for remote workers and support professionals. UltraViewer’s file transfer feature is fast, secure, and easy to use:
1. Establish a remote connection to the target device (follow the steps in the Core Features section of the first article).
2. Click the “File Transfer” icon in the UltraViewer toolbar (it looks like a folder with an arrow pointing right).
3. A new window will open with two panes: the left pane shows files on your local device, and the right pane shows files on the remote device.
4. Navigate to the folder containing the files you want to transfer in the left pane.
5. Select the files/folders by clicking them (hold Ctrl/Cmd to select multiple items).
6. Click the “Send” button (arrow pointing to the right) to transfer files from your local device to the remote device. To transfer files in the opposite direction, select files in the right pane and click the “Receive” button (arrow pointing to the left).
7. A progress bar will show the status of the transfer. Once complete, the files will be available in the selected destination folder.
Pro tip: For large files (over 1GB), compress them into a ZIP folder before transferring to reduce the time and bandwidth required.
### 2. Screen Recording and Editing
UltraViewer’s screen recording feature is perfect for creating tutorials, documenting issues, or keeping a record of remote sessions:
1. During a remote session, click the “Record Video” icon in the toolbar (looks like a camera with a red dot).
2. A small recording control panel will appear, showing the elapsed time.
3. To stop recording, click the “Stop” button in the control panel or press the F10 hotkey.
4. The recorded video will be saved to your default “Videos” folder (Windows) or “Movies” folder (Mac) in MP4 format.
5. Use the “Skip to Position” feature to jump to specific parts of the video . Open the video in UltraViewer’s built-in player, click the “Skip” button, and enter the time (in seconds) you want to jump to.
You can also adjust the recording quality in “Options” > “Recording.” Choose “High” for crystal-clear videos (best for fast internet connections) or “Low” for smaller file sizes (ideal for slow connections).
### 3. Multi-Device Management with Address Book
If you regularly connect to multiple remote devices (e.g., clients’ computers or your own work devices), UltraViewer’s Address Book feature will save you time:
1. Open UltraViewer and click the “Address Book” icon in the toolbar (looks like a book).
2. Click “Add” to create a new entry.
3. Enter a name for the device (e.g., “Work Laptop” or “Client X’s PC”), the device’s ID, and the custom password (if set).
4. Click “Save” to add the device to your Address Book.
5. To connect to a saved device, simply select it from the Address Book and click “Connect.” You won’t need to enter the ID and password manually each time.
The 2025 update fixed a bug where colons in Address Book passwords caused the software to crash , so you can use special characters in your passwords without issues.
### 4. Optimizing Performance for Slow Internet Connections
If you’re working with a slow or unstable internet connection, these tips will help improve your remote session experience:
- Reduce image quality: Go to “Options” > “Quality” and select “Low” or “Medium.” This reduces the amount of data transferred between devices.
- Disable remote wallpaper: UltraViewer automatically disables the target’s wallpaper by default, but if you re-enabled it, turn it off to save bandwidth.
- Use full-screen mode: Click the “Full Screen” button in the toolbar to eliminate unnecessary UI elements and focus on the remote screen.
- Close background apps on the target device: Ask the target user to close unused apps and browser tabs to free up resources.
### 5. Security Best Practices for Remote Sessions
While UltraViewer is designed with security in mind, following these best practices will further protect your data:
- Never share your ID and password with untrusted individuals.
- Use the temporary password (not the custom password) for one-time sessions with people you don’t know well.
- End the session immediately if you notice any suspicious activity (e.g., the controller accessing files they shouldn’t).
- Enable captcha verification: Go to “Options” > “Security” and check “Enable Captcha for Remote Access.” This adds an extra layer of protection against unauthorized access .
- Keep UltraViewer updated: Regular updates include security patches that address new vulnerabilities.
## Common UltraViewer Download & Usage FAQs (2025)
To address any remaining questions you may have, here are answers to the most frequently asked questions about UltraViewer download and usage:
### Q: Is UltraViewer free to download and use?
A: Yes! UltraViewer is completely free for both personal and commercial use. The only paid feature is the UltraViewer Lite license, which unlocks remote wake-up functionality. You can download and use all other features without paying a cent.
### Q: Can I use UltraViewer on my smartphone or tablet?
A: Currently, UltraViewer is only available for desktop operating systems (Windows, Mac, Linux). There is no mobile app, but you can control a desktop computer from another desktop device.
### Q: Is UltraViewer safe to download?
A: Yes, as long as you download it from the official website (ultraviewer.net). Third-party websites may distribute unsafe versions, so always stick to the official source.
### Q: How do I update UltraViewer to the latest version?
A: You can update UltraViewer by going to “Help” > “Check for Updates” within the software. If a new version is available, follow the prompts to download and install it. You can also download the latest version directly from the official website and reinstall it over your current version (your settings will be preserved).
### Q: Can I control multiple remote computers at the same time?
A: Yes! UltraViewer allows you to connect to multiple remote devices simultaneously. Simply open a new UltraViewer window for each connection and enter the respective ID and password. The 2025 update fixed a bug where multiple instances caused error messages on low-RAM computers , so you can use this feature even on less powerful devices.
### Q: What should I do if UltraViewer crashes during a session?
A: First, restart UltraViewer and try reconnecting. If the problem persists, check for updates (outdated versions are a common cause of crashes). If you’re still having issues, uninstall UltraViewer, restart your computer, and complete a fresh UltraViewer download from the official website.
## Conclusion
UltraViewer is a powerful, user-friendly remote control solution that caters to a wide range of needs – from remote work to technical support to personal use. The key to unlocking its full potential is a safe UltraViewer download from the official website, followed by proper installation and configuration. With the 2025 update, UltraViewer has become faster, more secure, and more feature-rich than ever, offering capabilities like microphone support, cross-device copy-pasting, and remote wake-up.
By following the steps outlined in this guide, you’ve learned how to safely download and install UltraViewer on any operating system, configure it for your specific use case, and leverage advanced features to enhance your remote sessions. You also know how to troubleshoot common issues and follow security best practices to protect your data.
Whether you’re a remote worker needing seamless access to your office computer, a tech support professional looking to provide efficient assistance, or a parent helping your child with their laptop, UltraViewer is the tool you need. Its free, lightweight, and secure nature makes it accessible to everyone, while its advanced features ensure it can handle even the most demanding tasks.
Don’t wait to experience the benefits of reliable remote control. Visit the official website today for a safe UltraViewer download and start connecting with devices anywhere in the world. With UltraViewer, distance is no longer a barrier to productivity, collaboration, or help.
Would you like me to create a **printable UltraViewer quick reference guide** that summarizes the key steps for download, installation, and core features? It will be optimized for easy offline use and include shortcut keys for common functions.